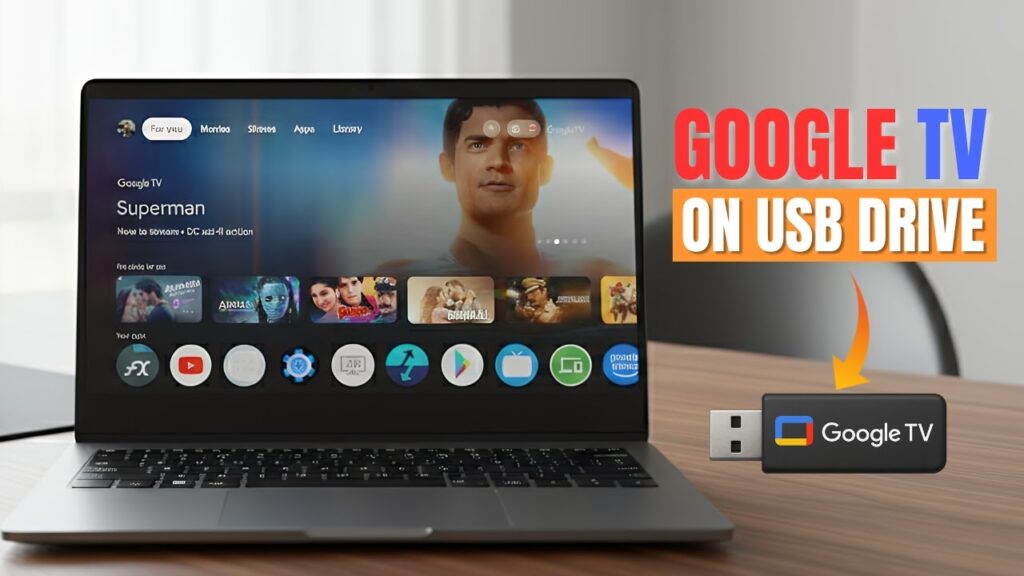
Want to turn any computer into a smart TV using just a USB drive?
In this step-by-step guide, you’ll learn how to install Google TV on a USB stick and carry a fully portable Android TV system in your pocket. Plug it into almost any PC or laptop, boot from USB, and instantly get access to the Play Store, YouTube, Netflix, and all your favorite streaming apps.
Unlike most tutorials that limit you to tiny storage space, this guide shows you how to unlock the full capacity of your USB drive — whether it’s 16GB, 32GB, or 64GB — so you can install apps and games without worrying about running out of space.
This tutorial is written for beginners. Even if you’ve never created a bootable USB before, just follow the steps carefully and you’ll have Google TV running in minutes.
What You’ll Need Before Starting
Before we begin, make sure you have everything ready. The installation process is simple, but having the right tools will save you time and prevent errors.
Here’s what you need:
- USB drive — minimum 8GB (recommended 32GB or 64GB for better storage)
- Windows PC or laptop
- Internet connection
- Rufus (free bootable USB creation tool)
- Google TV ISO + storage files
💡 For best performance, use a USB 3.0 drive or an external SSD. Slower USB 2.0 drives will still work, but Google TV may feel laggy.
Once you have everything ready, we can move to downloading the required files.
📥 Downloads Required
Before we create the bootable USB, we need to download the Google TV package and the boot tool.
The archive contains the operating system and storage files that allow Google TV to run with large app space.
Click one of the download buttons below:
After downloading:
- Right-click the archive
- Select Extract All
- Or extract using WinRAR / 7-Zip
Inside the extracted folder you’ll see:
- GoogleTV13.iso → operating system image
- Storages folder → storage files (4GB / 8GB / 16GB / 32GB / 64GB)
These storage files act as Google TV’s internal memory. We’ll choose the correct one later based on your USB size.
Do not change anything yet — just make sure the files are extracted properly.
Next, we’ll create the bootable USB.
Step 2 — Create the Bootable USB with Rufus
Now we’re going to turn your USB drive into a bootable Google TV system.
Rufus is the tool that writes the operating system into your USB so your computer can boot from it like a real device.
First, plug your USB drive into the computer.
Open Rufus. It should automatically detect your USB drive. If you are using an external SSD and it does not appear in the list, enable the option called “List USB Hard Drives”.
Next, click Select and choose the file:
GoogleTV13.iso
Important Rufus Settings
Before clicking Start, make sure these settings are correct:
- Partition Scheme: GPT (recommended for modern PCs)
- Use MBR only for very old BIOS-only systems
- File System: FAT32
- Persistent Partition Size: drag the slider all the way to the maximum
That persistent space allows Google TV to store apps and user data.
Once everything looks correct, click Start.
Rufus will warn that all data on the USB will be erased. This is normal — click OK and let it continue.
The process usually takes 5 to 10 minutes depending on USB speed.
When Rufus finishes, your USB is bootable.
But don’t boot yet — if you start now, Google TV will have very little storage. In the next step, we’ll unlock the full USB capacity.
Step 3 — Fix the Storage Limitation
If you boot Google TV right now, you’ll only get around 1GB of usable storage. That’s not enough for apps.
We’re going to fix this by creating a larger partition that supports big storage files.
Open Disk Management
Right-click the Start button and open:
Disk Management
In the Disk Management window, find your USB drive. You can identify it by its size.
You’ll see Rufus created two partitions:
- a small boot partition
- a larger Persistence partition
The problem is that the persistence partition is formatted as FAT32, which has a strict 4GB file size limit.
We need to change it to exFAT.
Delete the Persistence Partition
Right-click the Persistence partition
Click Delete Volume
A warning will appear — click Yes
The space will now show as Unallocated
Create a New exFAT Partition
Right-click the unallocated space
Choose New Simple Volume
Follow the wizard:
- Use the maximum size
- Assign any drive letter
- File system → exFAT
- Label → SYSTEM (or any name you prefer)
Click Finish.
Now your USB has:
- Boot partition (created by Rufus)
- SYSTEM partition (large exFAT storage)
This new SYSTEM partition will hold your Google TV storage files.
Step 4 — Move System Files and Add Large App Storage
Now we’ll prepare the SYSTEM partition so Google TV can use the full storage space.
This is the step that unlocks large app storage.
Move the System File
Open the Boot partition on your USB drive.
Inside, you’ll find a file called:
system.sfs
This file contains the Google TV system image.
Cut this file from the Boot partition and paste it into the SYSTEM partition we created earlier.
Do not copy — cut and paste.
Google TV must read this file from the SYSTEM partition.
Choose the Correct Storage File
Go back to the folder where you extracted the Google TV archive.
Open the folder named:
Storages
Inside, you’ll see multiple storage options:
4GB / 8GB / 16GB / 32GB / 64GB
Choose based on your USB size:
- 16GB USB → use 8GB file
- 32GB USB → use 16GB file
- 64GB USB → use 32GB file
Always leave free space.
Never choose a file equal to your USB size.
A good rule is: use half of your USB capacity.
Add the Storage File
Extract the storage file you chose.
Inside the extracted folder you’ll find:
data.img
This file acts as Google TV’s internal storage.
Copy data.img into the SYSTEM partition.
The copy may take several minutes depending on USB speed. Let it finish completely.
When done, the SYSTEM partition should contain:
- system.sfs
- data.img
That’s it — your USB is now fully prepared.
Next we’ll disable Secure Boot and boot Google TV.
Step 5 — Disable Secure Boot
Before booting Google TV, there’s one important setting we need to change.
Most modern computers have Secure Boot enabled. This feature only allows trusted operating systems like Windows to start. Since Google TV is a custom system, Secure Boot will block it.
We just need to temporarily turn it off.
Enter BIOS / UEFI
Restart your computer.
While it’s turning on, repeatedly press the BIOS key.
Common keys are:
- F2
- Delete
- Esc
- F10
It depends on your computer manufacturer.
If you see the BIOS/UEFI menu, you’re in the right place.
Disable Secure Boot
Look for an option called:
Secure Boot
It’s usually inside:
- Boot menu
- Security menu
- Advanced settings
Change it from:
Enabled → Disabled
Save your changes and exit BIOS.
Your computer will restart.
Secure Boot is now off, and the system is ready to boot Google TV.
Next, we’ll boot from the USB drive and start Google TV for the first time.
Step 6 — Boot Google TV from the USB Drive
Now it’s time to boot into Google TV.
Restart your computer again, but this time open the Boot Menu instead of normal Windows startup.
While the computer is turning on, repeatedly press the Boot Menu key.
Common keys include:
- F12
- Esc
- F8
- F11
This varies by manufacturer.
Select the USB Drive
In the Boot Menu, choose your USB drive.
It may appear under the brand name of your pen drive or SSD.
Press Enter.
After a few seconds, the Google TV boot menu will appear.
Choose a Kernel Option
You’ll see multiple Android kernel options:
- Normal kernel → for laptop/internal display
- External Display → for HDMI/DisplayPort monitors
Start with the first normal option.
If you get a black screen, reboot and try one labeled External Display.
First Boot Takes Longer
On the very first boot, Google TV sets up files on the USB.
This can take a few minutes.
Faster USB = faster boot
USB 2.0 = slower but still works
Be patient and let it finish.
Next, we’ll complete the Google TV setup wizard.
Step 7 — Complete the Google TV Setup
Once Google TV finishes booting, you’ll see the setup wizard — just like setting up a brand-new smart TV.
The process is simple and only takes a few minutes.
Choose Language
Select your preferred language.
Most people choose English, but you can pick any language you want.
Connect to the Internet
If your PC has Wi-Fi:
- Choose your network
- Enter the password
- Connect
If you’re using Ethernet, Google TV will connect automatically.
Internet is required to access the Play Store and sign in.
Sign In with Google Account
Enter your Gmail address and password.
Signing in unlocks:
- Google Play Store
- App downloads
- Sync across devices
- Personalized recommendations
This step is important if you want the full Google TV experience.
Accept Terms and Settings
Google will show terms and privacy options.
You can:
- Accept defaults (recommended)
- Customize location/diagnostics settings
Either option works fine.
After setup finishes, you’ll land on the Google TV home screen.
You now have full access to:
- Play Store
- YouTube
- Netflix
- Streaming apps
- Games
- Google Assistant
And because we added the large storage partition, you have plenty of space for apps.
Next, we’ll test performance and explain how to use Google TV smoothly.
Step 8 — Install Apps and Test Performance
Now that Google TV is running, let’s confirm everything works properly.
Open the Play Store and install a few apps — for example:
- YouTube
- Netflix
- Hotstar
- Prime Video
Because we added the large data.img storage file, Google TV now has plenty of internal space. Apps should install normally without storage warnings.
Try playing a video in YouTube. If your hardware supports it and your internet is fast enough, you should get smooth HD or even 4K playback.
Navigation should feel responsive using:
- Mouse
- Keyboard
- Remote (if supported)
At this point, your USB drive is acting like a portable smart TV box.
Performance Tips
For the best experience:
✔ Use USB 3.0 or external SSD
✔ Prefer wired Ethernet over Wi-Fi
✔ Avoid slow USB 2.0 drives
✔ Close background apps you don’t use
✔ Reboot Google TV occasionally for stability
Faster storage = smoother experience.
Is This Safe for My Computer?
Yes.
Google TV runs entirely from the USB drive.
It does not modify Windows or your internal disk.
Remove the USB → your PC boots normally.
This makes it safe to use on almost any compatible computer.
Final Result
You now have a fully portable Google TV system that fits in your pocket.
Plug it into any supported PC or laptop → instant smart TV.
Perfect for:
- Travel
- Old laptops
- Media centers
- Testing Android TV apps
- Portable entertainment setup
Conclusion
You’ve successfully installed Google TV 13 on a USB drive with full storage unlocked.
No expensive hardware.
No permanent system changes.
Just plug and enjoy.
If this guide helped you, share it with friends and bookmark Techy Druid for more deep tech tutorials.
See you in the next guide 🚀