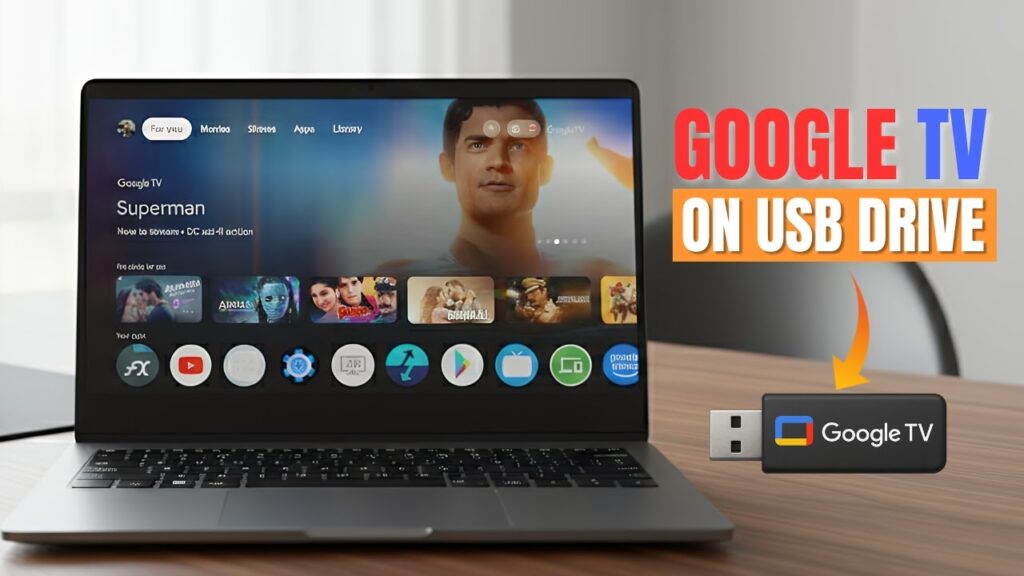
Turning your PC into a portable Android TV system is easier than you think. Instead of replacing your current operating system, you can install Android TV directly onto a USB drive and boot it whenever you want. This gives you a full smart TV experience — apps, streaming, games, and media — on almost any computer, without touching your internal storage. In this step-by-step guide, I’ll show you exactly how to install Android TV on a USB drive, create a bootable setup, and run it smoothly on your PC. Even if you’re a beginner, just follow along and you’ll have Android TV up and running in minutes.
What You’ll Need Before Starting
Before we begin the installation, make sure you have everything ready. Preparing the tools in advance will make the process smooth and prevent errors later.
You’ll need a USB flash drive with at least 8GB storage, but I strongly recommend using a 16GB or 32GB USB 3.0 drive for better speed and app storage. Android TV runs much smoother on faster USB drives.
You’ll also need a Windows computer to create the bootable USB.
Next, download the Android TV ISO image file:
Then download Rufus:
Finally, install 7-Zip or WinRAR. We’ll use it to extract the extra storage file later.
Once you have everything ready, continue to the next step.
Step 1: Create the Android TV Bootable USB
Now we’ll create the bootable Android TV drive. This step installs the Android TV system onto your USB flash drive.
First, plug your USB drive into your computer. Make sure there are no important files on it, because everything will be erased during this process.
Open Rufus on your Windows PC. At the top, you’ll see the Device dropdown. Select your USB drive from the list. Double-check this part — choosing the wrong drive could wipe another storage device.
Next, click the SELECT button and browse to the Android TV ISO file you downloaded earlier. Once selected, Rufus will automatically fill in most of the settings.
Make sure the File system is set to FAT32, just like we discussed earlier. Leave the rest of the settings at their default values unless you know what you’re doing.
Now click START.
If Rufus asks you to choose between ISO mode or DD mode, select the recommended/default option that Rufus suggests. Then wait patiently while the process completes. This may take a few minutes depending on your USB speed.
Once Rufus shows READY, close the program and safely eject the USB drive.
At this point, you already have a bootable Android TV USB. But we still need to prepare extra storage for apps and data, which we’ll do in the next step.
Step 2: Extract the Extra Storage File (data4GB)
After creating the bootable USB, there’s one important step left before we boot into Android TV. The USB contains a compressed file called data4GB. This file acts like an expansion storage for Android TV — it stores apps, settings, and user data. If you skip this step, Android TV may run with very limited storage.
Plug the USB drive back into your PC and open it in File Explorer. Look for a file named something like data4GB, data4GB.zip, or data4GB.rar.
Right-click the file and choose Extract here using 7-Zip or WinRAR. The extraction will create a new file called data.img (or data.IMG).
Make sure this extracted data.img stays in the same location on the USB drive. Don’t move it to another folder. Android TV expects to find it in that exact spot when booting.
Once extraction finishes, safely eject the USB drive again.
Now your Android TV USB is fully prepared and ready to boot. In the next step, we’ll start your computer directly from the USB drive and complete the Android TV setup.
Step 3: Boot Your Computer from the Android TV USB
Now it’s time to actually run Android TV.
Insert the prepared USB drive into the computer where you want to use Android TV. Then restart the computer.
As soon as the system starts turning on, repeatedly press the Boot Menu key. This key is different depending on the manufacturer. Common keys include F12, F9, Esc, F8, or F10. Most PCs briefly show the correct key on the startup screen with a message like “Press F12 for Boot Menu.”
When the Boot Menu appears, select your USB drive from the list and press Enter.
If everything was created correctly, your computer should now boot directly into Android TV. The first boot may take a little longer than usual because the system is initializing files and preparing storage.
After a short wait, you’ll see the Android TV welcome screen. That means the USB installation worked successfully.
In the next step, we’ll complete the first-time Android TV setup and connect it to the internet.
Step 4: Complete the Android TV First-Time Setup
Once Android TV finishes booting, you’ll be greeted by the setup screen — similar to setting up a brand-new smart TV.
First, choose your language using the keyboard or mouse. After that, Android TV will ask you to connect to the internet.
If your Wi-Fi adapter is supported, simply select your Wi-Fi network and enter the password. If Wi-Fi doesn’t show up or doesn’t work properly, plug in an Ethernet cable. In many Android TV builds, the wired connection appears as VirtualWiFi. Select it, and the system should connect to the internet instantly.
Next, when you see the screen that asks you to choose Android TV, select it and press Escape on your keyboard to bypass that extra screen — this helps the system continue booting properly in some builds.
After a few moments, Android TV will load the home screen. You can now sign into your Google account, install apps, open streaming services, and customize the interface just like a regular Android TV box.
That’s it — Android TV is now running entirely from your USB drive and ready to use on any compatible computer.
Final Thoughts: Turn Any PC into a Portable Android TV Box
And that’s all there is to it. You’ve successfully installed Android TV on a USB drive and created a portable smart TV system you can carry anywhere. Just plug the USB into a compatible computer, boot from it, and you instantly get a full Android TV experience — no permanent installation, no risk to your existing operating system.
This setup is perfect for reviving old PCs, building a DIY media center, or testing Android TV without buying a separate TV box. You can stream movies, install apps, browse the web, and even play Android games — all from a simple USB drive.
If you want better performance, consider upgrading to a faster USB 3.0 or USB 3.2 flash drive. The speed of the USB directly affects how smooth Android TV feels.