If your Wi-Fi signal becomes weak in certain rooms of your house, you don’t need to buy an expensive new extender. You can simply reuse an old router and turn it into a Wi-Fi range extender. In this guide, I’ll show you step by step how to use a TP-Link TL-WR841N router as a repeater to expand your existing wireless network. The setup is simple, wireless, and takes only a few minutes. By the end of this tutorial, your home will have stronger and more stable Wi-Fi coverage without spending extra money.
What You Need Before Starting
Before we begin the setup, make sure you have everything ready. This will help you complete the configuration smoothly without interruptions.
- A TP-Link TL-WR841N router
- Your main Wi-Fi router with an active internet connection
- A laptop or smartphone to configure the router
- Your main Wi-Fi name (SSID) and password
- A power outlet near the area where you plan to install the extender
If the TP-Link router was previously used, it’s a good idea to reset it first. To reset, power it on, press and hold the Reset button for about 10 seconds, and release when the lights blink. This ensures we start from factory settings and avoid configuration conflicts.
Now that everything is ready, let’s connect to the router and begin the setup.
Step 1: Connect to the TP-Link Router
First, we need to access the TP-Link router’s settings page.
Plug in the TP-Link router and power it on. Wait about a minute until all indicator lights stabilize. Now connect your computer or phone to the TP-Link Wi-Fi network. It usually appears as something like TP-Link_XXXX on the Wi-Fi list.
Once connected:
- Open a web browser
- Type tplinkwifi.net in the address bar and press Enter
(If that doesn’t work, try 192.168.0.1 or 192.168.1.1) - Log in to the router
If this is the first time setting it up, the router may ask you to create a new password. Otherwise, the default login is often admin / admin.
After logging in, you will see the TP-Link control panel. From here, we’ll switch the router into repeater mode in the next step.
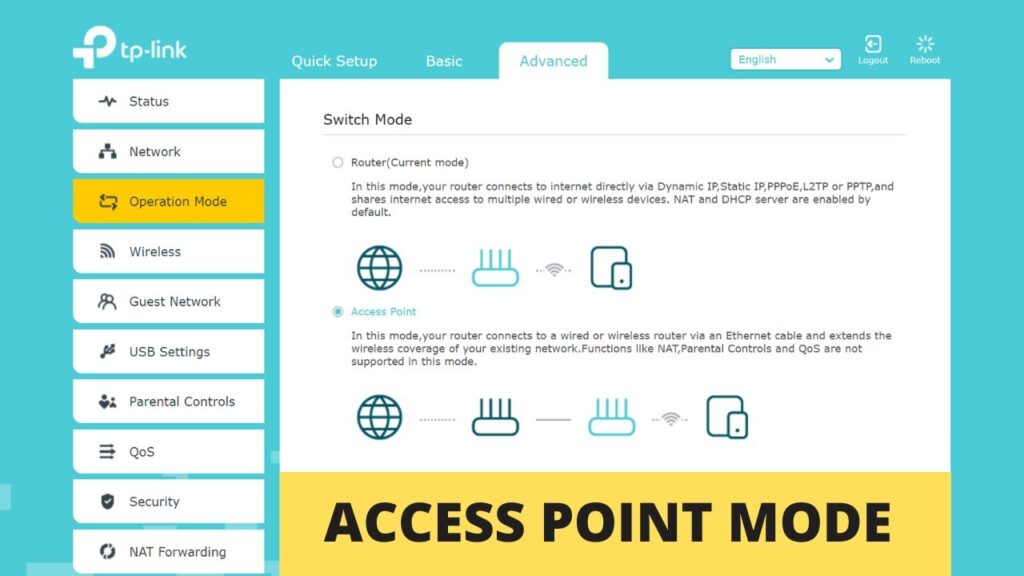
Step 2: Switch the Router to Range Extender Mode
Now we’ll change the operating mode of the TP-Link router so it works as a repeater instead of a normal router.
Inside the TP-Link settings page:
- Look for Operation Mode in the menu
- Click on it
- Select Range Extender Mode
- Click Save
The router will automatically reboot. This may take 1–2 minutes. Don’t unplug the router during this process.
After rebooting, the TL-WR841N is no longer acting as a standard router. It is now ready to extend another Wi-Fi network. In the next step, we’ll adjust its IP address to prevent network conflicts.
Step 3: Change the Router IP Address
To avoid conflicts with your main router, the extender must use a different IP address. If both routers use the same IP, your network may stop working properly.
For example, if your main router’s IP address is:
192.168.0.1
Then we can assign the TP-Link extender:
192.168.0.2
Inside the TP-Link control panel:
- Go to Network → LAN
- Find the IP Address field
- Change it to a new address in the same range
(example: 192.168.0.2) - Click Save
The router will reboot again.
After this step, you must use the new IP address to open the TP-Link settings page. So next time, instead of tplinkwifi.net, type:
Now that the IP conflict is fixed, we can connect the extender to your main Wi-Fi network in the next step.
Step 4: Connect the Extender to Your Main Wi-Fi Network
Now we’ll wirelessly link the TP-Link router to your main router so it can extend the signal.
Log back into the TP-Link settings using the new IP address you set in the previous step.
- Go to Wireless Settings
- Click Scan
- A list of nearby Wi-Fi networks will appear
- Select your main router’s Wi-Fi name (SSID)
- Click Connect
- Enter your main Wi-Fi password
- Click Save
After saving, the router will attempt to connect to your main network. Give it about a minute.
Once connected successfully, the TP-Link router is now repeating your Wi-Fi signal. In the next step, we’ll optionally create a separate Wi-Fi name for the extender if you want to identify it easily.
Step 5 (Optional): Create a Separate Wi-Fi Name for the Extender
By default, the extender may use the same Wi-Fi name as your main router. Some people prefer this because devices automatically switch to the stronger signal. But if you want to clearly identify the extender, you can create a separate SSID.
Inside the TP-Link settings:
- Go to Extended Network (or Wireless → Extended Settings)
- Enable the extended network option
- Enter a new Wi-Fi name
(example: HomeWiFi_Extender) - Set a password
(you can keep the same password as the main router) - Click Save
The router will reboot.
After restarting, you should see a new Wi-Fi network with the name you created. In the next step, we’ll disable DHCP to ensure the network runs smoothly without IP conflicts.
Step 6: Disable DHCP on the Extender
This is a very important step. Your main router should be the only device assigning IP addresses. If DHCP stays enabled on the extender, devices may get confused and lose internet access.
To disable DHCP:
- Go to DHCP Settings
- Select Disable
- Click Save
The router may reboot once more.
After this step, all devices connected to the extender will receive their IP addresses from the main router, which keeps the network stable and prevents connection errors.
Now we’re ready to test the connection and confirm everything is working correctly.
Step 7: Test the Connection
Now it’s time to confirm that the extender is working properly.
Open the Wi-Fi list on your phone or computer and connect to the extender network. If you created a separate SSID in the previous step, connect to that. Otherwise, connect to your normal Wi-Fi name.
Once connected:
- Open a browser
- Visit any website
- Play a video or run a speed test
Walk to the area where Wi-Fi was weak before and check the signal strength. You should now see a stronger and more stable connection.
If you don’t see the extender network:
- Restart the TP-Link router
- Restart your main router
- Turn Wi-Fi off and on again on your device
After a restart, the extender network should appear normally.
Best Placement Tips for Maximum Range
Where you place the extender makes a big difference in performance. If it’s too far from the main router, it won’t receive a strong signal to repeat. If it’s too close, you won’t gain much extra coverage.
For best results:
- Place the extender halfway between the main router and the weak-signal area
- Keep it in an open space, not inside cabinets
- Avoid placing it near thick concrete walls
- Keep it away from microwaves and large metal objects
- Position it slightly elevated, not directly on the floor
A good rule: the extender should still receive at least 50–70% signal from the main router.
Next, let’s look at common problems and how to fix them.
Troubleshooting Common Problems
If the extender isn’t working as expected, don’t worry. Most issues are easy to fix.
Connected but no internet
- Make sure DHCP is disabled on the extender
- Re-enter the main Wi-Fi password carefully
- Confirm the extender is connected to the correct SSID
Can’t open the TP-Link settings page
- Use the new IP address you assigned (example: 192.168.0.2)
- Try another browser
- Restart the extender
- If needed, reset the router and set it up again
Extender network not showing
- Restart both routers
- Wait 2–3 minutes after reboot
- Toggle Wi-Fi off and on on your device
Slow speed on the extender
- Move the extender closer to the main router
- Avoid thick walls and interference
- Remember: repeaters always lose some speed due to signal rebroadcasting
After fixing these issues, the extender should work smoothly.
Final Words
That’s it — your TP-Link TL-WR841N is now working as a Wi-Fi range extender. With just a few configuration changes, you’ve expanded your wireless coverage without buying any extra equipment.
This method is perfect for large homes, multi-floor buildings, or rooms where Wi-Fi signals struggle to reach. Once configured, the extender works automatically in the background, giving you stronger and more stable internet throughout your space.
If you ever want to reconfigure the extender, simply open its IP address in a browser and adjust the settings anytime.
Enjoy your improved Wi-Fi coverage!