Do you want to install macOS Tahoe 26 on a Windows computer using VMware Workstation? In this guide, I will show you how to set up macOS Tahoe inside VMware on a Windows PC.
With this setup, you can test macOS without replacing Windows or creating a dual-boot setup. After installation, macOS Tahoe can run inside VMware, connect to the internet, open Safari, run macOS applications, and transfer files between Windows and macOS using shared folders.
This is an experimental setup, so follow every step carefully and do not interrupt the installation once it starts.
What You Need
Before starting, make sure you have these things ready:
- A Windows PC
- VMware Workstation Pro
- OC4VM files
- QEMU for Windows
- Enough free storage for the macOS virtual machine
- At least 8 GB RAM, but 16 GB or more is better
- A stable internet connection
The macOS recovery image download and installation can take a long time, so make sure your computer stays powered on during the whole process.
Step 1: Get OC4VM from GitHub
First, open your browser and visit the OC4VM GitHub page.
Open the latest release and scroll down to the Assets section.
Download the OC4VM ZIP file.
Once the download is complete, open the Downloads folder. Right-click the ZIP file and extract it.
Now open the extracted OC4VM folder.
Step 2: Download macOS Tahoe Recovery Image
Inside the extracted OC4VM folder, open the tools folder.
Then open the Windows folder.
Here, find the recoveryOS application and double-click it.
A Command Prompt window will appear. The tool will show several macOS versions.
Enter:
7This selects macOS Tahoe.
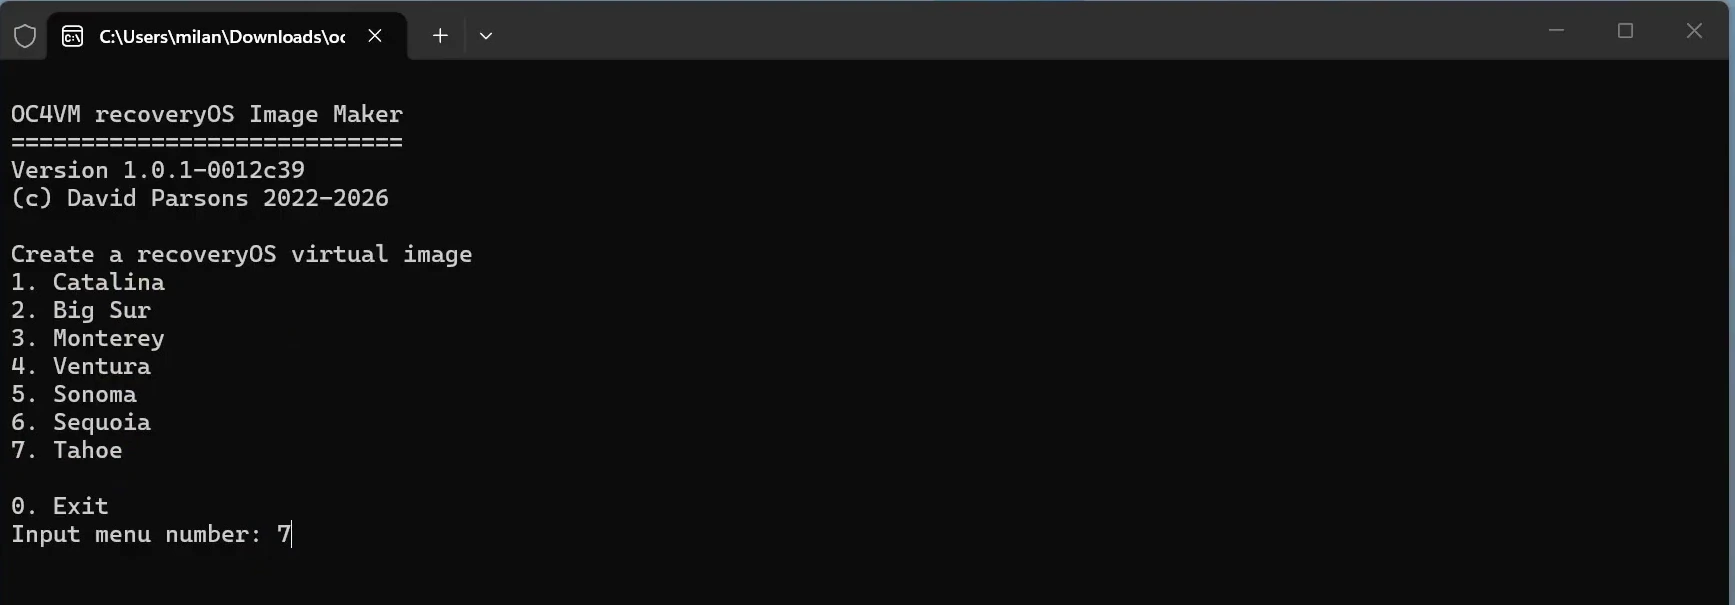
The tool will now download the recovery image directly from the Apple server. The download may take some time, so wait until it reaches 100 percent.
After downloading, select the VMware VMDK option.
If recoveryOS successfully creates a VMDK file, use that recovery disk and skip the manual QEMU conversion in Steps 3 and 4. The recording continues with tahoe.dmg and converts it manually because a VMDK is not present in the folder.
When the process is complete, return to the Windows folder. You should now see a file named:
tahoe.dmgThis is the macOS Tahoe recovery image that we downloaded.
Step 3: Install QEMU on Windows
VMware cannot use the DMG file directly, so we need to convert it into a VMware virtual disk. For this, we will use QEMU.
Open the QEMU download page and get the latest 64-bit QEMU installer for Windows.
Open the installer and continue with the default settings.
Keep the default installation location and click Install.
Step 4: Convert tahoe.dmg to VMware VMDK
Once QEMU has been installed, return to the folder containing the tahoe.dmg file.
Click the File Explorer address bar, type:
cmdThen press Enter.
Command Prompt will open directly inside this directory.
Now run this conversion command:
"C:\Program Files\qemu\qemu-img.exe" convert -O vmdk -o compat6 tahoe.dmg tahoe-install.vmdk
QEMU will convert the DMG file into a VMware-compatible virtual disk.
The command may not show a progress bar, so wait until the normal Command Prompt line appears again.
After that, return to File Explorer. You should now see a new file named:
tahoe-install.vmdkCopy this VMDK file.
Step 5: Copy the VMDK File to the VMware Folder
Now open the main OC4VM folder.
Open the vmware folder.
Inside this folder, you will see separate folders for Intel and AMD processors.
If your computer uses an Intel processor, open the Intel folder.
If your computer uses an AMD processor, open the AMD folder instead, if supported by your OC4VM package.
Paste the converted tahoe-install.vmdk file into the correct processor folder.
Step 6: Install VMware Workstation
Now we need to install VMware Workstation on Windows.
Open the official VMware Workstation download page and download the latest version of VMware Workstation Pro for Windows.
After downloading, open the installer.
Click Next, accept the licence agreement, and continue.
Keep the default installation options selected.
Then click Install.
Wait for the installation to complete. Once it is finished, click Finish.
Step 7: Open the Pre-Configured macOS Virtual Machine
Open VMware Workstation from the Start menu.
Click Open a Virtual Machine.
Browse to the OC4VM folder.
Open the vmware folder, then open the correct processor folder. For example, if your computer uses an Intel processor, open the Intel folder.
Here, you should see a pre-configured macOS virtual machine file.
Select it and click Open.
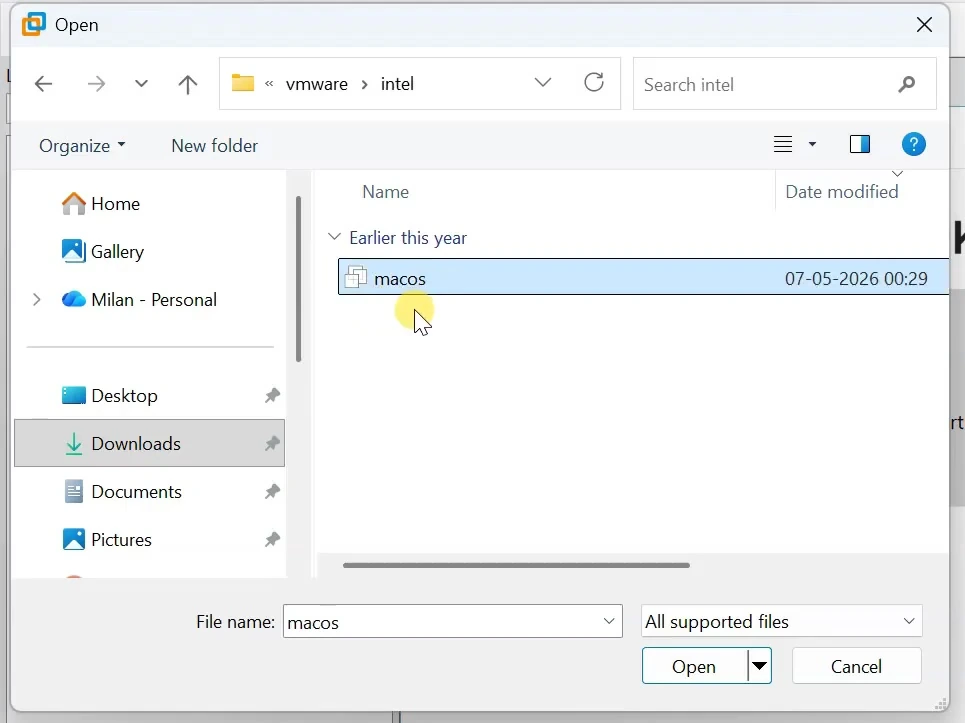
The prepared macOS virtual machine will now appear inside VMware.
Step 8: Adjust Virtual Machine Memory
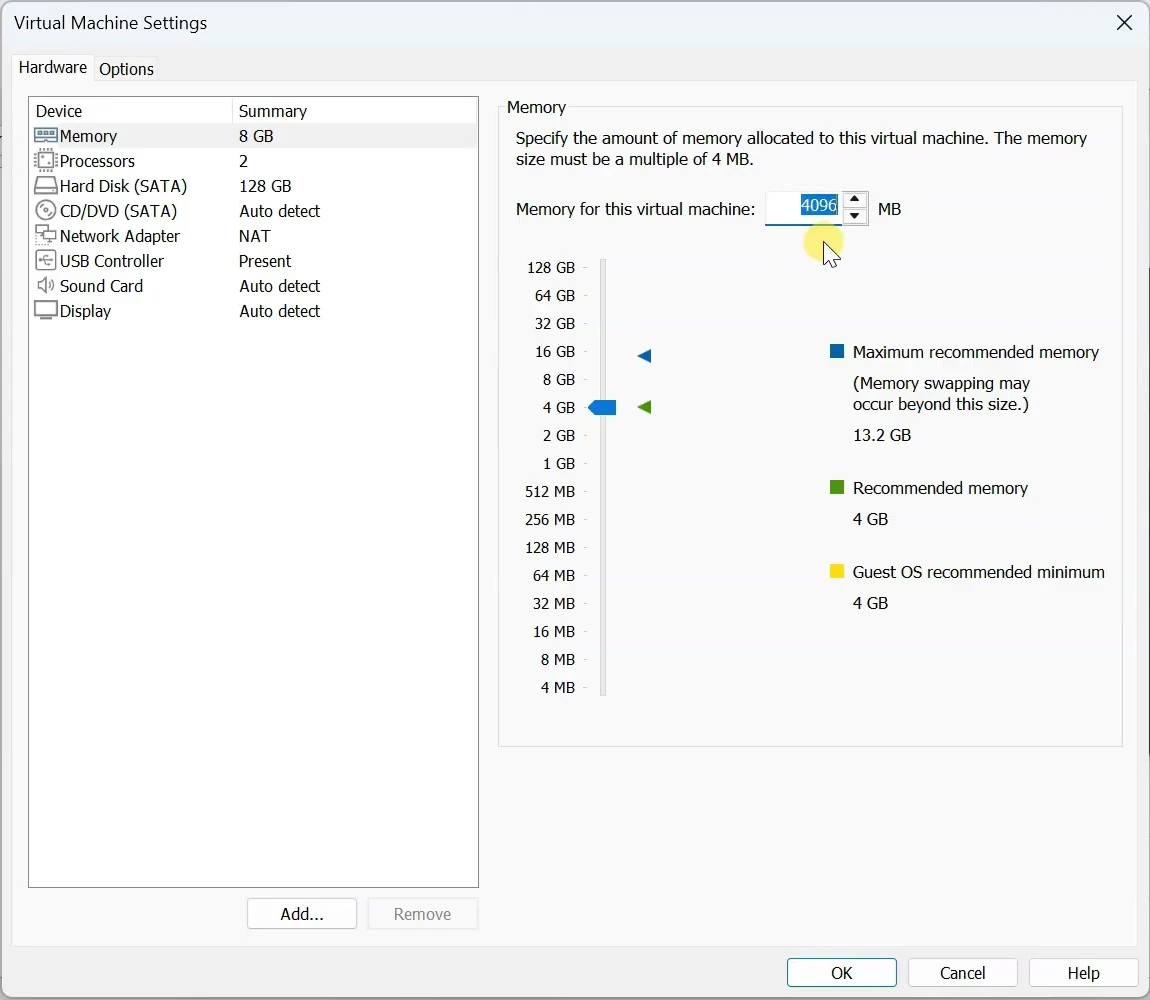
Before starting the virtual machine, click Edit virtual machine settings.
First, open the Memory section.
If your computer has 16 GB of RAM, you can assign around 4 GB to the macOS virtual machine.
Do not assign all the available RAM to the virtual machine because Windows also needs enough memory to continue running.
If your computer has more RAM, you can assign more memory depending on your system capacity.
Step 9: Adjust Processor Settings
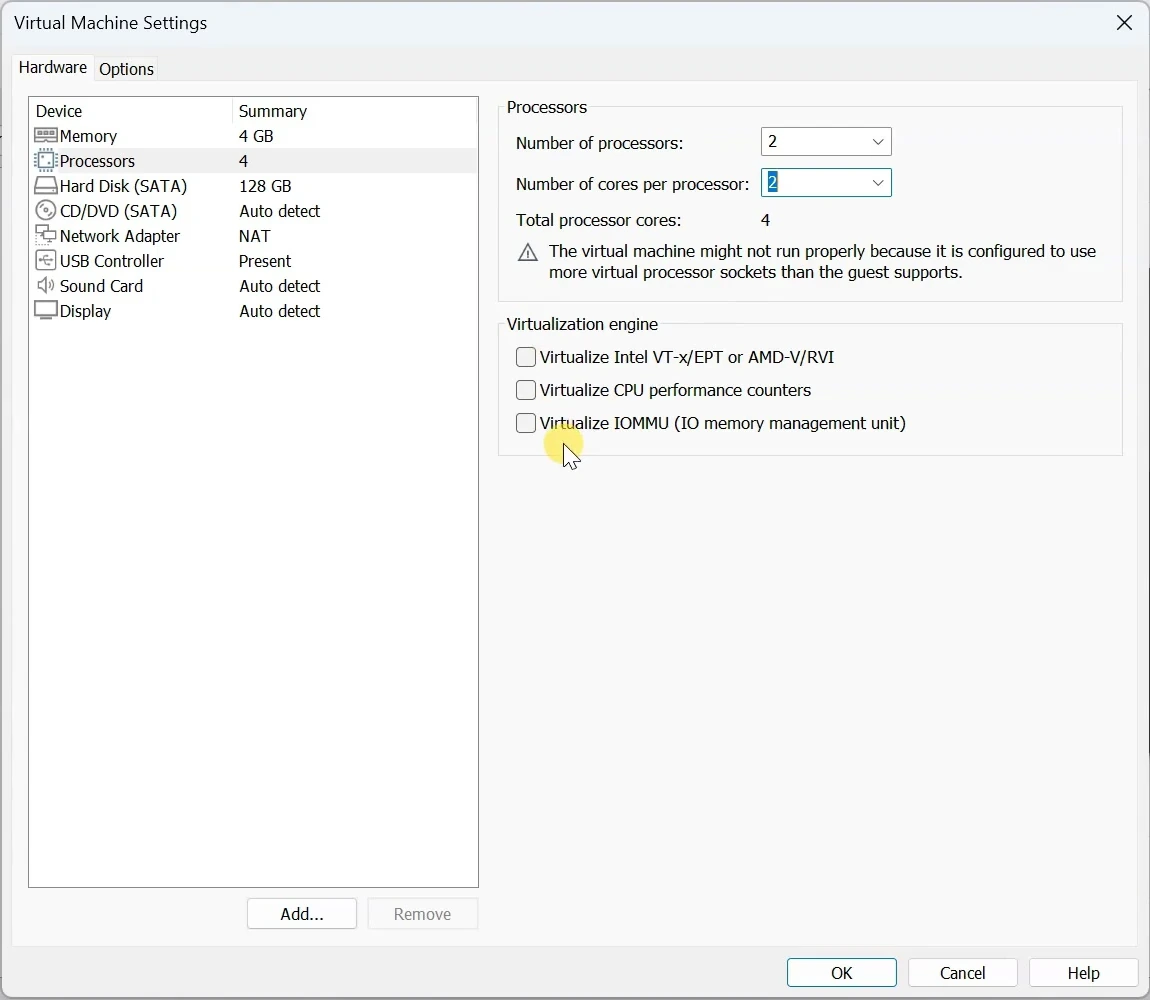
Next, open the Processors section.
For a stable installation, set:
- Number of processors: 2
- Number of cores per processor: 2
This gives the virtual machine four total processor cores.
Leave all the options under Virtualization Engine unchecked.
Step 10: Attach the macOS Recovery Disk
Now we need to attach the macOS recovery disk.
Inside virtual machine settings, click Add.
Select Hard Disk and continue.
Choose SATA.
Then select Use an existing virtual disk.
Click Browse and select the converted tahoe-install.vmdk file.
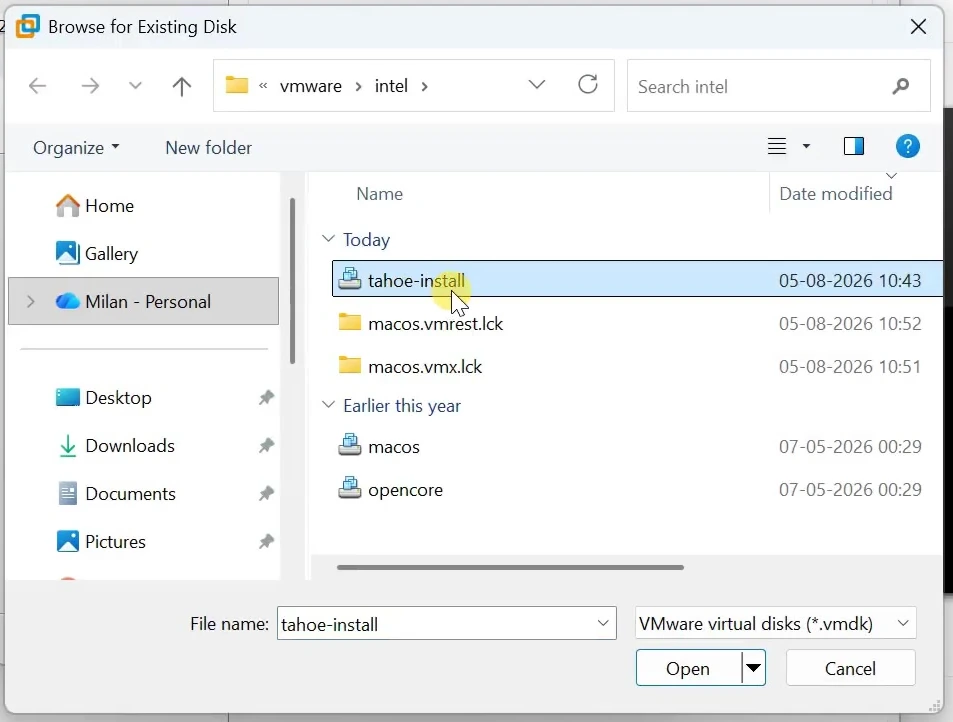
Click Finish.
Then click OK to save the virtual machine settings.
Step 11: Start the macOS Virtual Machine
Now start the virtual machine.
The OpenCore boot menu will appear.
Select:
macOS Base SystemThen press Enter.
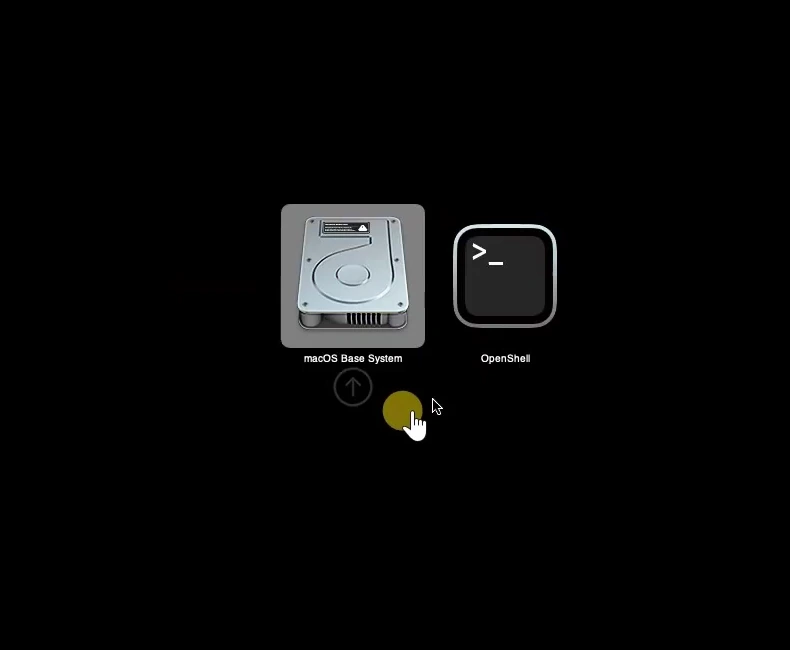
The macOS recovery environment will begin loading. This may take several minutes.
Once it loads, choose your language.
Step 12: Install macOS Tahoe
Once the recovery screen appears, select Reinstall macOS Tahoe.
Continue through the installer.
Choose Macintosh HD as the installation destination.
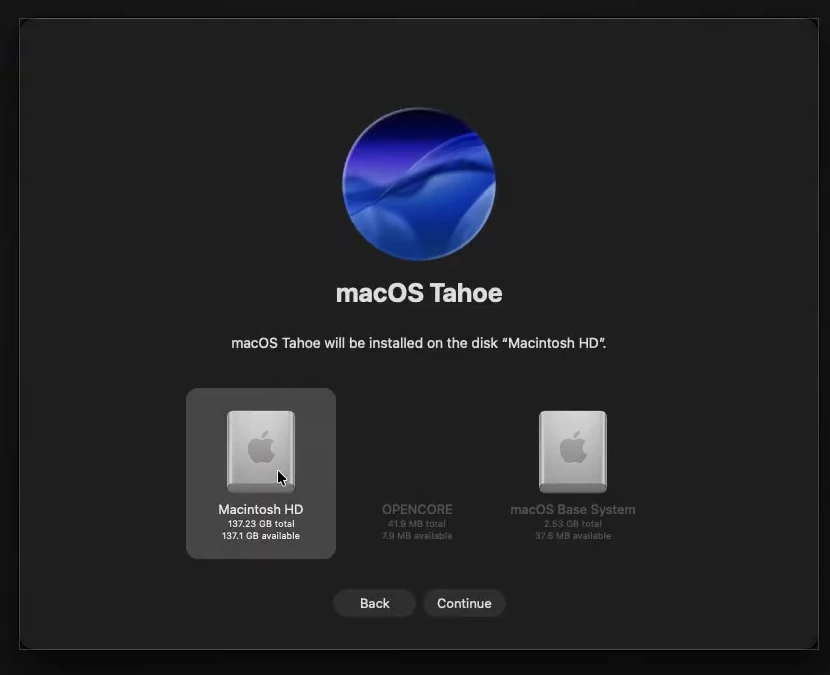
The installation may take more than one hour. The virtual machine may also restart several times during the process.
Step 13: Complete macOS Setup
When the installation is complete, finish the normal macOS setup.
Choose your country and keyboard layout.
During the setup, you may experience some lag. The cursor may also feel stuck on the screen. This should improve once you reach the macOS desktop.
Create your local user account.
You can skip the Apple Account sign-in and quickly complete the initial setup.
Once the desktop appears, macOS Tahoe has been installed successfully.
Step 14: Install VMware Tools
After reaching the desktop, the graphics memory may initially show only 4 MB. The screen may also feel slow.
To improve performance, mouse movement, screen resizing, and graphics memory, we need to install VMware Tools.
Open the Opencore folder from the macOS desktop.
Then go to the OC4VM folder.
Open the ISO folder.
Here, you should see a file named:
darwin.iso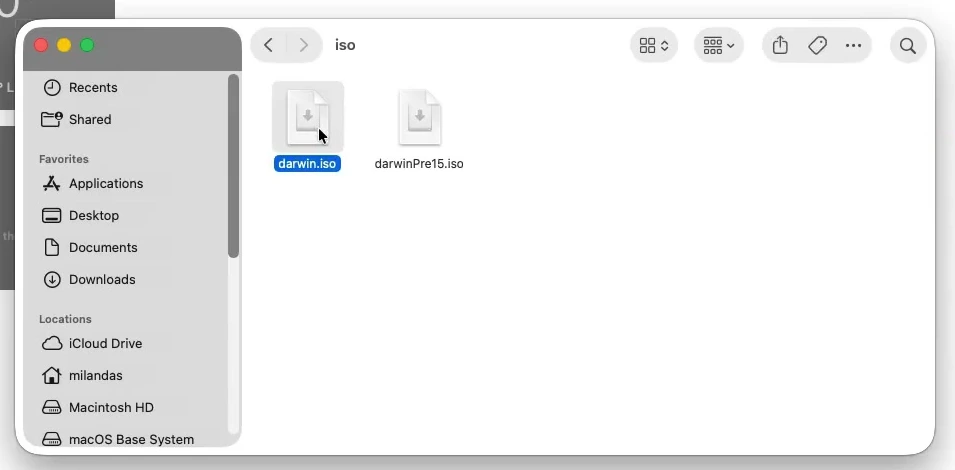
Double-click it.
A VMware Tools disk should now appear on the desktop.
Open it and double-click Install VMware Tools.
Click Continue, then click Install.
Enter your macOS password when requested.
macOS may block the VMware system software. Open System Settings and allow the software from VMware. Enter your password to confirm the change.
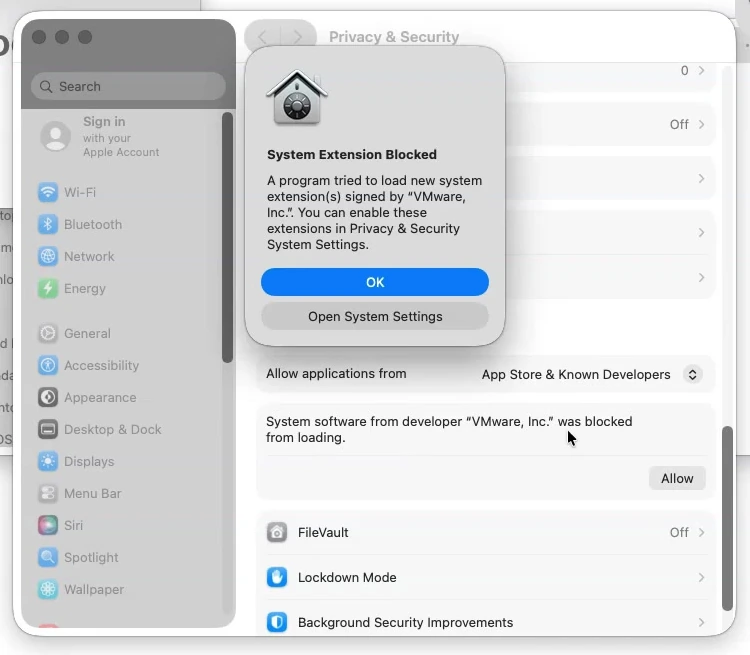
The first VMware Tools installation may fail. If this happens, close the installer, open VMware Tools again, and run the installation a second time.
After the installation succeeds, restart macOS.
After restarting, the graphics memory should increase to around 128 MB. Mouse movement and screen resizing should also work better.
Step 15: Enable Shared Folders
Next, we will enable shared folders so you can transfer files between Windows and macOS.
Open the VMware virtual machine settings.
Go to the Options tab.
Select Shared Folders.
Choose Always enabled.
Click Add.
Select a folder from your Windows computer. This folder will be used to transfer files between Windows and macOS.
Complete the wizard and save the settings.
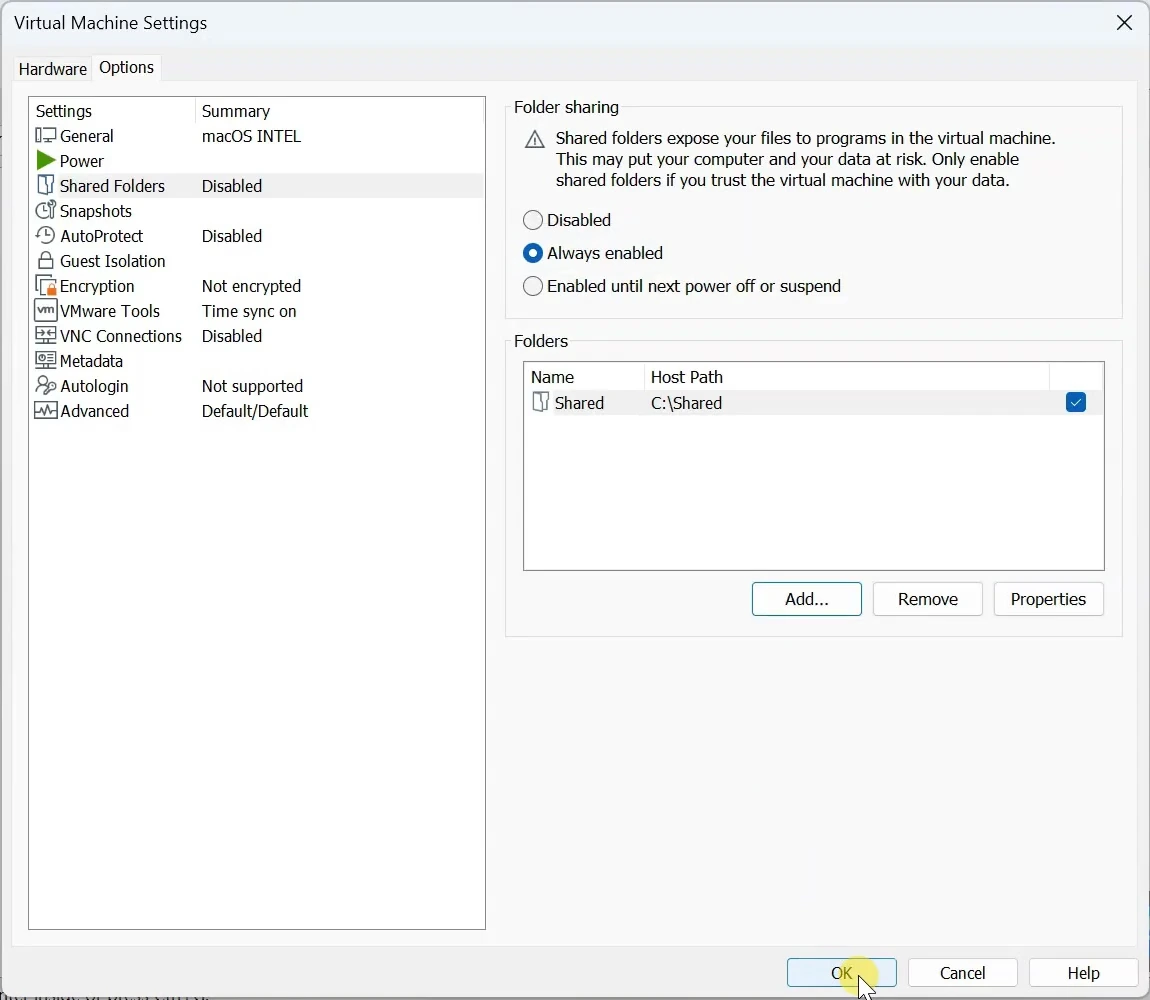
After that, restart macOS.
After restarting, open Finder.
Click Go, then open Computer.
Open VMware Shared Folders.
You should now see the Windows shared folder inside macOS.
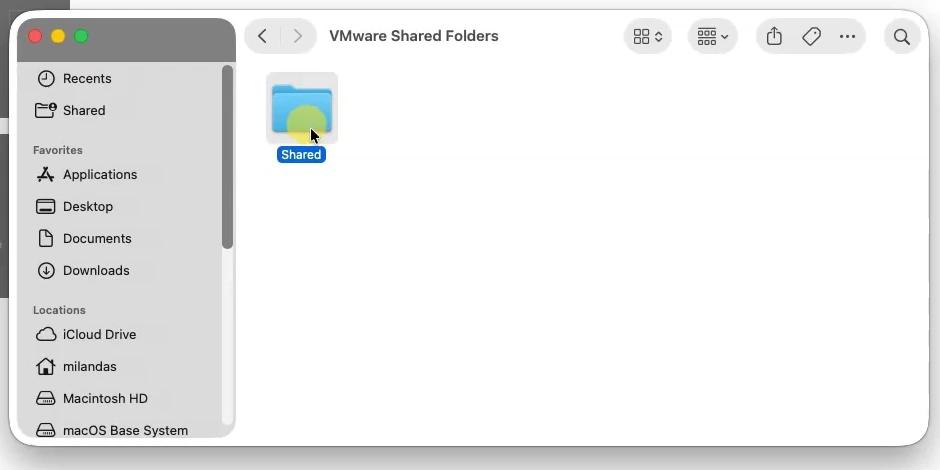
You can use this folder to transfer images, applications, and other files between Windows and macOS.
How to Fix Sound in macOS Tahoe VMware
Finally, we will fix the sound by installing the audio driver package from OC4VM.
This part requires disabling System Integrity Protection inside the macOS virtual machine and then installing the VoodooHDA Tahoe package.
Step 1: Copy the Audio Driver Package
Open the packages folder inside OC4VM on Windows.
Copy the VoodooHDA Tahoe package into the shared folder.
Then copy the file from the shared folder into your macOS Documents folder.
Step 2: Boot into OpenShell
Before installing the driver, restart the virtual machine.
When the OpenCore menu appears, select:
OpenShellThe OpenCore command shell will open.
Step 3: Disable System Integrity Protection
In the recording, the OpenCore filesystem is mapped as FS8:. This number can change between virtual machines. Use the mapping that contains EFI\OC\Tools\CsrUtil.efi; the OC4VM audio instructions show a different example using FS7:. If FS8: does not contain that path, check the other FS mappings shown by OpenShell before continuing.
Enter:
FS8:Then go to the Tools folder:
cd EFI\OC\ToolsShow all files inside the Tools folder:
dirYou should see a file named:
CsrUtil.efiNow run this command:
CsrUtil.efi disable 0xA85The shell should report that System Integrity Protection is disabled.
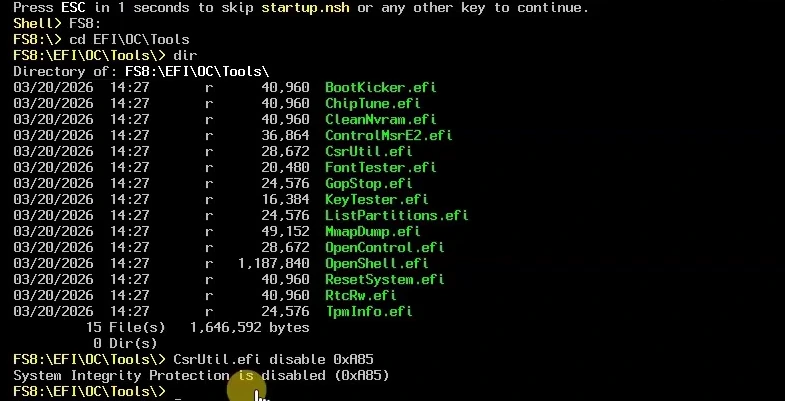
Finally, restart the virtual machine by entering:
resetStep 4: Install the VoodooHDA Tahoe Package
Once macOS starts again, open the Documents folder.
Double-click the VoodooHDA Tahoe package.
Continue through the installer and enter your macOS password when requested.
Open System Settings and approve any blocked software or system extension related to the audio driver.
Click Allow and enter your password.
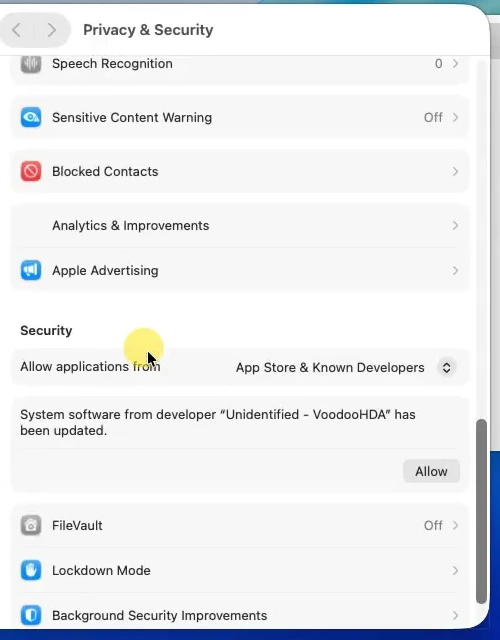
If needed, run the installer again.
Once the installation is complete, restart the virtual machine to apply the changes.
Step 5: Test the Sound
After macOS starts again, play a video or an audio file to test the sound.
The macOS Tahoe virtual machine should now have working audio.
Important Notes
Before installing macOS Tahoe in VMware, remember these points:
- This is an experimental setup.
- The installation can take more than one hour.
- The virtual machine may restart several times during installation.
- Do not assign all RAM to the virtual machine.
- Use the correct Intel or AMD folder based on your processor.
- Install VMware Tools after reaching the macOS desktop.
- Shared folders are useful for file transfer between Windows and macOS.
- Sound may require the VoodooHDA Tahoe package and SIP changes.
Troubleshooting
QEMU Conversion Looks Stuck
The QEMU conversion command may not show a progress bar.
Wait until the normal Command Prompt line appears again. After that, check whether the tahoe-install.vmdk file has been created.
macOS Recovery Takes a Long Time to Load
The macOS recovery environment can take several minutes to load inside VMware.
Wait patiently and do not restart the virtual machine too early.
macOS Installation Takes Too Long
The installation may take more than one hour and the virtual machine can restart several times.
This is normal. Do not turn off the virtual machine during the installation.
Mouse or Screen Feels Slow
Install VMware Tools from the darwin.iso file inside the OC4VM ISO folder.
After VMware Tools is installed and macOS is restarted, mouse movement and screen resizing should improve.
VMware Tools Installation Fails
If the first VMware Tools installation fails, close the installer and run it again.
Also check System Settings and allow the VMware system software if macOS blocks it.
Shared Folder Not Showing
Make sure Shared Folders is set to Always enabled in VMware settings.
Restart macOS, then open Finder, click Go, open Computer, and check VMware Shared Folders.
Sound is Not Working
Install the VoodooHDA Tahoe package from OC4VM and approve any blocked system extension from System Settings.
If required, disable System Integrity Protection using the OpenShell method shown above and restart the virtual machine after installation.
Frequently Asked Questions
Can I install macOS Tahoe 26 on Windows using VMware?
Yes, you can set up macOS Tahoe 26 inside VMware Workstation on a Windows PC using OC4VM and a converted VMware virtual disk.
Does this replace Windows?
No. macOS runs inside VMware as a virtual machine, so Windows stays installed and continues running normally.
Why do we need QEMU?
QEMU is used to convert the downloaded macOS DMG file into a VMware-compatible VMDK virtual disk.
Why is the screen slow after installation?
The graphics memory may initially show only 4 MB. Installing VMware Tools improves graphics memory, mouse movement, and screen resizing.
Can I transfer files between Windows and macOS?
Yes, you can enable VMware Shared Folders and access a Windows folder from inside macOS.
How do I fix sound?
You can install the VoodooHDA Tahoe package from OC4VM. The process may require disabling System Integrity Protection and approving the blocked system extension.
Can I sign in with Apple Account?
You can skip Apple Account sign-in during the initial setup. For testing purposes, a local account is enough.
Conclusion
So, this is how you can install macOS Tahoe 26 on a Windows PC using VMware Workstation.
First, we downloaded OC4VM, used recoveryOS to get the macOS Tahoe recovery image, converted the DMG file to VMDK using QEMU, opened the pre-configured VMware virtual machine, attached the recovery disk, and installed macOS Tahoe.
After installation, we installed VMware Tools to improve graphics and mouse performance, enabled shared folders to transfer files between Windows and macOS, and installed the audio driver to fix sound.
This setup is useful if you want to test macOS Tahoe inside Windows without replacing your existing Windows installation.