Do you want to install Kali Linux on VirtualBox in Windows 11 or Windows 10? In this guide, I will show you how to run Kali Linux inside VirtualBox using Kali’s official pre-built VirtualBox image.
With this method, you do not need to dual boot or change your Windows partitions. Kali Linux will run inside a virtual machine, so Windows will remain installed and running normally on your computer.
The best part is that we do not need to manually create a new virtual machine or go through the full Kali installer process. Kali provides an official pre-built VirtualBox image, so we can simply import it into VirtualBox, adjust a few settings, and start using Kali Linux.
What You Need
Before starting, make sure you have these things ready:
- A Windows 11 or Windows 10 computer
- Hardware virtualization enabled
- VirtualBox for Windows
- Kali Linux pre-built VirtualBox image
- 7-Zip or WinRAR to extract the downloaded archive
- Enough free storage for the Kali virtual machine
- A stable internet connection
The Kali VirtualBox image is several gigabytes in size, so the download may take some time depending on your internet speed.
Step 1: Check Hardware Virtualization
First, we need to check whether hardware virtualization is enabled on the computer.
Right-click the Windows taskbar and open Task Manager.
Go to the Performance section.
Select CPU.
Now look for Virtualization.
If it says Enabled, your computer is ready, and you can continue to the next step.
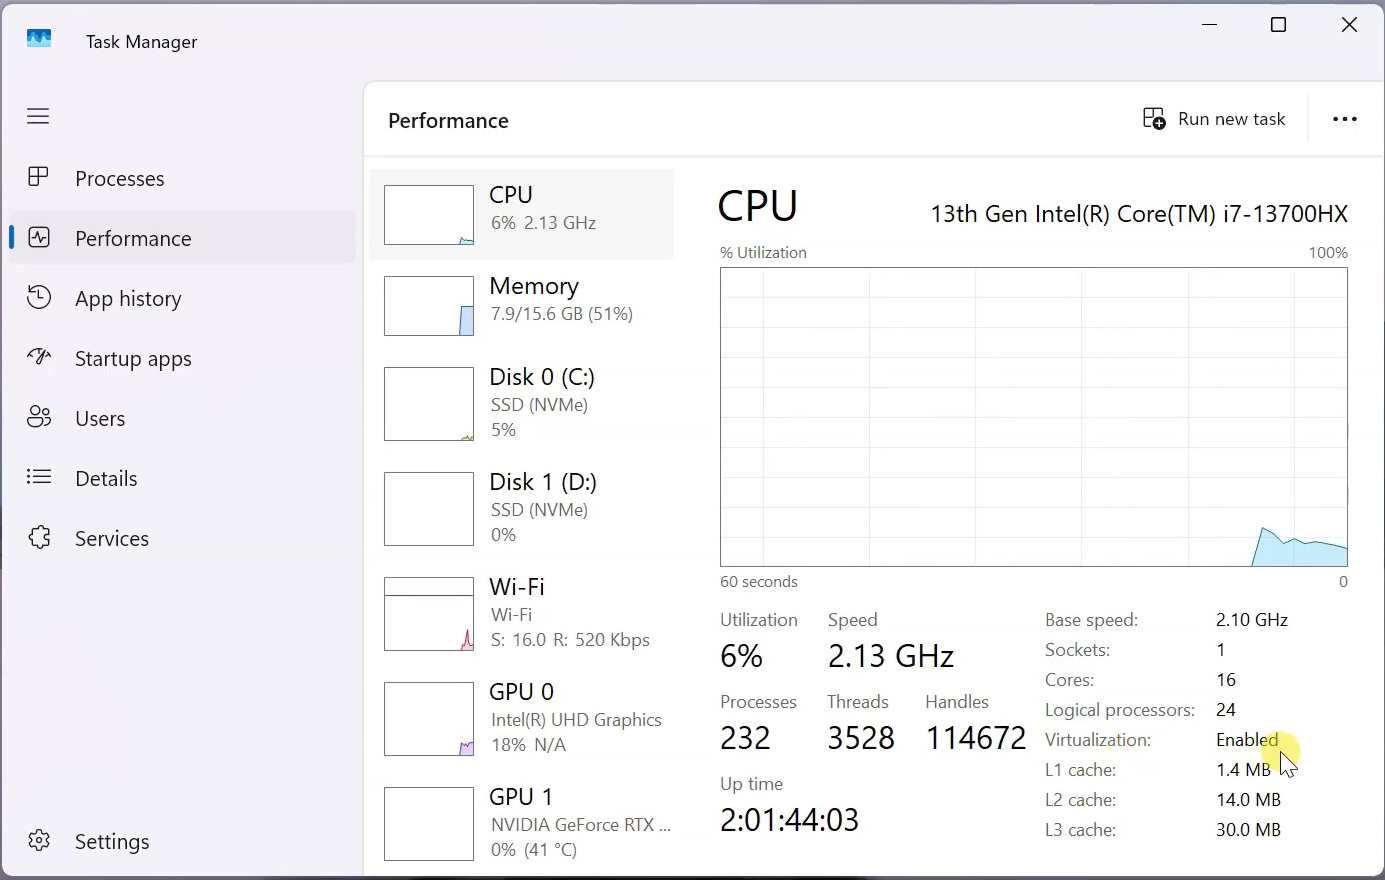
If it says Disabled, you need to enable virtualization from your computer’s BIOS or UEFI settings.
Restart the computer and enter the BIOS. The BIOS key depends on your computer or motherboard, but common keys include:
- F2
- F9
- F10
- Delete
Inside the BIOS, look for the processor virtualization setting.
On an Intel computer, this option is usually called Intel Virtualization Technology or VT-x.
On an AMD computer, look for SVM Mode or AMD-V.
Enable the option, save the changes, and restart Windows.
Step 2: Install VirtualBox on Windows
Once virtualization is enabled, open your browser and visit the official VirtualBox website.
Open the VirtualBox download page.
Under VirtualBox Platform Packages, click Windows Hosts to get VirtualBox for Windows.
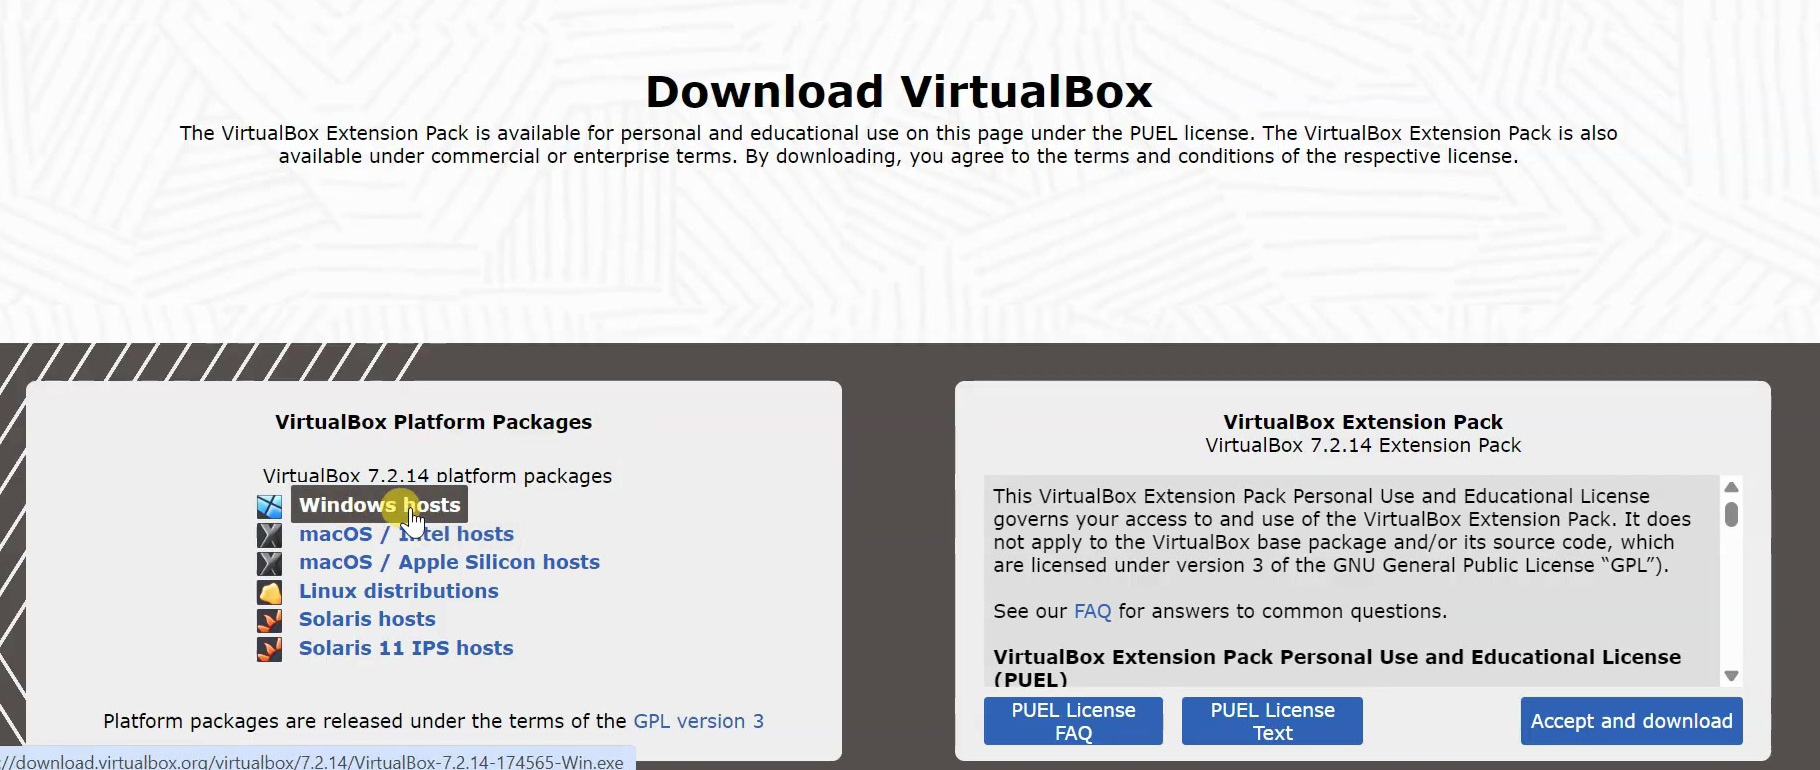
You can also get the VirtualBox Extension Pack. The Extension Pack adds some extra features like enhanced USB device support, VirtualBox Remote Desktop support, disk image encryption, webcam passthrough, and some cloud integration features.
However, the Extension Pack is optional for running Kali Linux. You can skip it if you do not need these extra features.
After the files are downloaded, open the VirtualBox installer.
Click Next. You can leave the default installation options selected.
Continue through the installer and click Install.
Once the installation is complete, click Finish.
VirtualBox should now open on your Windows PC.
Step 3: Install VirtualBox Extension Pack Optional
If you downloaded the VirtualBox Extension Pack, you can install it now.
Double-click the Extension Pack file.
VirtualBox will open and ask whether you want to install it.
Click Install.
Read through the license agreement and click I Agree.
After the installation completes, the Extension Pack will be added to VirtualBox.
Step 4: Get Kali Linux Pre-Built VirtualBox Image
Now we need to get Kali Linux.
Open your browser and visit the official Kali Linux download page.
Select Pre-built VMs or scroll to the Pre-built Virtual Machines section instead of downloading the normal installer ISO.
Here, Kali provides virtual machines that are already prepared for VMware, VirtualBox, Hyper-V, and QEMU.
Click VirtualBox and get the 64-bit image.
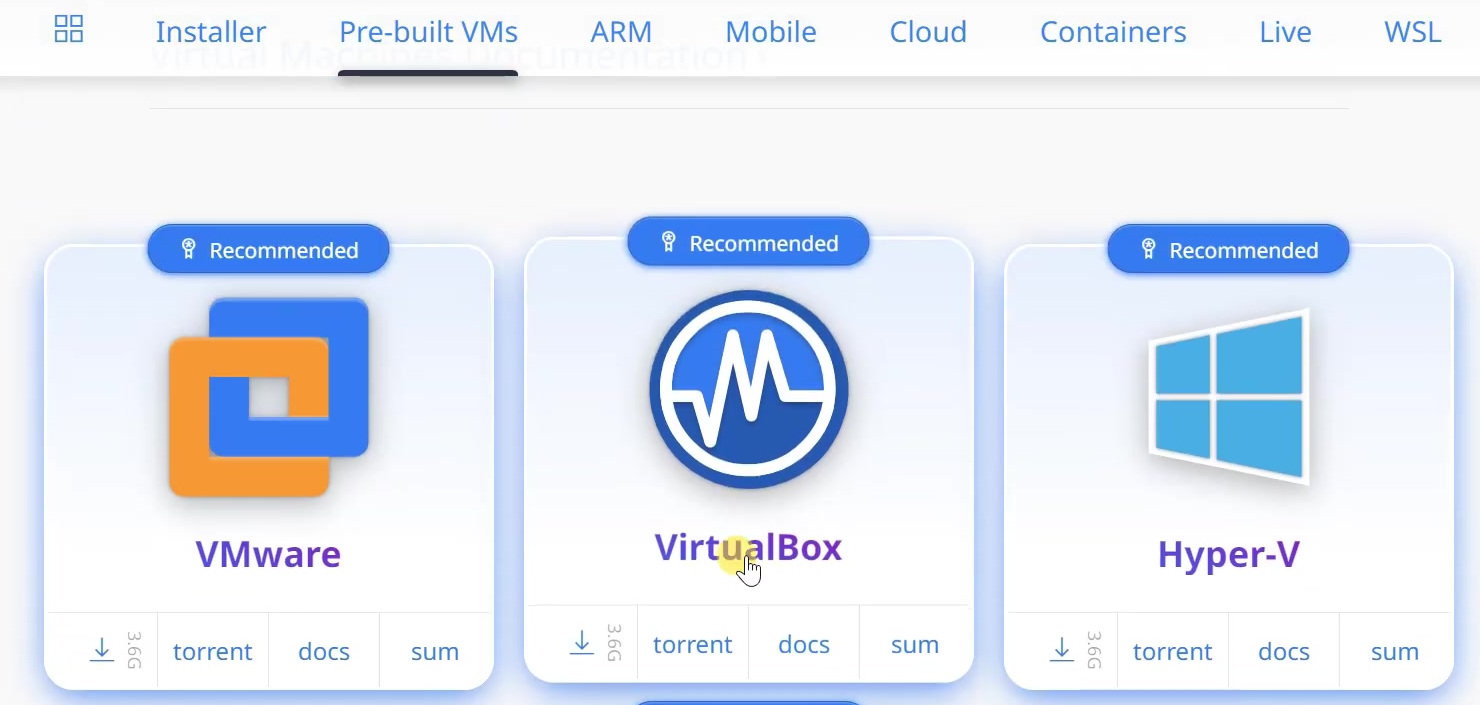
At the time of recording, Kali Linux 2026.2 was used in the video. The download is several gigabytes, so wait until it finishes completely.
Step 5: Extract the Kali VirtualBox Image
Once the Kali VirtualBox image has finished downloading, open your Downloads folder.
The Kali VirtualBox image will be inside a compressed archive.
Right-click the archive and extract it using 7-Zip or WinRAR.
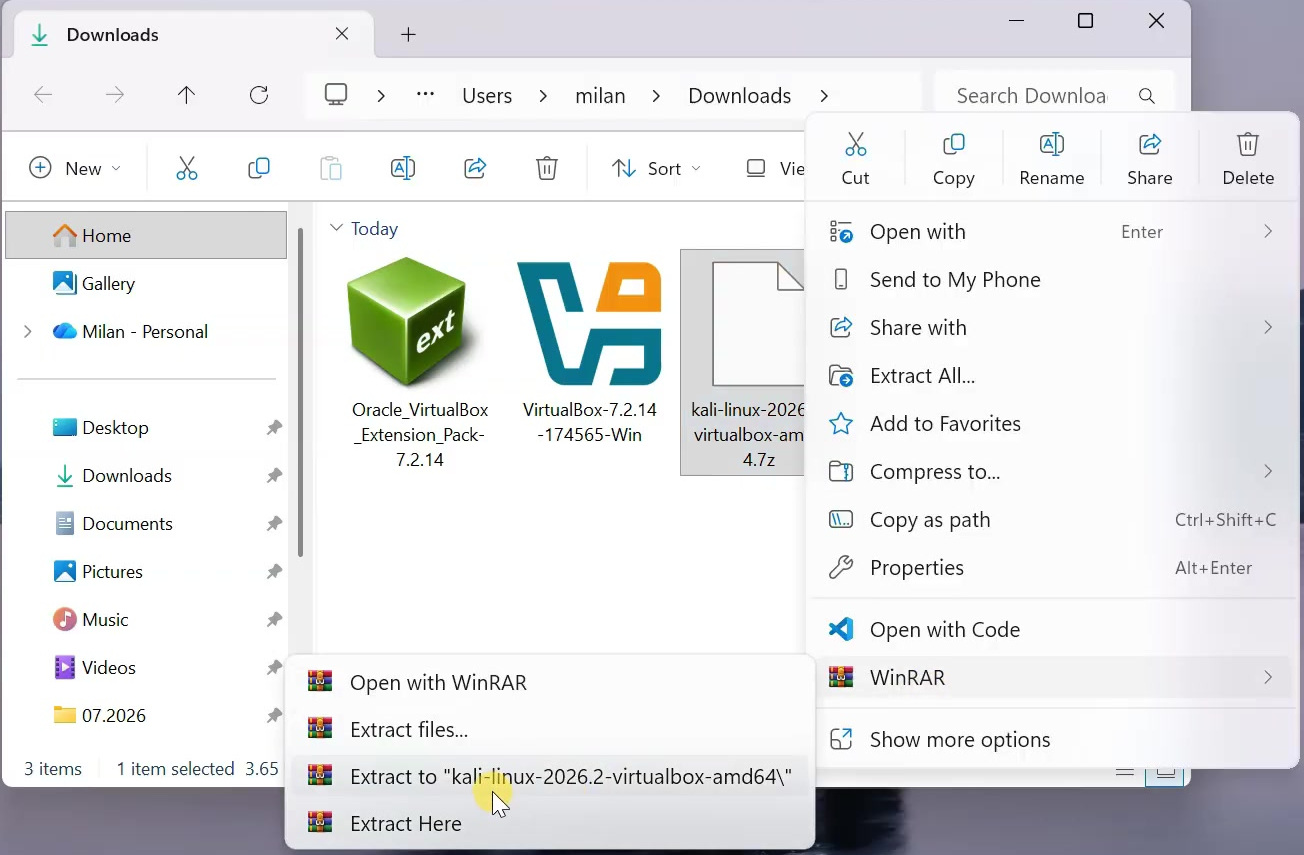
After extraction, open the extracted folder.
Inside it, you should see the Kali virtual hard disk and a VirtualBox machine configuration file.
We do not need to manually create a new virtual machine because Kali has already prepared the configuration for us.
Step 6: Open the Kali Virtual Machine in VirtualBox
Now open VirtualBox.
Click Open.
Navigate to the extracted Kali Linux folder.
Select the Kali .vbox file and open it.
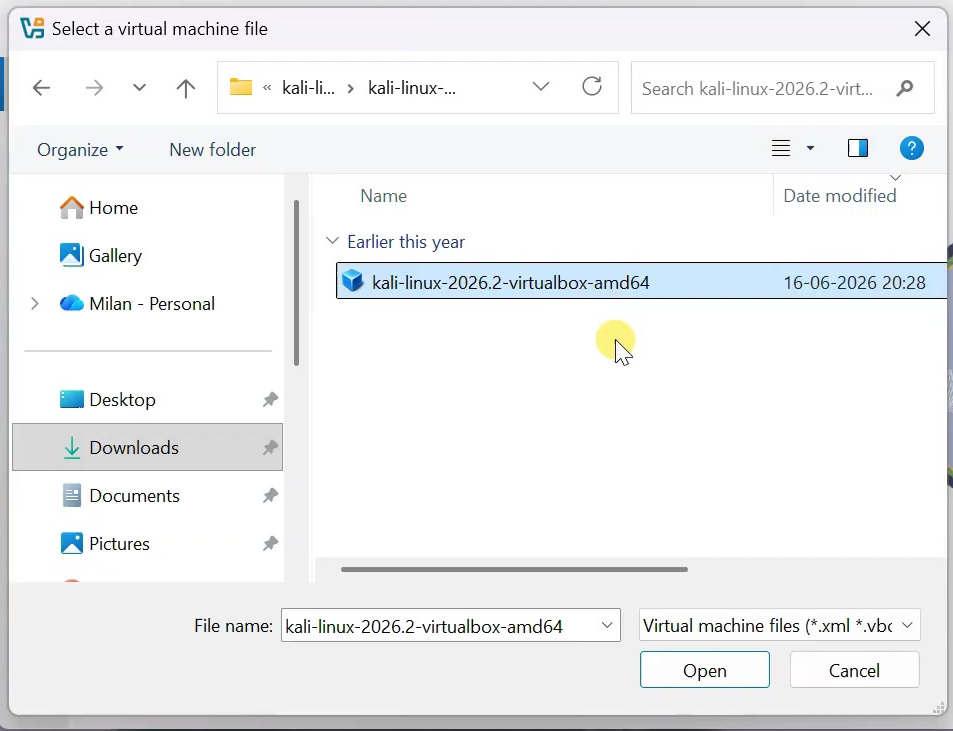
Kali Linux should immediately appear in the VirtualBox machine list.
Step 7: Enable Shared Clipboard and Drag and Drop
Before starting Kali, we should change a few settings.
Select the Kali virtual machine and click Settings.
Switch to Expert Mode so that all settings are visible.
First, open General.
Then go to the Features section.
Set Shared Clipboard to Bidirectional.
Also set Drag and Drop to Bidirectional.
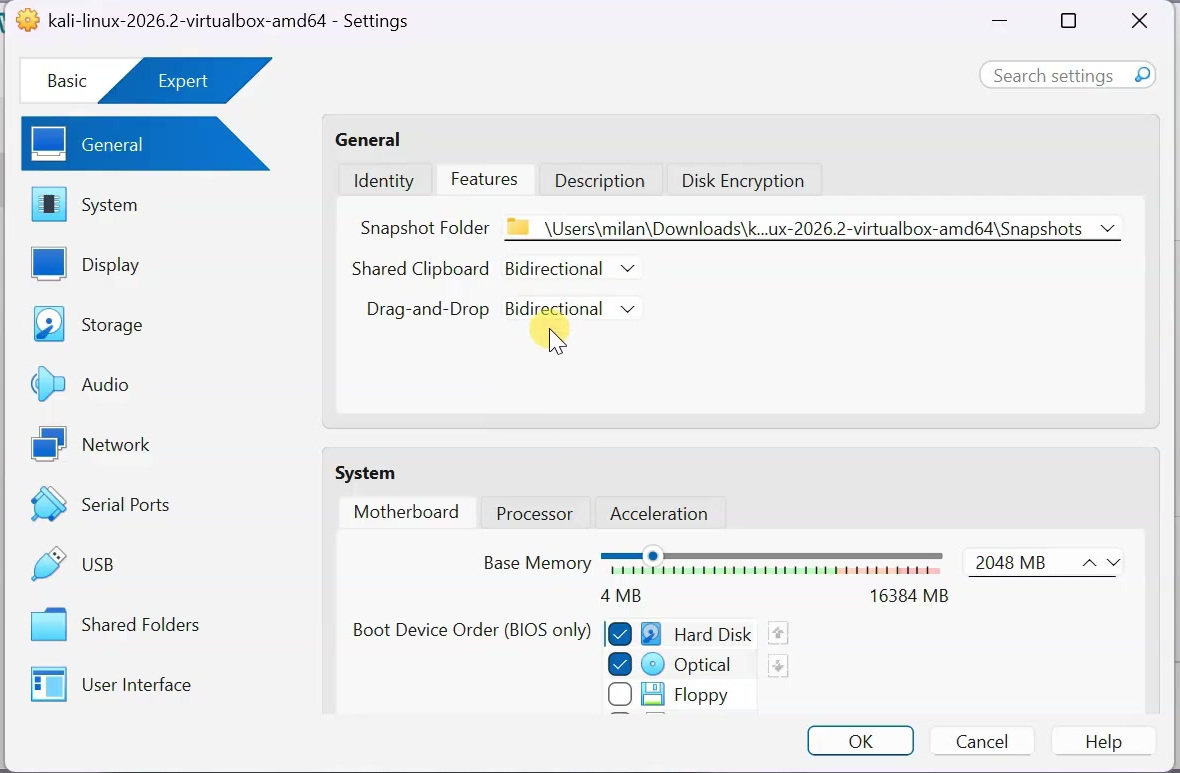
This allows clipboard sharing and drag-and-drop operations to work between Windows and Kali.
Step 8: Adjust RAM for Kali Linux
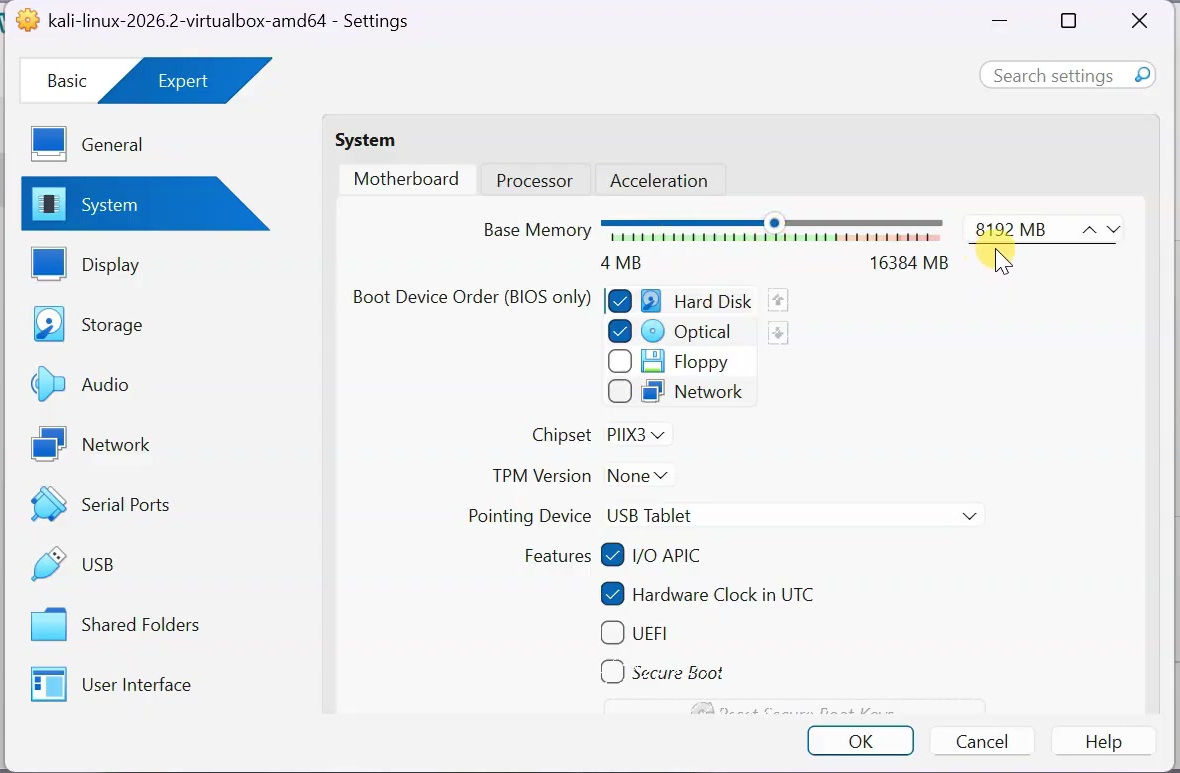
Now select System.
Here, you can change the amount of RAM assigned to Kali Linux.
The official pre-built configuration can run with around 2 GB of RAM. But if your computer has enough memory, assigning more RAM will provide a better experience.
If your computer has 8 GB of RAM, you can start with around 2 GB to 4 GB for Kali.
If your computer has 16 GB of RAM, you can assign more, such as 6 GB or 8 GB, depending on your usage.
Do not assign all RAM to the virtual machine. Windows also needs enough memory to continue running smoothly.
Step 9: Adjust CPU Settings
Next, open the Processor section.
Here, you can decide how many virtual CPUs Kali can use.
For most modern computers, around 2 to 4 CPUs should be enough for normal Kali usage.
If your computer has more CPU cores and you want better performance, you can assign more. But again, do not assign everything to the virtual machine because Windows also needs CPU resources.
Step 10: Adjust Display Settings
Now go to Display.
Set Video Memory to:
128 MBFor this setup, you can leave Enable 3D Acceleration disabled.
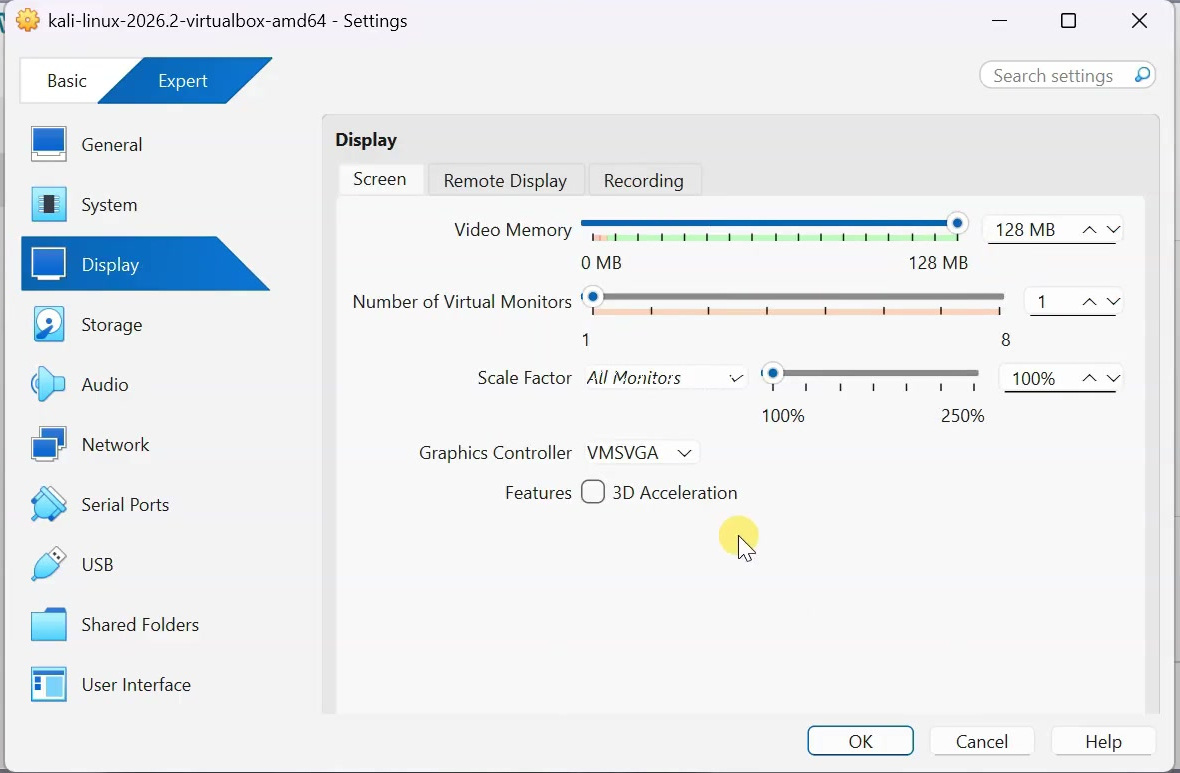
This should be enough for normal Kali Linux usage inside VirtualBox.
Step 11: Check Network Settings
Next, open Network.
For most users, I recommend leaving it set to NAT.
With NAT, Kali can use your Windows computer’s internet connection without requiring any additional network configuration.
If you specifically need Kali to appear as a separate device on your local network, you can use Bridged Adapter instead. In that case, your router can assign Kali its own network address.
But for a normal Kali VirtualBox setup, NAT is enough.
Now click OK to save the settings.
Step 12: Start Kali Linux
Now we are ready to start Kali Linux.
Select the Kali virtual machine and click Start.
Wait for Kali Linux to boot.
When you click inside the virtual machine, VirtualBox may capture your mouse and keyboard input.
If you need to release the mouse and keyboard back to Windows, press the Right Ctrl key on your keyboard.
Step 13: Log in to Kali Linux
After Kali finishes booting, you will reach the login screen.
The default username for Kali’s official pre-built virtual machine is:
kaliThe default password is also:
kaliEnter the username and password and log in.
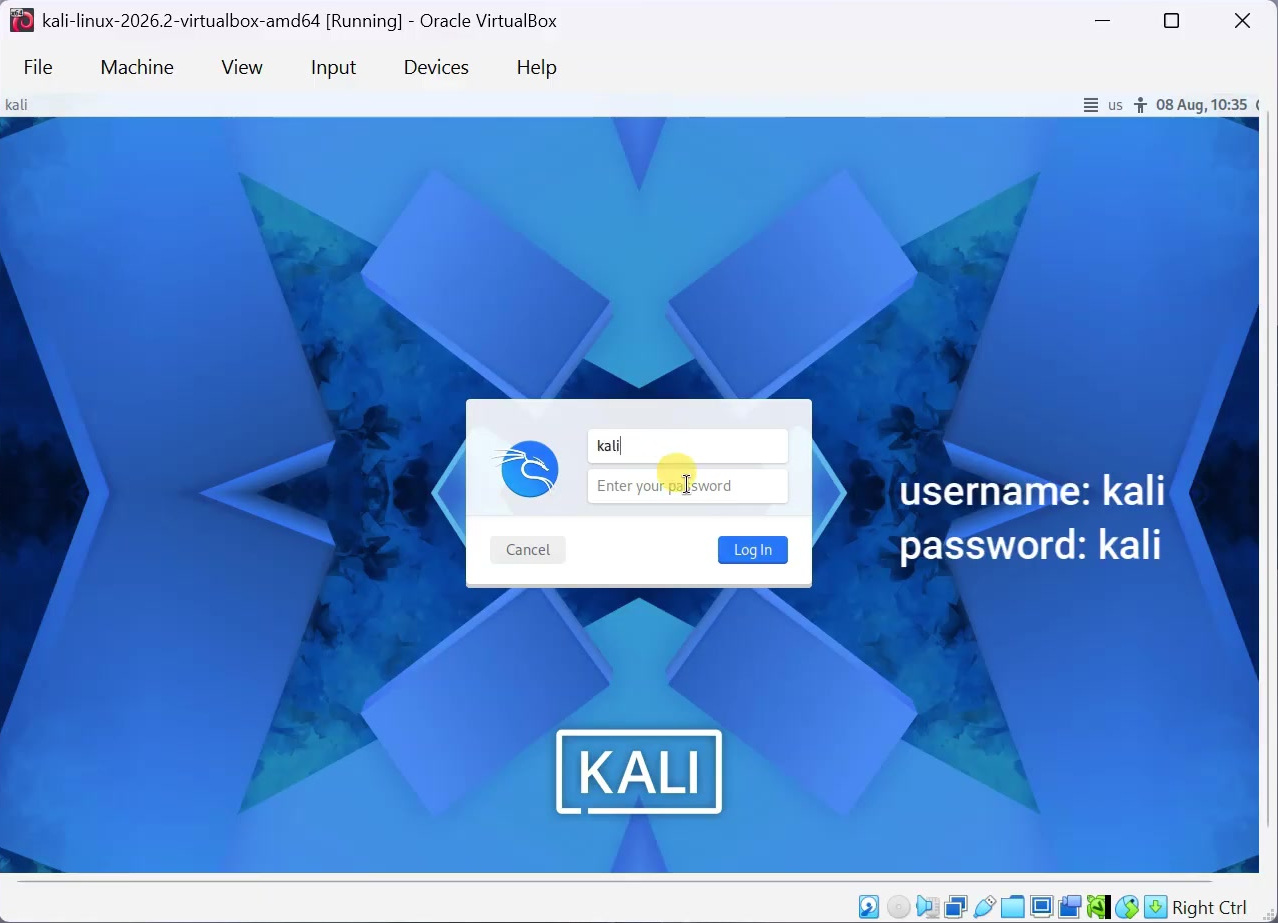
Now Kali Linux should be running successfully inside VirtualBox.
Step 14: Change the Default Kali Password
Because kali is a publicly known default password, you should change it before using the system regularly.
Open the Terminal inside Kali Linux.
Run this command:
passwdEnter your current password:
kaliThen enter your new password and confirm it.
After that, your Kali password will be changed.
Step 15: Update Kali Linux
Now update Kali Linux to the latest available packages.
In the Terminal, run this command:
sudo apt update && sudo apt full-upgrade -yEnter your password when asked.
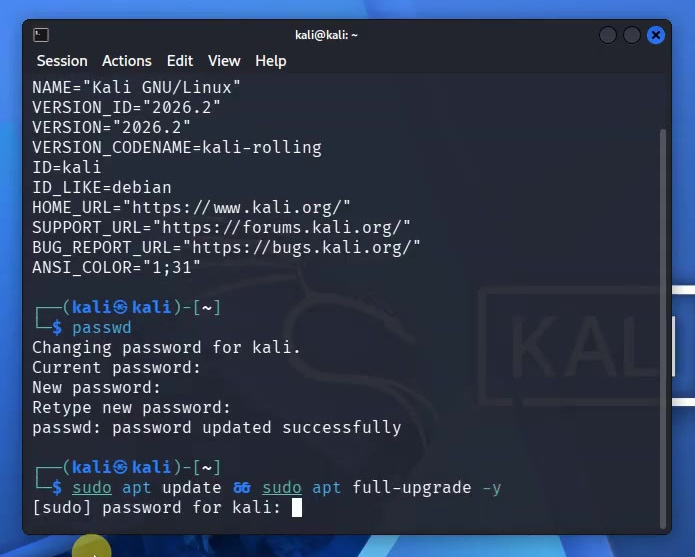
Kali will refresh its package information and install available updates.
Depending on your internet connection, this process may take some time.
Once the update is complete, reboot Kali using:
sudo rebootStep 16: Use Full-Screen Mode
After the restart, log back into Kali.
Now you can check the display integration.
Resize the VirtualBox window. Kali should automatically adjust its desktop resolution to fit the window.
You can also use Kali in full-screen mode.
To enter full-screen mode, open the VirtualBox View menu and select Full-screen Mode.
You can also press this keyboard shortcut:
Right Ctrl + FThe official Kali pre-built VirtualBox image already includes the guest integration, so you normally do not need to manually install VirtualBox Guest Additions.
Step 17: Test Shared Clipboard and Drag and Drop
Now let’s test the shared clipboard that we enabled earlier.
Copy some text from Windows.
Then open a text editor inside Kali and paste it.
If everything is working correctly, the copied text should paste directly into Kali Linux.
Because we selected Bidirectional, clipboard sharing can work in both directions. You can copy text from Windows to Kali and from Kali back to Windows.
You can also test drag and drop by dragging a file between Windows and Kali.
How to Set Up Shared Folder Between Windows and Kali
Shared folders are a more convenient way to transfer files between Windows and Kali Linux.
Step 1: Create a Folder in Windows
First, open Windows File Explorer.
Create a folder anywhere you want.
For this tutorial, the folder is named:
ShareStep 2: Shut Down Kali Linux
Before changing shared-folder settings, shut down Kali Linux if it is currently running.
Step 3: Add Shared Folder in VirtualBox
Now select the Kali virtual machine in VirtualBox and click Settings.
Open Shared Folders.
Click the Add Folder icon.
For Folder Path, select the Windows folder that you created earlier.
Enable Auto-mount.
Leave Read-only disabled.
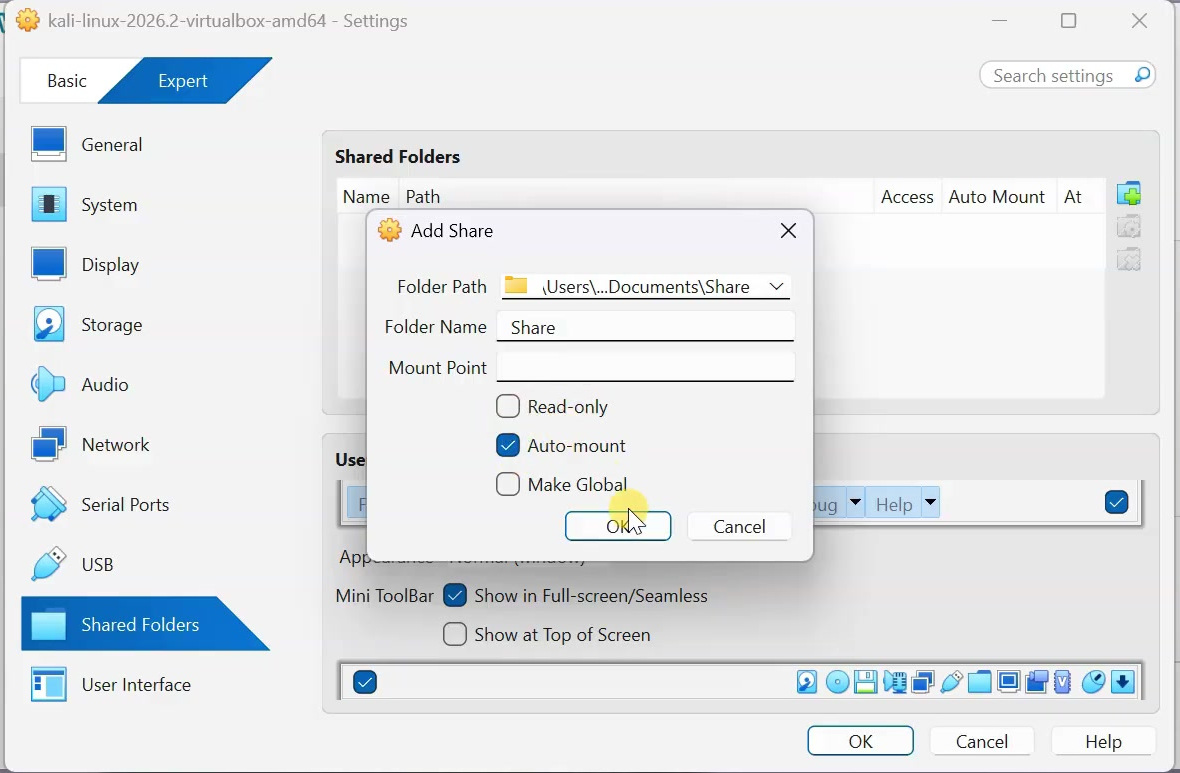
Click OK to add the folder.
Then click OK again to save the virtual machine settings.
Step 4: Access Shared Folder in Kali
Start Kali Linux again and log in.
Open the Kali file manager.
You should see the shared folder in the sidebar.
If your Windows folder is named Share, VirtualBox may display it inside Kali as:
sf_ShareOpen it.
Now anything you place inside the Share folder from Windows can be accessed from Kali.
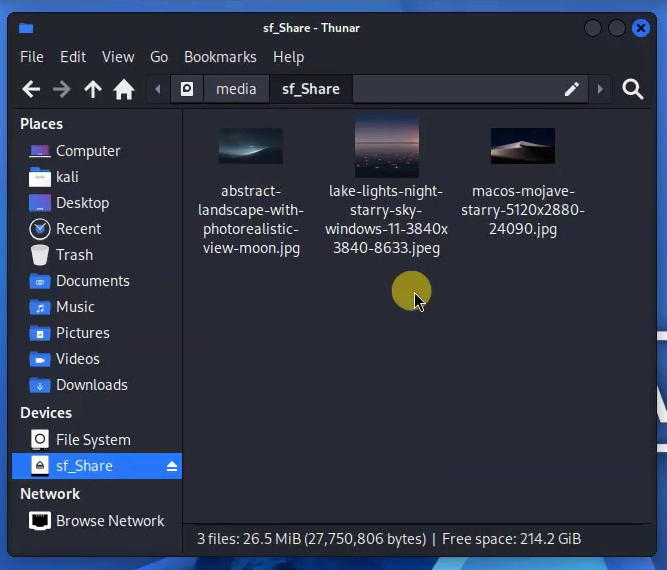
You can also place files inside the shared folder from Kali and access them from Windows.
What Works After Setup?
After completing the setup, you should have a fully functional Kali Linux virtual machine inside Windows.
You should be able to:
- Use Kali Linux apps
- Open Terminal and run commands
- Connect to the internet
- Browse websites from Kali
- Use full-screen mode
- Auto-adjust screen resolution
- Copy and paste between Windows and Kali
- Transfer files using shared folders
Important Notes
Before using Kali Linux in VirtualBox, remember these points:
- Enable hardware virtualization before starting.
- Use Kali’s official pre-built VirtualBox image.
- Change the default password after first login.
- Keep Kali updated with the latest packages.
- Do not assign all RAM or CPU cores to the virtual machine.
- Use NAT networking for normal internet access.
- Use shared folders for easier file transfer.
Troubleshooting
Virtualization is Disabled
If Task Manager shows virtualization as disabled, enable it from BIOS or UEFI settings.
On Intel systems, look for Intel Virtualization Technology or VT-x.
On AMD systems, look for SVM Mode or AMD-V.
Kali Virtual Machine is Slow
If Kali feels slow, increase RAM or CPU allocation if your computer has enough resources.
Also make sure Windows still has enough RAM and CPU available.
Internet Not Working in Kali
Open VirtualBox settings and check the Network section.
For most users, NAT should work without extra configuration.
Screen Resolution is Not Adjusting
Use the official Kali pre-built VirtualBox image because it already includes guest integration.
Also try resizing the VirtualBox window or using full-screen mode.
Shared Clipboard Not Working
Open VirtualBox settings, go to General, then Features.
Set Shared Clipboard to Bidirectional.
Restart the virtual machine and test again.
Shared Folder Not Showing in Kali
Make sure the shared folder has been added in VirtualBox settings.
Enable Auto-mount and keep Read-only disabled.
Restart Kali and check the file manager sidebar again.
Frequently Asked Questions
Can I install Kali Linux on VirtualBox in Windows 11?
Yes, you can install Kali Linux on VirtualBox in Windows 11 using Kali’s official pre-built VirtualBox image.
Does this work on Windows 10?
Yes, this method also works on Windows 10 if VirtualBox is supported and hardware virtualization is enabled.
Do I need to dual boot?
No. Kali runs inside VirtualBox, so you do not need to dual boot or change Windows partitions.
Do I need to manually install Kali from ISO?
No. This method uses Kali’s official pre-built VirtualBox image, so you do not need to manually create a virtual machine or install Kali from an ISO.
What is the default Kali username and password?
For Kali’s official pre-built virtual machine, the default username is kali, and the default password is also kali.
Should I change the default Kali password?
Yes. Because the default password is publicly known, you should change it using the passwd command.
Can I copy files between Windows and Kali?
Yes, you can use shared folders to transfer files between Windows and Kali in both directions.
Conclusion
So, this is how you can install Kali Linux on VirtualBox in Windows 11 or Windows 10.
We used Kali’s official pre-built VirtualBox image, so we did not need to manually create a virtual machine or install Kali from an ISO. After opening the Kali .vbox file in VirtualBox, we adjusted RAM, CPU, display, network, clipboard, and shared folder settings.
After booting into Kali, we changed the default password, updated the system, tested full-screen mode, checked clipboard sharing, and created a shared folder for file transfer between Windows and Kali.
Now you have a fully functional Kali Linux virtual machine running inside Windows through VirtualBox.