Do you want to install TWRP Recovery on your Android phone using a Windows PC? In this guide, I will show you the complete process of flashing TWRP Recovery using ADB and Fastboot.
For this tutorial, the process is demonstrated on the POCO F1. By the end of the guide, the original MIUI Recovery on the phone will be replaced with TWRP Recovery.
TWRP is a custom recovery that allows you to perform advanced tasks such as flashing custom ROMs, installing ZIP files, creating backups, wiping partitions, and modifying Android system files. However, installing TWRP is an advanced process, so you need to follow every step carefully.
Important Things to Know Before Installing TWRP
There is no universal TWRP installation method for every Android phone. The correct file, command, and partition name can be different depending on your device model.
In this guide, the POCO F1 is used as an example. Its device codename is beryllium. If you are using a different phone, you must open the official TWRP page for your exact device and follow the instructions given there.
Do not blindly use the POCO F1 files or commands on another device. Flashing the wrong recovery image can cause boot or recovery problems.
What You Need
Before starting, make sure you have these things ready:
- An Android phone with an unlocked bootloader
- A Windows PC
- A proper USB data cable
- The correct TWRP image for your phone
- Android SDK Platform-Tools
- USB debugging enabled on the phone
You should also know your phone’s exact model name and device codename. This is very important because TWRP files are device-specific.
Required Links
First, open the official TWRP website and download the TWRP image made for your exact phone model. You also need Android SDK Platform-Tools to use ADB and Fastboot commands on your Windows PC.
Step 1: Find Your Device on the Official TWRP Website
Once your phone’s bootloader is unlocked, open the official TWRP website on your computer.
Go to the Devices section.
Now select your phone manufacturer and search for your exact phone model.
For this tutorial, the selected device is Xiaomi Pocophone F1. Its device codename is beryllium.
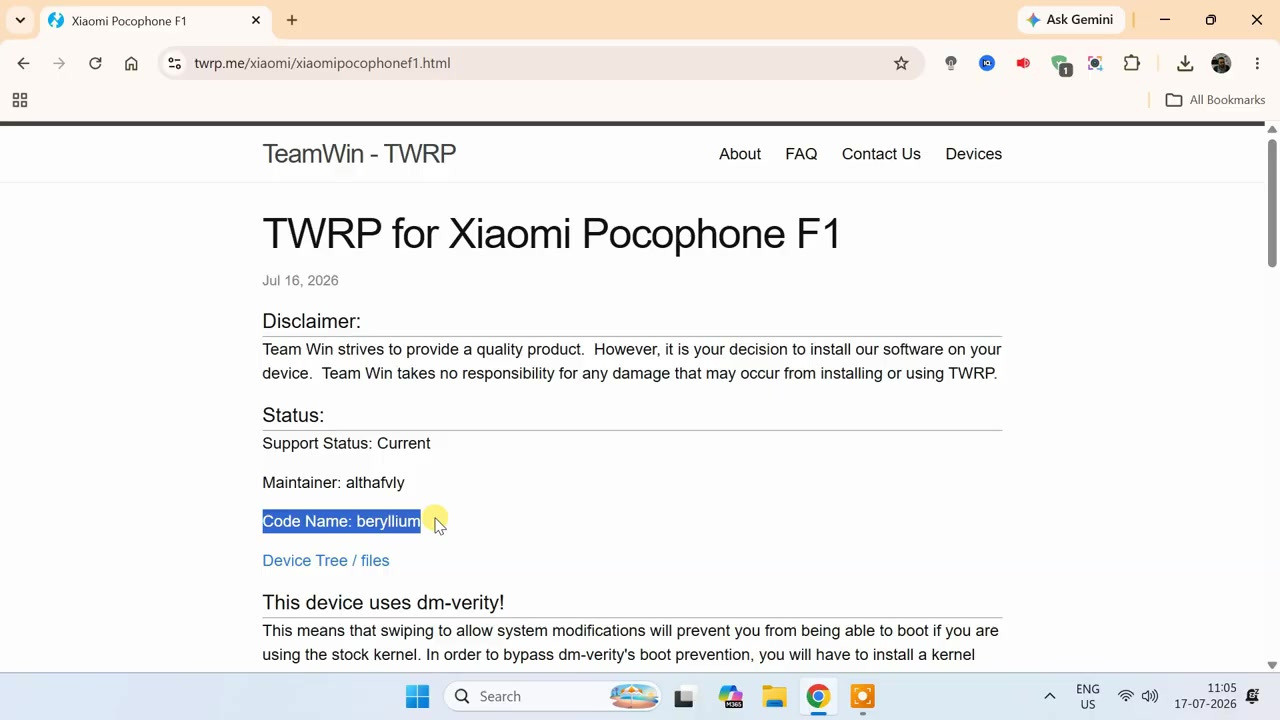
Before downloading anything, confirm that both the model name and codename match your phone. This step is very important because using the wrong TWRP image can cause problems.
Step 2: Download the Correct TWRP Image
After opening your phone’s official TWRP device page, scroll down to the Download Links section.
Select one of the available mirrors.
Now download the latest compatible TWRP image file for your device.
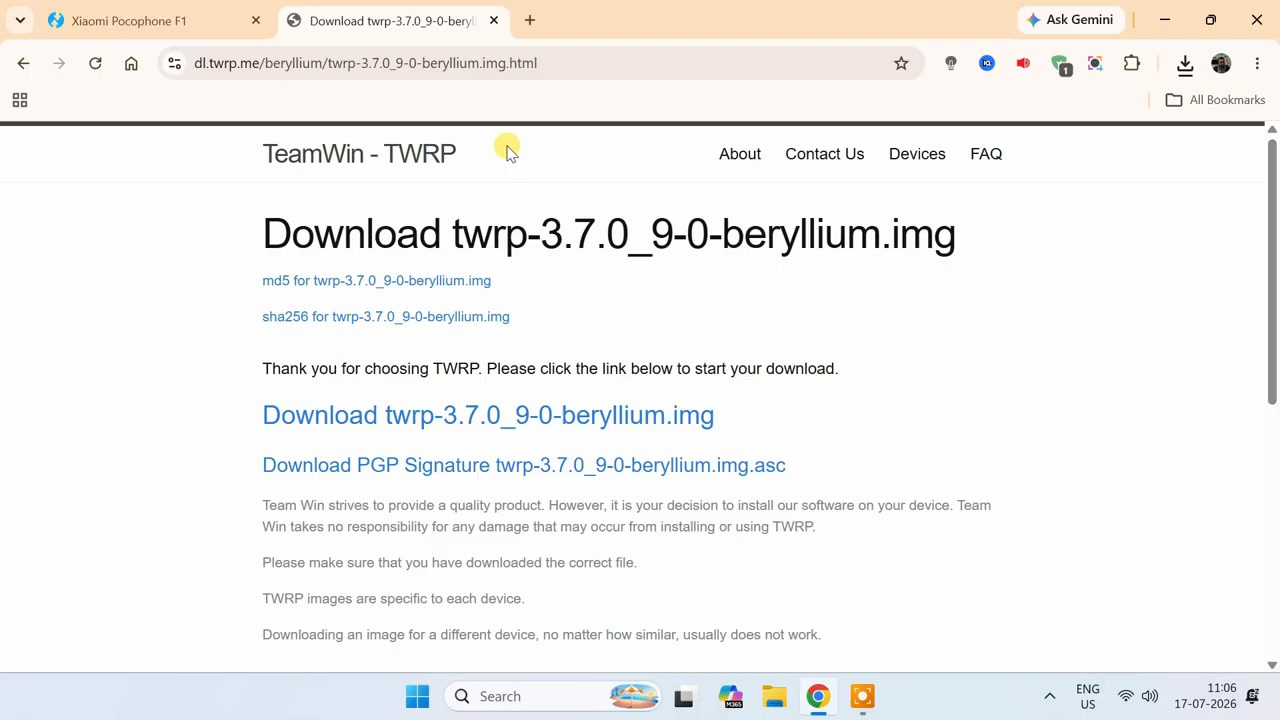
The file will usually be an image file with the .img extension.
Step 3: Download Android SDK Platform-Tools
After downloading the TWRP image, return to the device page and scroll down to the Installation Guide section.
The first requirement shown there is usually Android SDK Platform-Tools.
Open the Platform-Tools link and download the latest package for Windows.
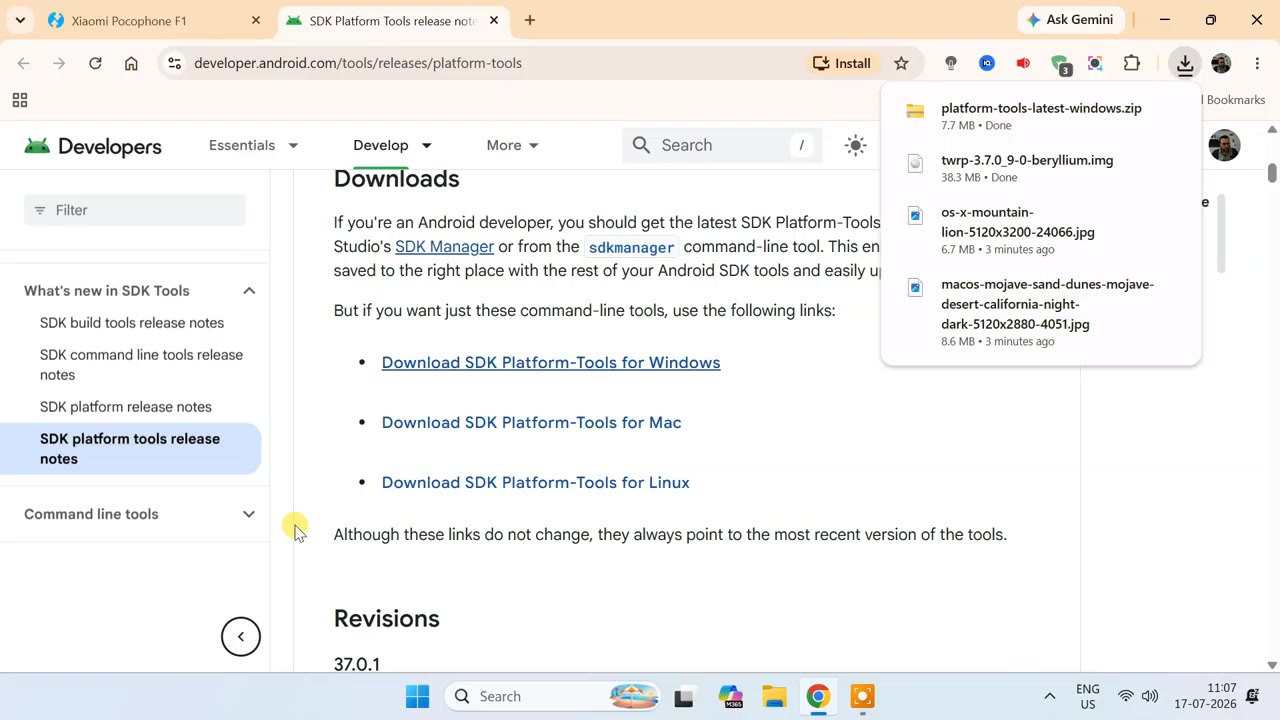
After downloading the ZIP file, right-click it and select Extract All.
Now open the extracted platform-tools folder.
Step 4: Move the TWRP Image to Platform-Tools Folder
Now copy the TWRP image file that you downloaded earlier.
Paste it inside the extracted platform-tools folder.
To make the flashing command easier, rename the TWRP image file to:
twrp.imgNow ADB, Fastboot, and the TWRP image file are available inside the same folder.
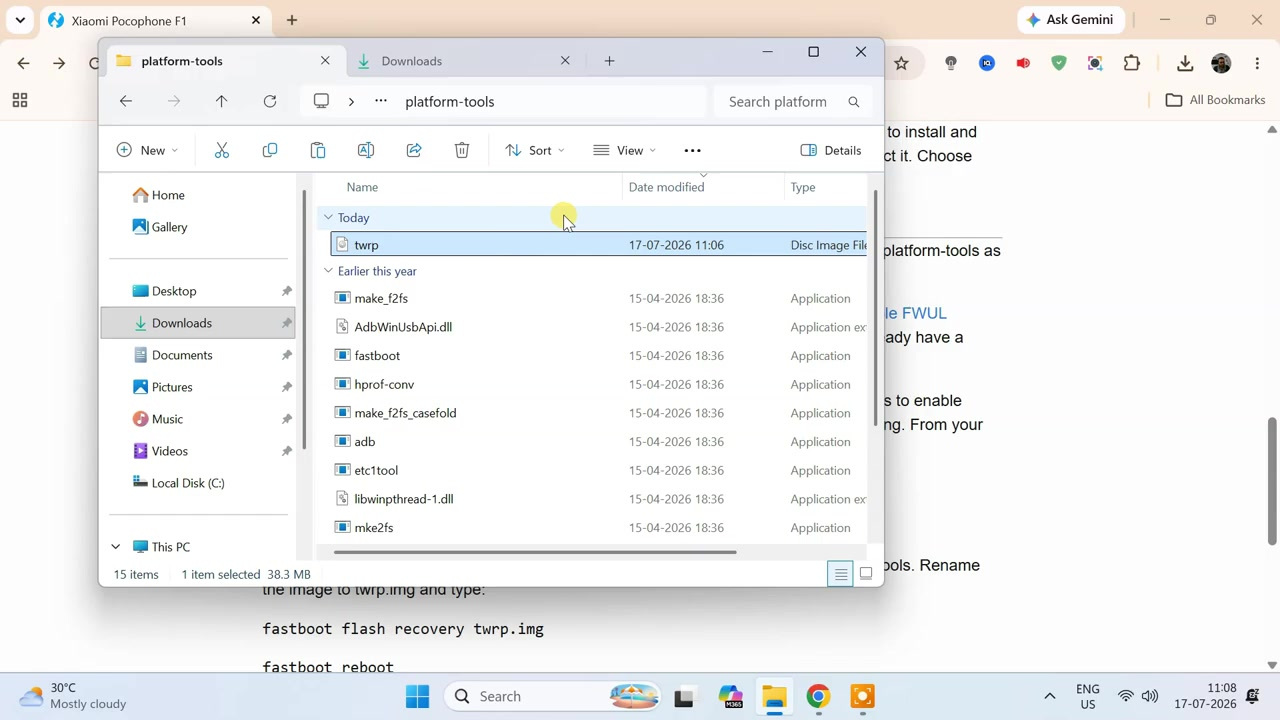
This makes the command easier to run because you do not need to type the full file path of the TWRP image.
Step 5: Enable Developer Options on the Phone
Now we need to enable Developer Options and USB debugging on the Android phone.
Open Settings on your phone.
Go to About phone.
If you are using MIUI, tap on MIUI Version seven times.
On many other Android phones, you need to tap on Build Number seven times instead.
After tapping several times, you should see a message saying that Developer Options have been enabled.
Step 6: Enable USB Debugging
Now return to the main Settings page.
On the POCO F1, open Additional Settings.
Then open Developer Options.
Inside Developer Options, find and enable USB Debugging.
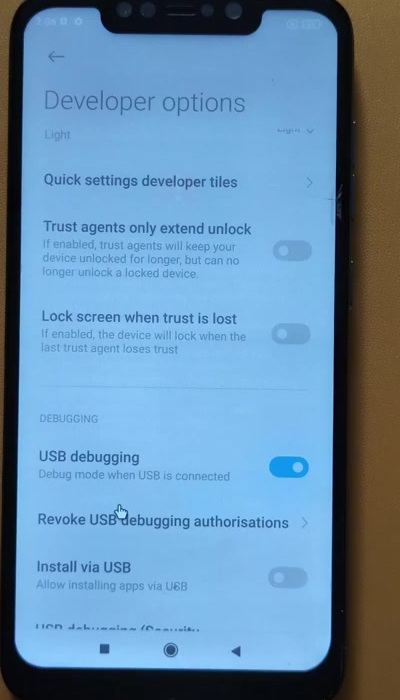
When the warning appears, tap Accept or OK to confirm.
USB debugging allows the computer to communicate with the phone using ADB.
Step 7: Open Command Prompt Inside Platform-Tools
Now return to the platform-tools folder on your computer.
Click on the address bar at the top.
Type:
cmdThen press Enter.
Command Prompt will now open directly inside the Platform-Tools folder.
Step 8: Connect the Phone to the Computer
Now connect your Android phone to the computer using a proper USB data cable.
Make sure you are using a data cable, not a charging-only cable.
If a USB debugging permission popup appears on the phone, tap Allow.
It is also a good idea to keep the phone screen unlocked during the process.
Step 9: Check ADB Connection
Now we need to confirm that ADB can detect the phone.
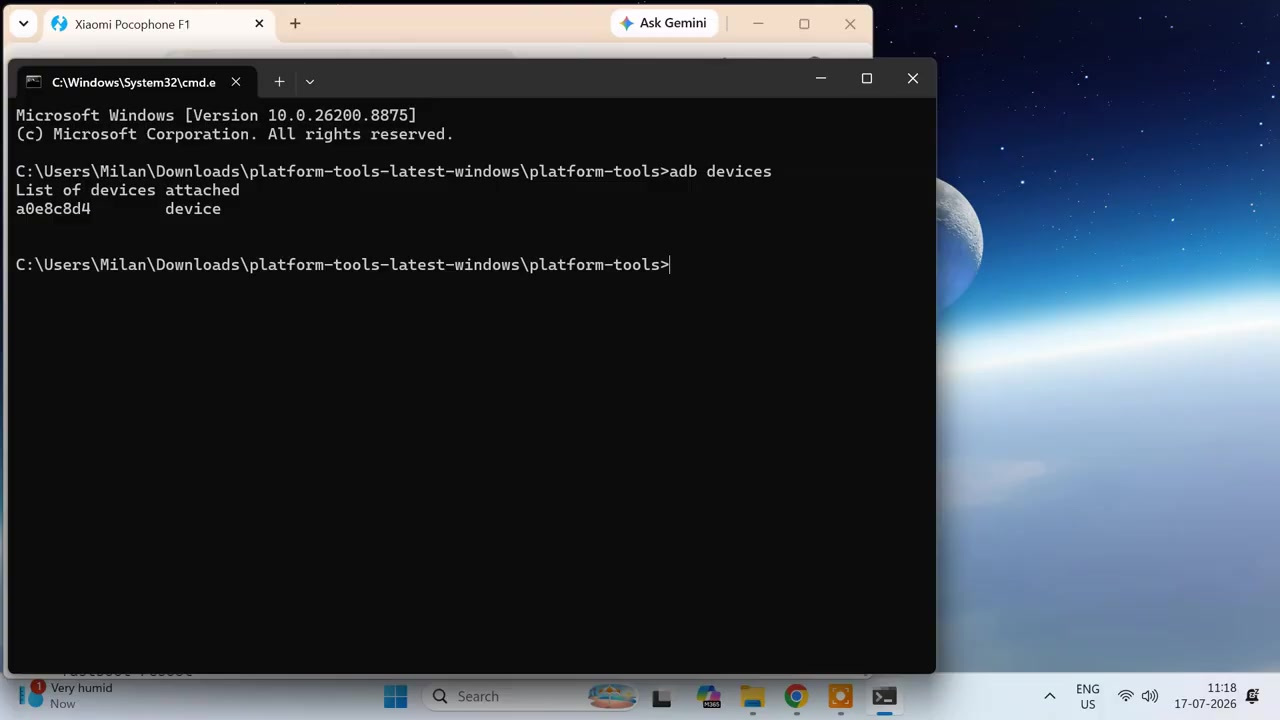
In Command Prompt, run this command:
adb devicesIf the phone is connected properly, you should see the phone’s serial number.
If your phone asks for USB debugging permission, allow it and run the command again.
Once the device serial number appears, ADB is working correctly.
Step 10: Reboot the Phone into Fastboot Mode
Now we need to reboot the phone into Fastboot Mode.
Run this command:
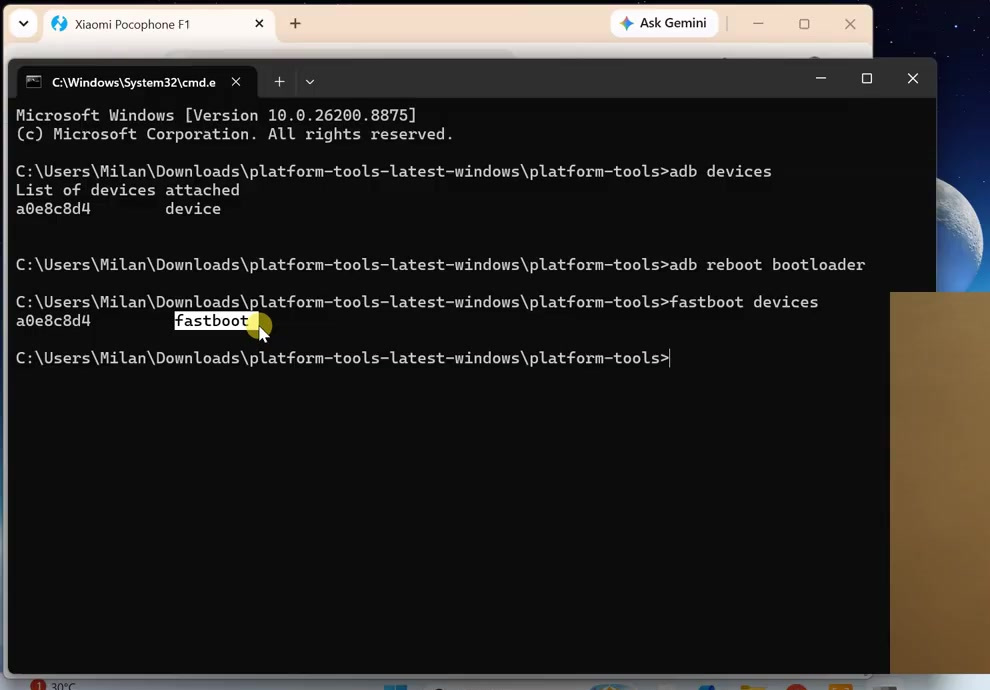
adb reboot bootloaderThe phone will now restart and enter Fastboot Mode.
On many Xiaomi, Redmi, and POCO phones, you will see the Fastboot screen after the phone reboots.
Step 11: Check Fastboot Connection
Before flashing the recovery, confirm that Fastboot can detect the phone.
In Command Prompt, run:
fastboot devicesIf the phone is properly connected in Fastboot Mode, you should see the phone’s serial number.
This confirms that the device is properly detected and ready for the flashing command.
Step 12: Flash TWRP Recovery
Now we will flash the TWRP image to the recovery partition.
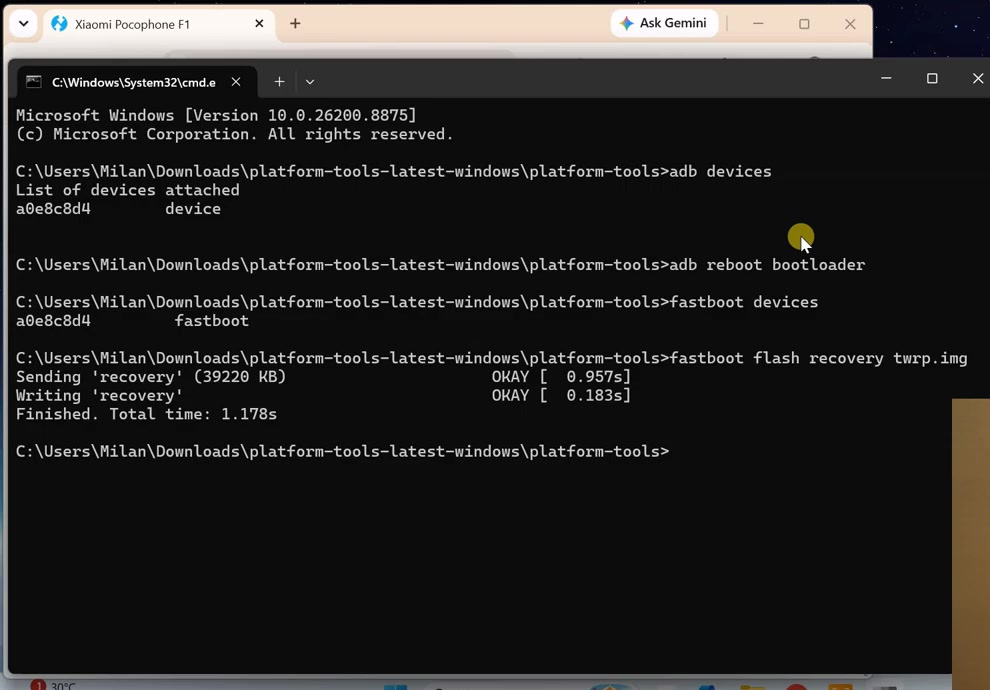
For the POCO F1, the official TWRP installation guide provides this command:
fastboot flash recovery twrp.imgPaste the command into Command Prompt and press Enter.
Fastboot will now flash the TWRP image to the recovery partition.
Step 13: Reboot and Boot Directly into TWRP
This step is very important.
Many devices can automatically replace a custom recovery with the original stock recovery during the first Android boot.
To prevent that, you must boot directly into TWRP immediately after running the reboot command.
For the POCO F1, the recovery button combination is:
Volume Up + PowerNow run this command:
fastboot rebootAs soon as the phone starts restarting, press and hold the Volume Up and Power buttons together.
Continue holding the buttons until the phone begins booting into recovery.
Step 14: Confirm TWRP Installation
If everything worked correctly, the phone should boot into TWRP Recovery instead of the original MIUI Recovery or stock recovery.
This confirms that TWRP Recovery has been successfully installed on the phone.
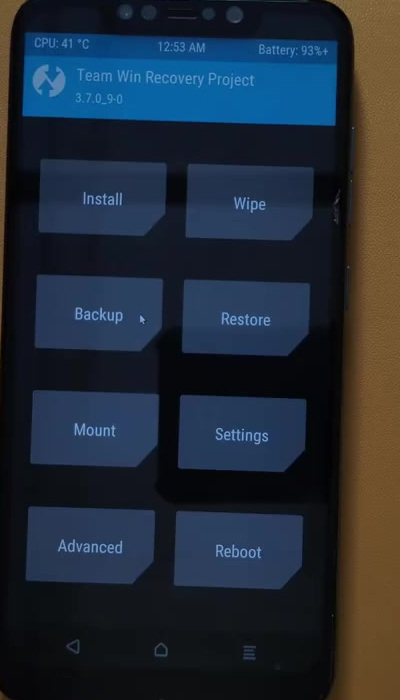
From here, you can use TWRP for supported advanced tasks such as installing ZIP files, flashing custom ROMs, creating backups, or managing partitions.
Important Notes
Before installing TWRP, remember these points:
- Your bootloader must be unlocked before flashing TWRP.
- Unlocking the bootloader normally deletes phone data.
- Always download TWRP from the official page for your exact device.
- Confirm both the phone model and codename before flashing.
- Do not use another device’s TWRP image.
- Your phone may require different commands or partition names.
- Boot directly into TWRP after flashing to prevent stock recovery from replacing it.
Troubleshooting
ADB Devices Not Showing Phone
If the adb devices command does not show your phone, make sure USB debugging is enabled.
Also check the phone screen and allow the USB debugging permission popup.
If it still does not work, try another USB cable, another USB port, or reinstall your phone’s USB drivers.
Fastboot Devices Not Detecting Phone
If fastboot devices does not show the phone, make sure the phone is actually in Fastboot Mode.
Try changing the USB port or USB cable.
On Windows, you may also need proper Fastboot drivers for your device.
TWRP Does Not Open After Flashing
If TWRP does not open after flashing, your phone may have restored the original stock recovery during the first Android boot.
To avoid this, flash TWRP again and boot directly into recovery immediately after running the Fastboot reboot command.
Command Fails While Flashing
If the flashing command fails, check whether the bootloader is unlocked.
Also make sure the TWRP image is inside the Platform-Tools folder and renamed correctly as:
twrp.imgIf your device’s official TWRP guide uses a different command, follow that official command instead.
Frequently Asked Questions
Can I install TWRP on any Android phone?
No. TWRP availability depends on your phone model. You should check the official TWRP device page to see whether your device is supported.
Do I need an unlocked bootloader?
Yes. In most cases, the bootloader must be unlocked before flashing TWRP Recovery.
Will unlocking the bootloader delete my data?
Yes, unlocking the bootloader normally deletes all data stored on the phone. Always back up your important files before unlocking.
Can I use this same TWRP file on another phone?
No. TWRP images are device-specific. You must use the file made for your exact phone model and codename.
Why should I boot directly into TWRP after flashing?
Some phones can replace custom recovery with stock recovery during the first Android boot. Booting directly into TWRP helps prevent that.
What if my phone’s TWRP page shows a different command?
Follow the command shown on your phone’s official TWRP page. Different phones can use different commands, files, or partition names.
Conclusion
So, this is how you can install TWRP Recovery on an Android phone using a Windows PC.
In this guide, we downloaded the correct TWRP image for the phone, installed Android SDK Platform-Tools, enabled USB debugging, checked ADB and Fastboot connection, flashed the TWRP image, and then booted directly into TWRP Recovery.
Remember, there is no universal TWRP installation process for every Android device. Always open the official TWRP page for your exact phone model and follow the device-specific instructions given there.
If you face any problem, note your complete phone model, device codename, Android version, and the exact error message shown on the screen. This information will make troubleshooting much easier.