Old Android phones usually become slow and outdated because they stop receiving official Android updates. But sometimes, the hardware is still good enough for daily use. The main problem is the old software.
In this guide, I will show you how I turned my old POCO F1 into a clean Google Pixel-style phone by installing PixelOS Android 15. After installing this custom ROM, the old MIUI interface was replaced with a clean Pixel launcher, modern Android features, useful Google apps, and a much smoother experience.
This tutorial is based on the POCO F1, also known by its codename beryllium. However, if your phone is officially supported by PixelOS, you can follow a similar process by using the files and instructions for your own device.
Why Install PixelOS on an Old Phone?
The POCO F1 was launched many years ago, but its hardware is still quite usable. The Snapdragon processor and 6GB RAM can still handle normal daily tasks like calling, messaging, browsing, YouTube, social media, and light multitasking.
But the problem is software. The phone is still running MIUI 12 based on Android 10, and it no longer receives the latest Android updates or security updates from the company. The interface looks old, and there are also unnecessary preinstalled apps that many users never use.
By installing PixelOS Android 15, the same old phone gets a fresh software experience. The phone starts feeling cleaner, faster, and more modern, almost like using a Google Pixel-style device.
What You Need Before Starting
Before installing PixelOS, you need to download the required files for your device. For the POCO F1, I used the PixelOS ROM file, PixelOS recovery image, and the super empty image file.
You can download the required ROM and recovery files from the official PixelOS website.
You will also need Android Platform Tools on your Windows PC. Platform Tools contains ADB and Fastboot, which are required to send commands from your computer to your phone.
Step 1: Enable Developer Options
First, open Settings on your Android phone. Then go to About Phone.
Now tap on the MIUI Version or Build Number seven times. After a few taps, you should see a message saying that Developer Options have been enabled.
After that, go back to the main Settings page. On Xiaomi, Redmi, or POCO phones, open Additional Settings, and then go to Developer Options.
Step 2: Enable OEM Unlocking and USB Debugging
Inside Developer Options, first check that OEM Unlocking is enabled. This is important because your phone’s bootloader must be unlocked before installing PixelOS.
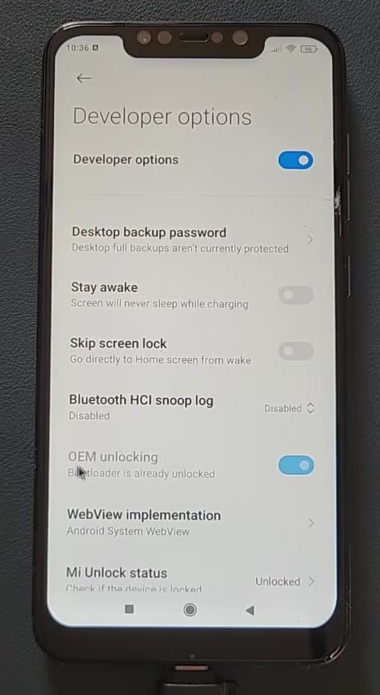
After that, scroll down and enable USB Debugging. USB Debugging allows your phone to communicate with the computer using ADB commands.
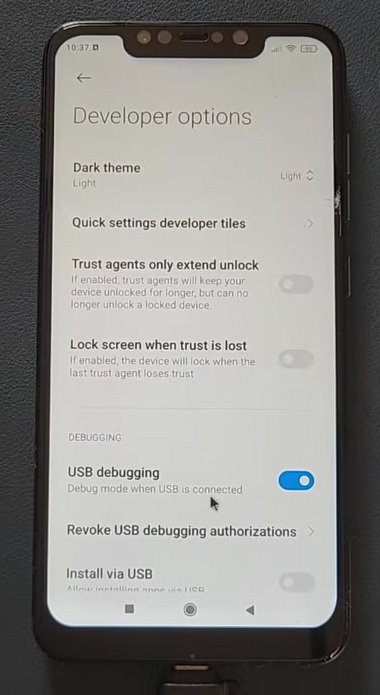
Now connect your phone to your PC using a good quality USB cable. I recommend using the original cable or a proper data cable. Avoid using a charging-only cable.
Also, open the USB options on your phone and select File Transfer mode instead of Charging Only mode.
Step 3: Download the Required PixelOS Files
Now open the PixelOS website on your PC and search for your device. Since I am using the POCO F1, I searched for POCO F1 or beryllium.
Beryllium is the codename of the POCO F1. So whenever you download files for the POCO F1, make sure the device codename is beryllium.
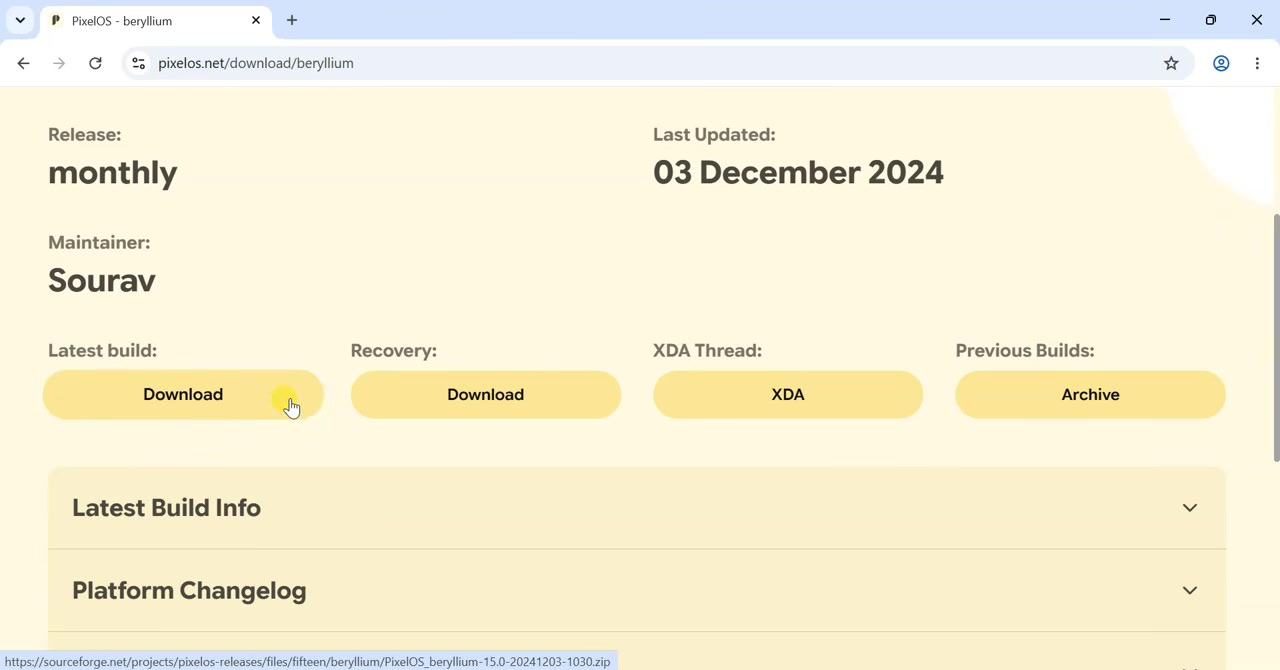
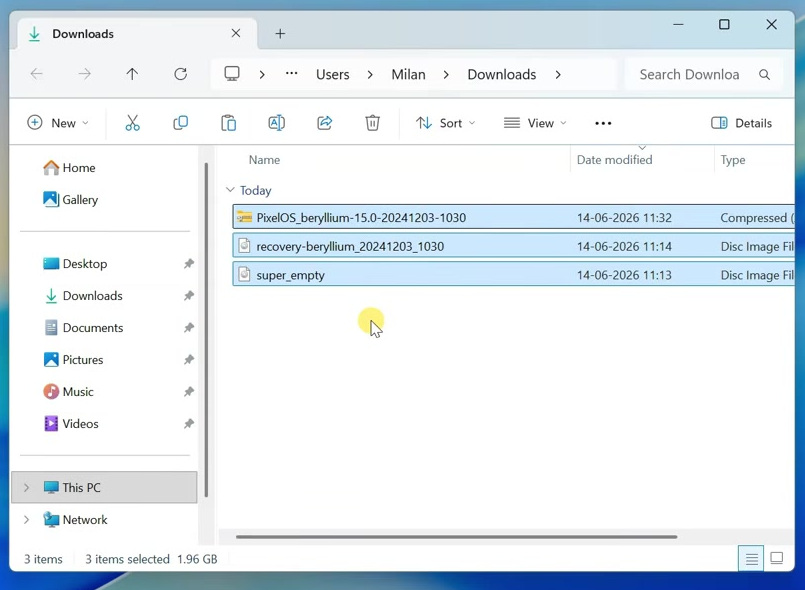
For the POCO F1 installation, I downloaded these files:
- PixelOS ROM zip file
- PixelOS recovery image
- Super empty image file
After downloading all the required files, keep them in one folder so they are easy to find during the flashing process.
Step 4: Set Up Platform Tools on Your PC
After downloading Android Platform Tools, extract the zip file on your computer.
Now open the extracted platform-tools folder. Inside this folder, you will see files like adb, fastboot, and other related files.
Click on the address bar at the top of the folder, type CMD, and press Enter. This will open Command Prompt directly inside the platform-tools folder.
Step 5: Check ADB Connection
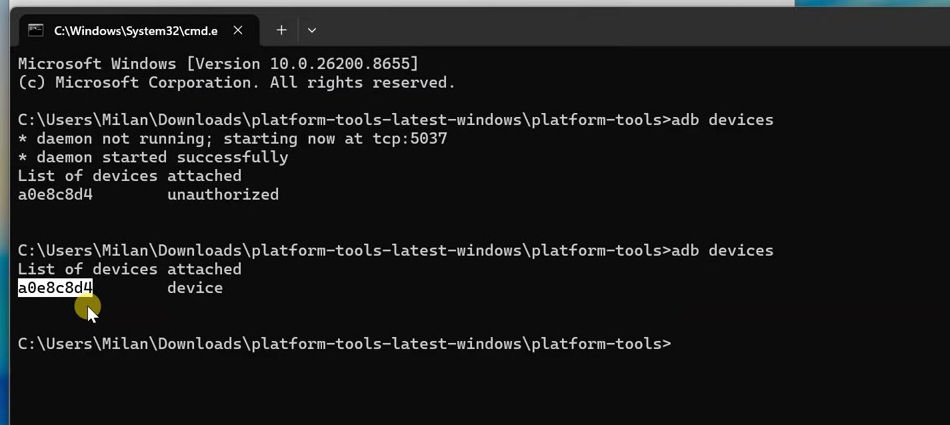
Now we need to check whether the phone is detected by ADB. In the Command Prompt window, type the following command:
adb devices
The first time you run this command, you may see a USB Debugging permission popup on your phone. Tick Always allow from this computer and tap OK.
Now run the same command again:
adb devices
If your phone’s serial number appears in the Command Prompt window, that means ADB is working properly.
Step 6: Boot the Phone into Fastboot Mode
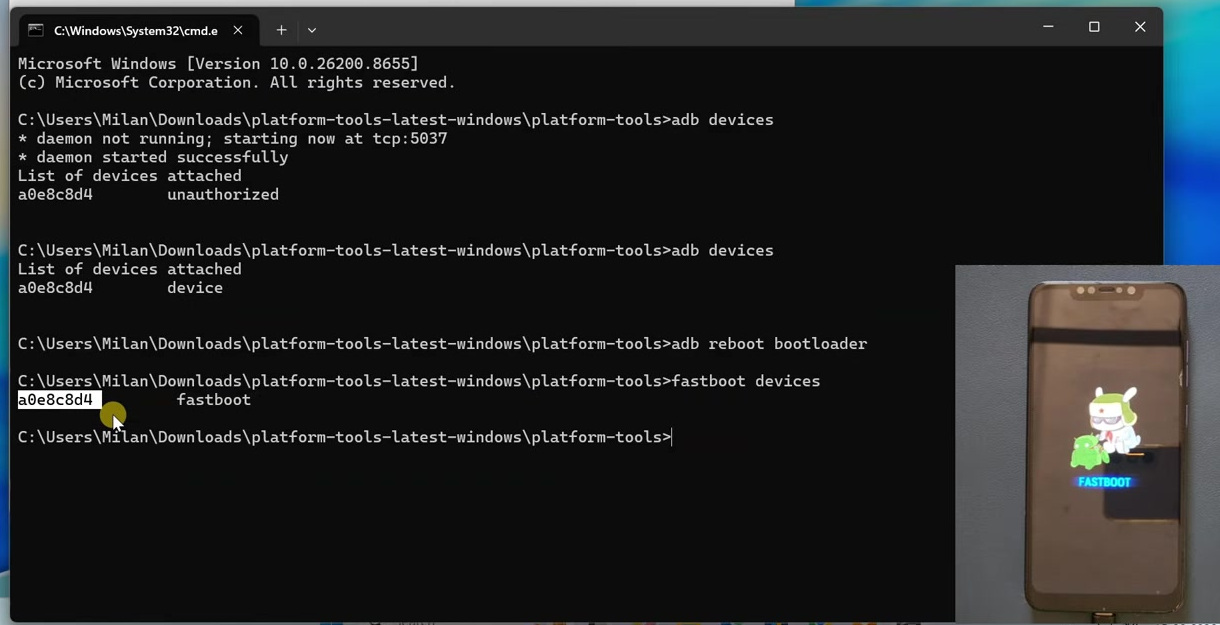
Once ADB is working, we need to boot the phone into Fastboot mode. Type this command and press Enter:
adb reboot bootloader
Your phone will now restart and boot into Fastboot mode. On the phone screen, you should see the Fastboot logo.
Now check if your computer is detecting the phone in Fastboot mode by running this command:
fastboot devices
If you see your phone’s serial number, Fastboot is working properly.
Step 7: Wipe the Super Partition
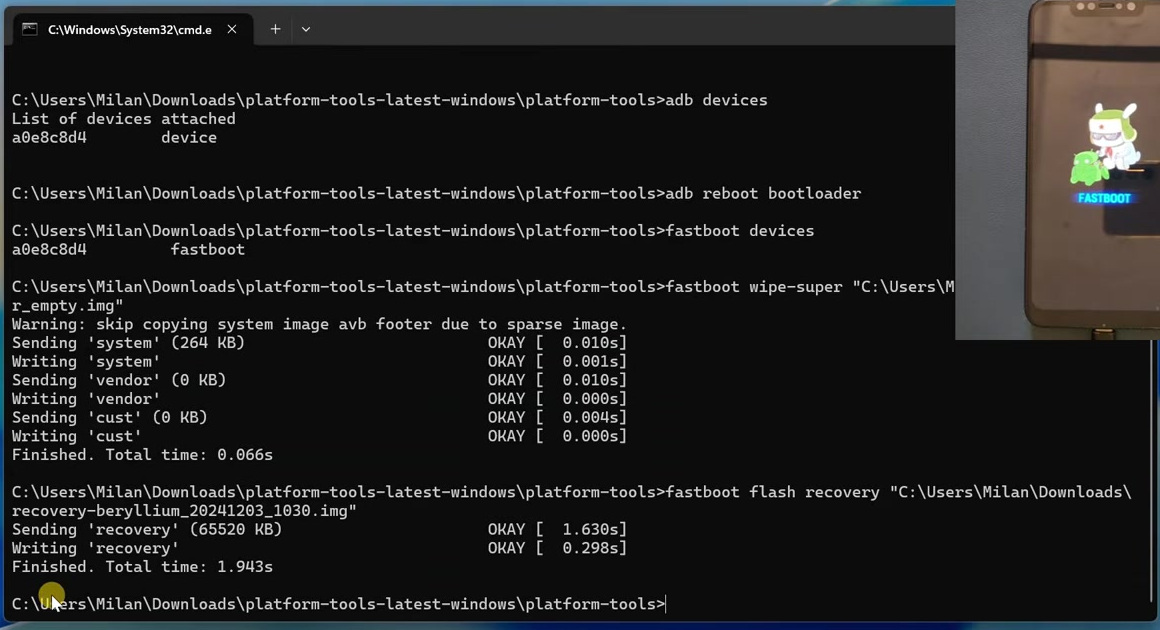
For the POCO F1, we first need to wipe the super partition using the super empty image file.
In Command Prompt, type this command:
fastboot wipe-super
After typing the command, drag and drop the super empty image file into the Command Prompt window to copy its full path. Then press Enter.
Step 8: Flash PixelOS Recovery
Next, we need to flash the PixelOS recovery image.
Type this command:
fastboot flash recovery
Now drag and drop the PixelOS recovery image file into the Command Prompt window and press Enter.
This will flash PixelOS recovery on your phone.
Step 9: Boot into PixelOS Recovery
After flashing the recovery, you need to boot directly into recovery mode.
On the POCO F1, press and hold Volume Up + Power together. Keep holding the buttons until the phone restarts and boots into PixelOS recovery.
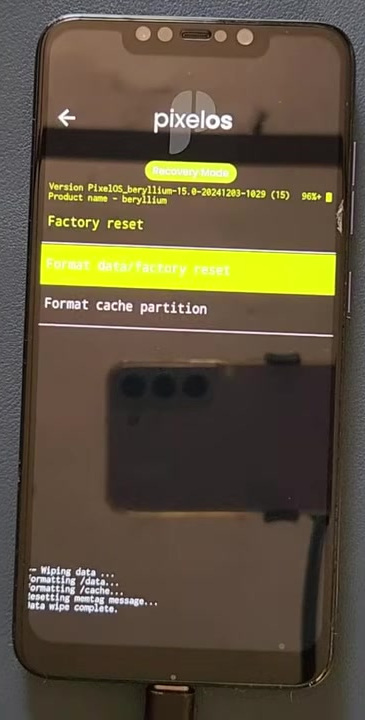
Now you should see the PixelOS recovery screen.
Step 10: Format Data
Inside PixelOS recovery, the first thing we need to do is format the data. This step is very important because we are switching from MIUI to a completely different custom ROM.
Select Factory Reset. Then select Format Data / Factory Reset. Confirm the format process.
After the data wipe is complete, go back to the main recovery screen.
Step 11: Start ADB Sideload Mode
From the main recovery screen, select Apply Update. Then select Apply from ADB.
Your phone is now ready to receive the PixelOS ROM file from the computer.
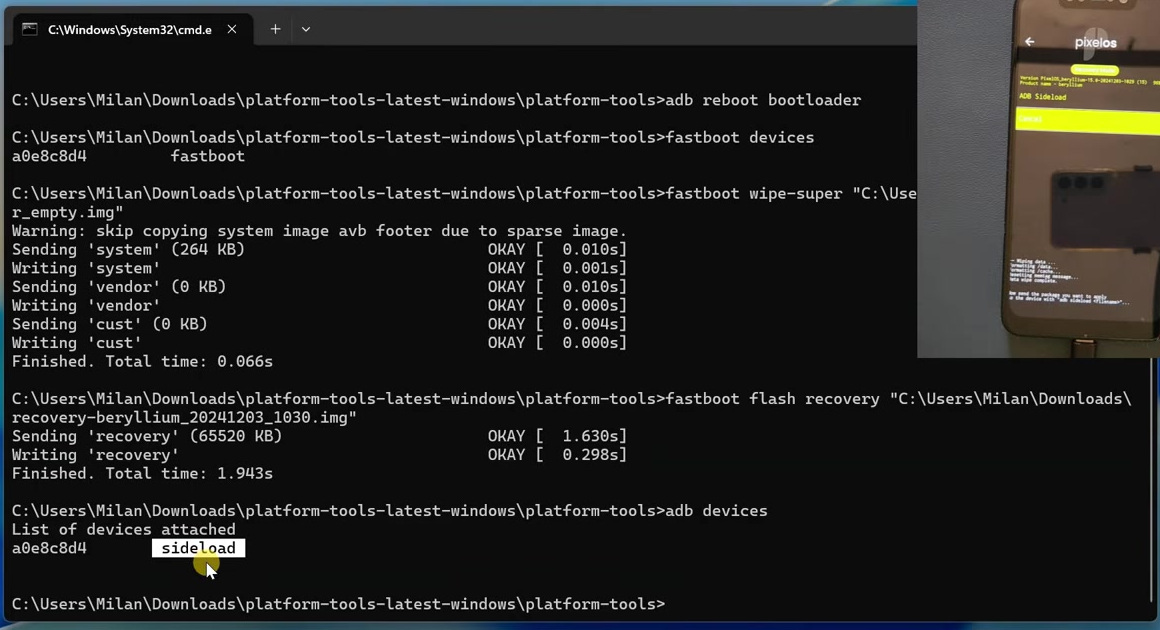
On your PC, go back to the Command Prompt window and check whether the phone is detected in sideload mode:
adb devices
If everything is working properly, your device should appear with the word sideload.
Step 12: Install PixelOS Android 15
Now we can finally install the PixelOS ROM.
Type this command in Command Prompt:
adb sideload
After typing the command, drag and drop the PixelOS ROM zip file into the Command Prompt window. Then press Enter.
The flashing process will now start. You will see the installation progress on both the computer and the phone.
Do not disconnect the USB cable, close the Command Prompt window, or press random buttons on the phone during this process. The ROM file is large, so the installation can take several minutes.
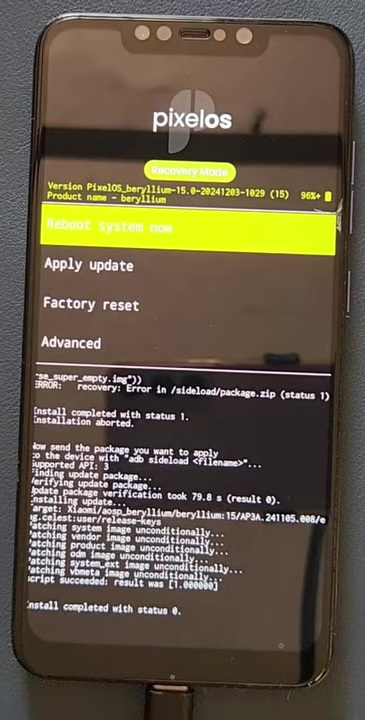
If the installation gets cancelled or shows status code 1, you can try again. On your phone, select Apply Update and then Apply from ADB again. Then run the same ADB sideload command using the PixelOS ROM file.
Once the installation is successful, you should see a message like Installation completed with status code 0. That means the ROM has been flashed properly.
Step 13: Reboot the Phone
After the installation is complete, go back to the main recovery menu and select Reboot System.
This is the first boot after installing PixelOS, so it will take more time than a normal restart. It may take 4 to 5 minutes, or sometimes a little longer. So don’t panic if the boot animation stays on the screen for a few minutes.
PixelOS Android 15 Running on POCO F1
After the setup is complete, the phone will boot into PixelOS. The old MIUI interface will be gone, and you will now get a clean Pixel-style home screen.
To confirm the Android version, open Settings, scroll down to About Phone, and check the Android version. In my case, this old POCO F1 is now running Android 15 with PixelOS.
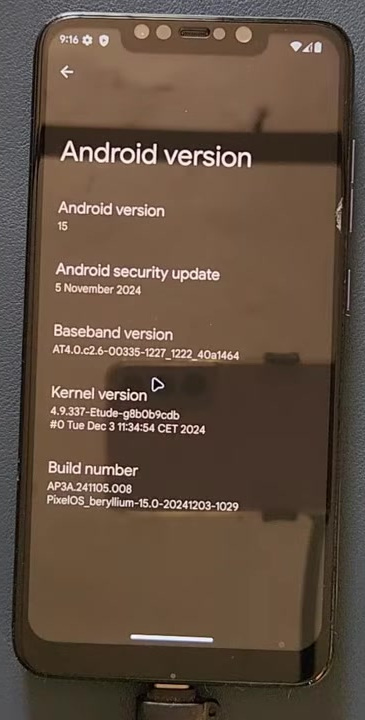
Of course, this does not turn the POCO F1 into a real Google Pixel device. But the software experience becomes very similar to a Pixel phone. You get a clean Android UI, Google apps, better privacy features, and a much fresher experience compared to the old MIUI Android 10 software.
Final Thoughts
This is how I turned my 8-year-old POCO F1 into a Google Pixel-style phone using PixelOS Android 15.
Custom ROMs are very useful for old Android phones. Even when the company stops providing official updates, the custom ROM community can keep the device alive with newer Android versions and a cleaner user experience.
If you have an old Android phone that is still powerful enough but feels outdated because of old software, installing a custom ROM like PixelOS can give it a fresh new life. Just make sure your device is officially supported, download the correct files, unlock the bootloader, and carefully follow the instructions for your exact phone model.