Do you want to root your Xiaomi, Redmi, or POCO phone using Magisk without installing TWRP? In this guide, I will show you how to root a Xiaomi, Redmi, or POCO device by patching the original boot image with Magisk and flashing it using Fastboot.
For this tutorial, the process is demonstrated on a POCO F1 running the official stock MIUI 12 ROM. However, the basic method can also work on many other Xiaomi, Redmi, and POCO phones running MIUI or HyperOS.
This method does not require TWRP, OrangeFox, or any other custom recovery. Instead, we will use the original firmware boot image, patch it with Magisk, and then flash the patched image to the phone using Fastboot.
What This Method Does
This method roots your phone by using Magisk to patch the original boot image from your phone’s exact firmware version.
After patching, the Magisk-patched boot image is flashed to the phone through Fastboot. Once the phone reboots, Magisk will be installed, and root access will be available.
The most important part of this process is using the correct boot image. The boot image must come from the exact firmware version currently installed on your phone. If you use the wrong boot image, your phone may fail to boot.
Requirements
Before starting, make sure you have these things ready:
- A Xiaomi, Redmi, or POCO phone
- Unlocked bootloader
- Windows PC
- USB data cable
- Exact Fastboot ROM for your phone model and firmware version
- Magisk APK
- Android SDK Platform Tools
- Root Checker app for verification
You should also back up your important files before continuing. This method normally does not wipe data, but rooting and flashing always carry some risk.
Required Links
You can use these tools for this tutorial:
Step 1: Check Current Root Status
Before starting, you can check whether your phone is already rooted or not.
Install and open the Root Checker app on your phone. Tap on Verify Root.
If your phone is not rooted, Root Checker will show that root access is not properly installed on the device.
This confirms that the phone is currently not rooted, and we can continue with the rooting process.
Step 2: Enable Developer Options
First, we need to enable Developer Options on the phone.
Open Settings on your Xiaomi, Redmi, or POCO phone.
Now go to About phone.
If your phone is running MIUI, tap repeatedly on MIUI version until you see a message saying Developer Options have been enabled.
If your phone is running HyperOS, tap repeatedly on the OS version instead.
After this, Developer Options will be enabled on your phone.
Step 3: Enable USB Debugging
Now return to the main Settings page.
Open Additional settings, then open Developer options.
Scroll down and find USB debugging.
Turn on USB debugging. Read the warning and tap Accept or OK.
USB debugging allows your computer to communicate with the phone using ADB. It does not root the phone by itself.
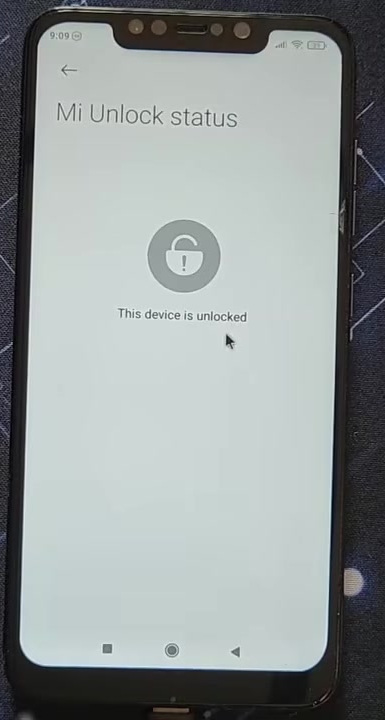
Step 4: Make Sure the Bootloader is Unlocked
Your phone’s bootloader must be unlocked before you can flash the Magisk-patched boot image.
If the bootloader is locked, Fastboot will not allow you to flash the modified boot image.
For Xiaomi, Redmi, and POCO phones, bootloader unlocking is usually done using the official Mi Unlock Tool. If your bootloader is not unlocked yet, unlock it first and then continue with this guide.
Step 5: Check Your MIUI or HyperOS Version
Now open Settings again and go to About phone.
Check the complete MIUI or HyperOS version currently installed on your phone.
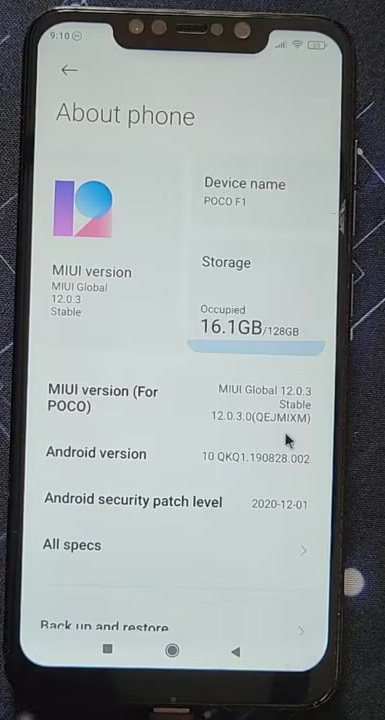
Take a screenshot or write down the full build number. This is very important because the boot image must come from the exact firmware version installed on your phone.
For example, if your phone is running a specific MIUI 12 build, you need the Fastboot ROM for that same device, same region, and same build version.
Step 6: Get the Matching Fastboot ROM
Now move to your computer.
Open your browser and search for the Fastboot ROM matching your complete phone model and installed firmware version.
Make sure you download the Fastboot ROM, not the Recovery ROM.
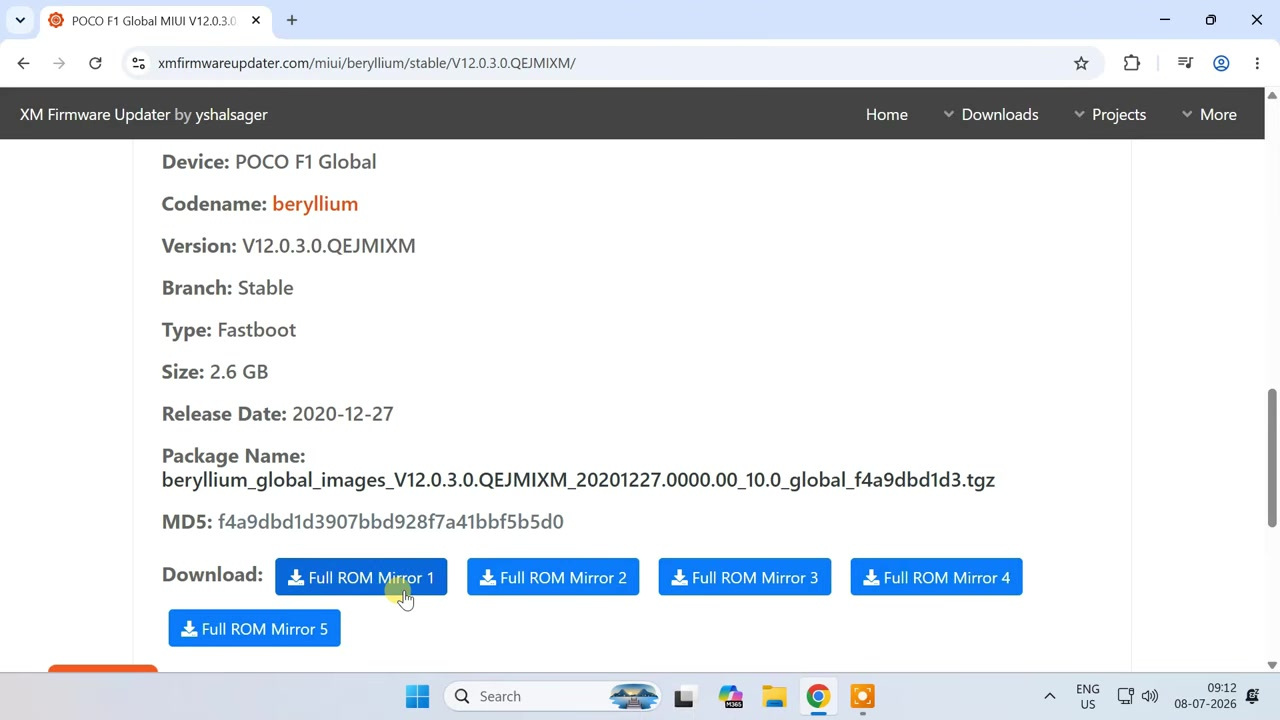
The Fastboot ROM is usually provided as a .tgz file. This package contains the original boot image that we need to patch with Magisk.
Step 7: Extract the Fastboot ROM
After the Fastboot ROM is saved on your computer, extract it using 7-Zip or any similar extraction tool.
After extracting, open the extracted firmware folder.
Now open the images folder.
Inside this folder, look for one of these files:
- boot.img
- init_boot.img
On older devices like the POCO F1 running MIUI 12, you usually need to patch boot.img.
On some newer Xiaomi, Redmi, and POCO phones, you may need to patch init_boot.img instead.
For this POCO F1 tutorial, we will use boot.img.
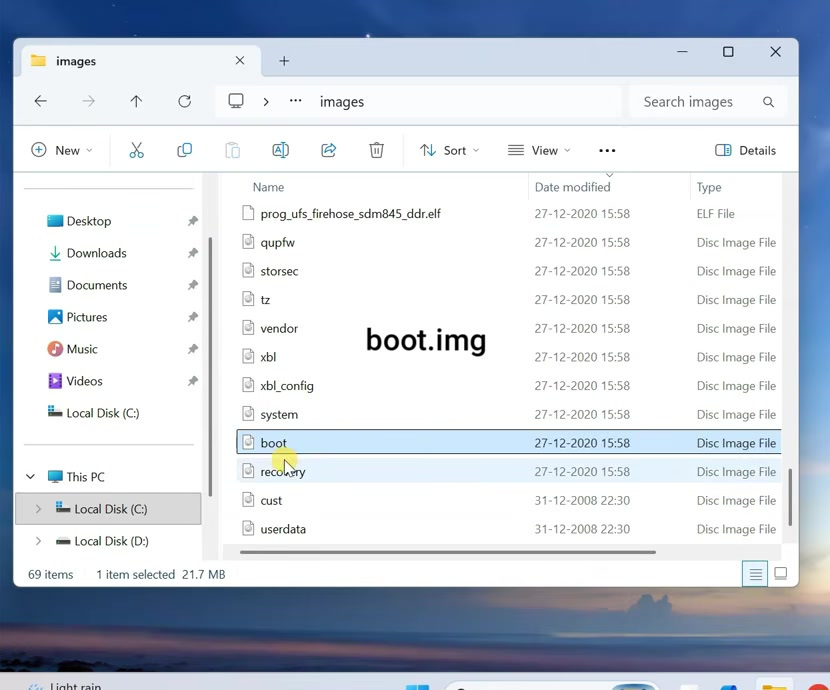
Step 8: Copy boot.img to the Phone
Now copy the required image file to your phone’s internal storage.
For POCO F1, copy:
boot.imgIf your device uses init_boot, then copy:
init_boot.imgYou can place the file in the Downloads folder or any location that is easy to find from the Magisk app.
Step 9: Install Magisk on the Phone
Now download the latest stable Magisk APK from the official Magisk GitHub page.
Install the APK on your phone. If Android blocks the installation, allow installation from your browser or file manager and install it again.
After installation, open the Magisk app.
Step 10: Patch the Boot Image Using Magisk
Inside the Magisk app, tap on Install.
Then tap on Next.
Now select Select and Patch a File.
From your phone storage, select the boot.img file that you copied earlier.
If your device uses init_boot.img, select that file instead.
After selecting the file, tap on Let’s Go.
Magisk will now patch the original boot image.
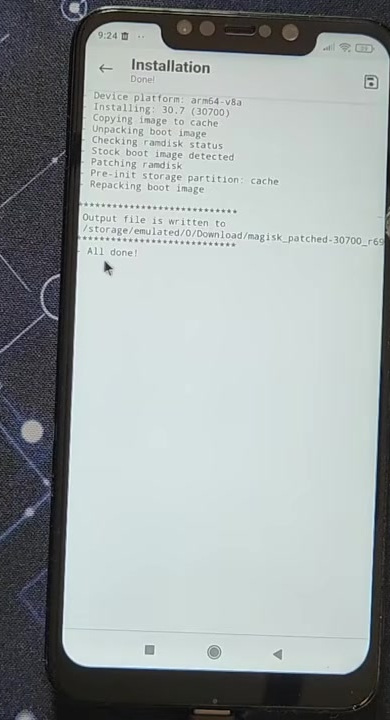
Once the process is complete, you should see the message:
All DoneThe patched file will be saved inside your phone’s Download folder. The file name will look similar to:
magisk_patched-xxxxx.imgStep 11: Copy the Patched Image to the Computer
Now copy the Magisk-patched image file from the phone back to your computer.
You can copy it using a USB cable in File Transfer mode.
Place the patched image somewhere easy to find, such as your Desktop or Downloads folder.
Step 12: Set Up Android SDK Platform Tools
Now we need ADB and Fastboot tools to communicate with the phone and flash the patched image.
Download Android SDK Platform Tools for Windows from the official Android Developers website.
After saving the ZIP file, extract it.
Now open the extracted platform-tools folder.
Click on the address bar at the top, type:
cmdThen press Enter.
This will open Command Prompt directly inside the Platform Tools folder.
Step 13: Check ADB Connection
Now connect the phone to the computer using a proper USB data cable.
On the phone, select File transfer mode if it asks for USB mode.
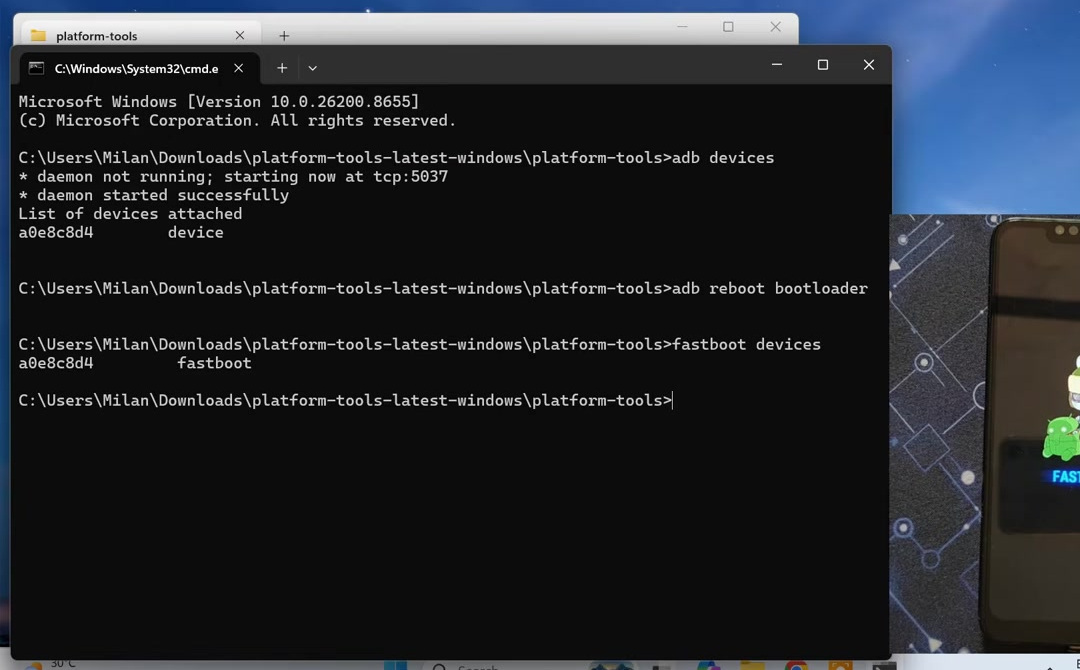
In Command Prompt, run this command:
adb devicesIf this is the first time connecting the phone, you may see a USB debugging permission popup on your phone.
Tap on Allow.
After that, run the command again if needed.
If the phone is detected correctly, you should see the serial number of the phone.
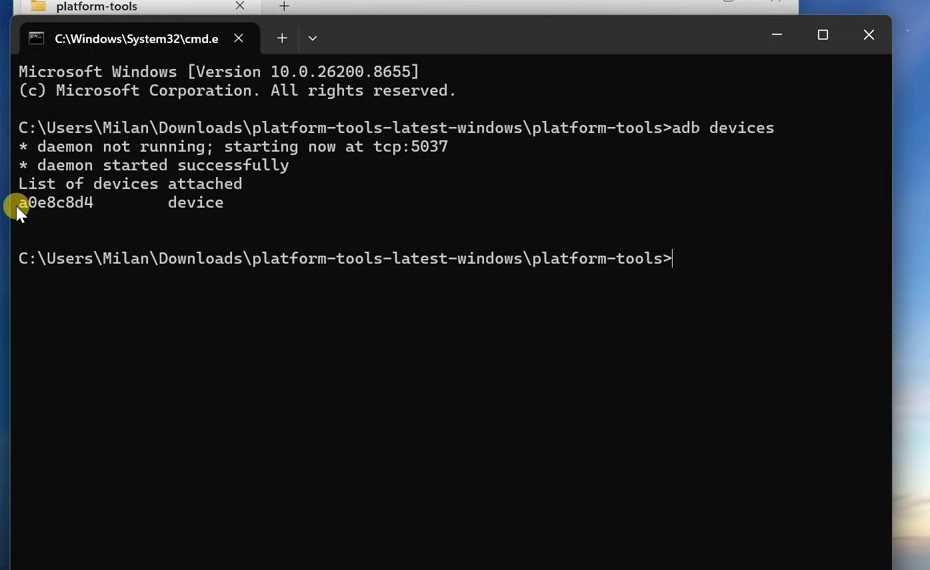
Step 14: Reboot the Phone into Fastboot Mode
Now reboot the phone into Fastboot mode using this command:
adb reboot bootloaderThe phone will restart and show the Fastboot screen.
Once the phone is in Fastboot mode, check the Fastboot connection using this command:
fastboot devicesIf the phone is properly detected, its serial number will appear in Command Prompt.
Step 15: Flash the Magisk-Patched Image
Now we are ready to flash the patched image.
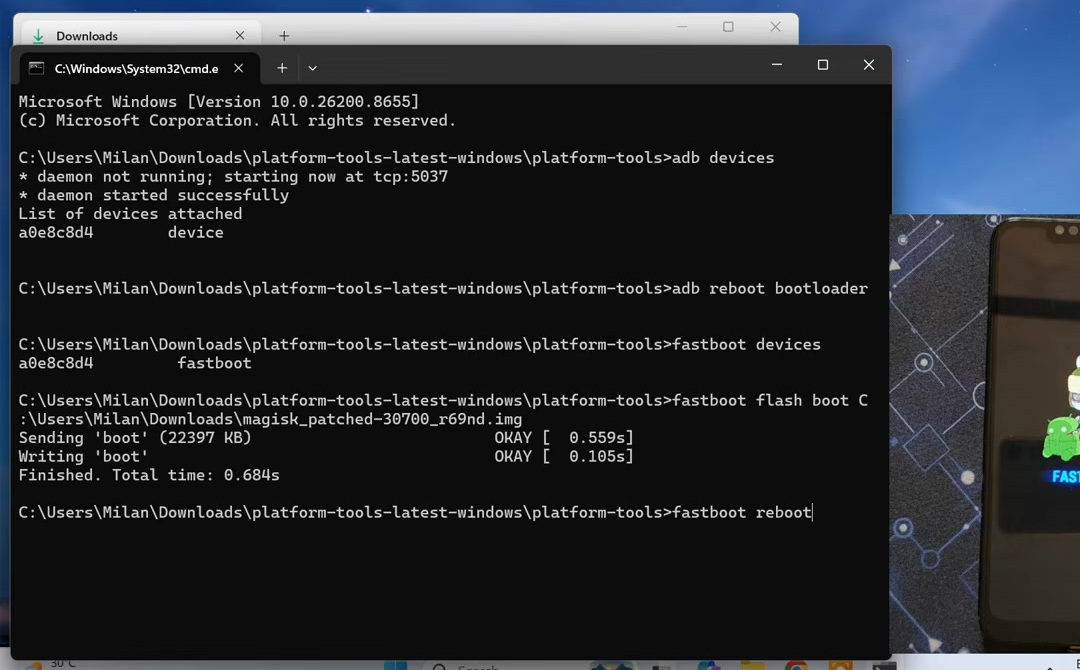
If your phone uses boot.img, type this command but do not press Enter yet:
fastboot flash bootAfter the word boot, add a space. Then drag and drop the Magisk-patched image file into the Command Prompt window.
The command will look something like this:
fastboot flash boot "C:\Users\YourName\Downloads\magisk_patched-xxxxx.img"Now press Enter.
If your phone uses init_boot.img, use this command instead:
fastboot flash init_boot "C:\Users\YourName\Downloads\magisk_patched-xxxxx.img"Wait until the flashing process is complete.
Step 16: Reboot the Phone
After the patched image is flashed successfully, reboot the phone using this command:
fastboot rebootThe phone will now restart.
The first boot may take a little longer than usual, so wait patiently.
Step 17: Check Magisk Installation
After the phone starts, open the Magisk app.
In the Magisk section, it should now show an installed version number instead of Not Installed.
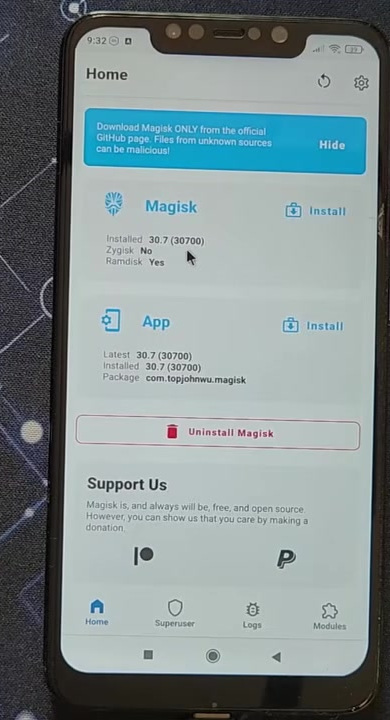
This means Magisk has been installed successfully.
Step 18: Verify Root Access
Now open the Root Checker app.
Tap on Verify Root.
Magisk should show a superuser permission popup. Grant the permission.
After that, Root Checker should confirm that root access is properly installed on the phone.
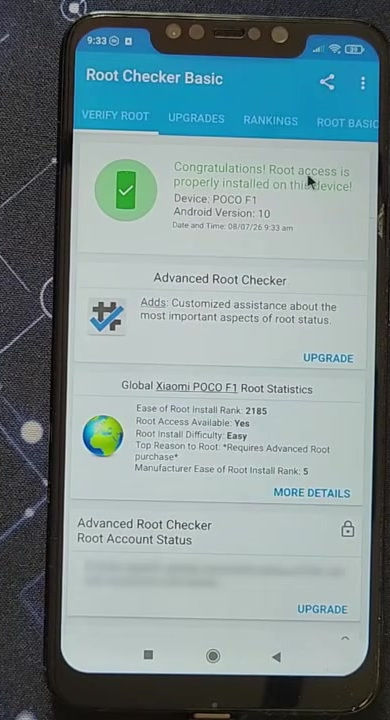
This means your Xiaomi, Redmi, or POCO phone has been successfully rooted using Magisk.
How to Unroot Xiaomi, Redmi, or POCO Phone
If you ever want to remove root from your phone, you can do it directly from the Magisk app.
Step 1: Open Magisk
Open the Magisk app on your phone.
Step 2: Start Uninstall Process
Tap on Uninstall Magisk.
Step 3: Select Complete Uninstall
Now select Complete Uninstall.
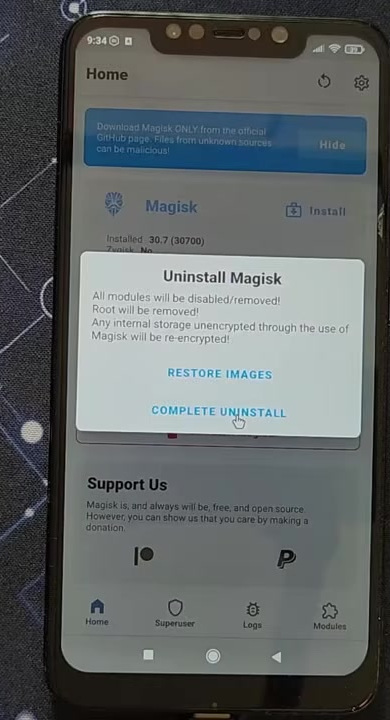
Allow Magisk to complete the process. The phone may restart automatically.
Step 4: Verify Root Removal
After the phone restarts, open Root Checker again.
Tap on Verify Root. It should now confirm that root access is no longer installed.
Important Notes
Before using this method, remember these points:
- The bootloader must be unlocked before flashing the patched image.
- Use the boot image from the exact firmware version installed on your phone.
- Use boot.img or init_boot.img depending on your device.
- Do not flash a patched image made from another phone’s firmware.
- Rooting can affect banking apps, payment apps, DRM apps, updates, and warranty.
- Only grant root permission to trusted apps.
Troubleshooting
ADB Devices Not Showing Phone
If adb devices does not show your phone, make sure USB debugging is enabled.
Also check your phone screen and allow the USB debugging popup.
If it still does not work, try another USB cable, another USB port, or reinstall the phone USB drivers.
Fastboot Devices Not Detecting Phone
If fastboot devices does not show your phone, try changing the USB port or cable.
Also make sure the phone is actually in Fastboot mode.
On Windows, you may also need proper Fastboot drivers for your device.
Phone Bootloops After Flashing
If the phone bootloops after flashing, you may have used the wrong boot image or wrong firmware version.
Flash the original boot image from the correct Fastboot ROM to restore the phone.
Magisk Shows Not Installed
If Magisk still shows Not Installed, make sure you flashed the correct patched image to the correct partition.
For older devices, it may be boot. For newer devices, it may be init_boot.
Banking Apps Not Working After Root
Some banking and payment apps may stop working after root because they detect system modification.
This is one of the common limitations of rooting, so keep this in mind before rooting your primary phone.
Frequently Asked Questions
Can I root Xiaomi, Redmi, or POCO without TWRP?
Yes, you can root many Xiaomi, Redmi, and POCO phones without TWRP by patching the original boot image using Magisk and flashing it through Fastboot.
Do I need to unlock the bootloader?
Yes, the bootloader must be unlocked before you can flash the Magisk-patched boot image.
Does this method wipe data?
Flashing the patched boot image normally does not wipe data. However, unlocking the bootloader usually wipes the phone, and any flashing process has some risk. So, backup is recommended.
Should I patch boot.img or init_boot.img?
It depends on your device. Older devices like the POCO F1 usually use boot.img. Some newer devices may use init_boot.img.
Can I use any boot.img file?
No. You must use the boot image from the exact firmware version currently installed on your phone.
Can I unroot later?
Yes, you can open Magisk, tap Uninstall Magisk, and choose Complete Uninstall.
Will rooting affect banking apps?
It can. Many banking and payment apps may detect root and stop working properly.
Conclusion
So, this is how you can root a Xiaomi, Redmi, or POCO phone using Magisk without installing TWRP or any custom recovery.
First, we enabled USB debugging and confirmed that the bootloader was unlocked. Then we downloaded the matching Fastboot ROM, extracted the correct boot image, patched it using Magisk, and flashed the patched image using Fastboot.
After rebooting, Magisk was installed successfully, and root access was verified using Root Checker.
This is a clean method to root many Xiaomi, Redmi, and POCO devices, but make sure you use the correct firmware files and understand the risks before continuing.