Do you want to install Windows 11 directly on an Android phone? In this guide, I will show you how to install Windows 11 ARM on a supported Android device and use it like a real Windows computer.
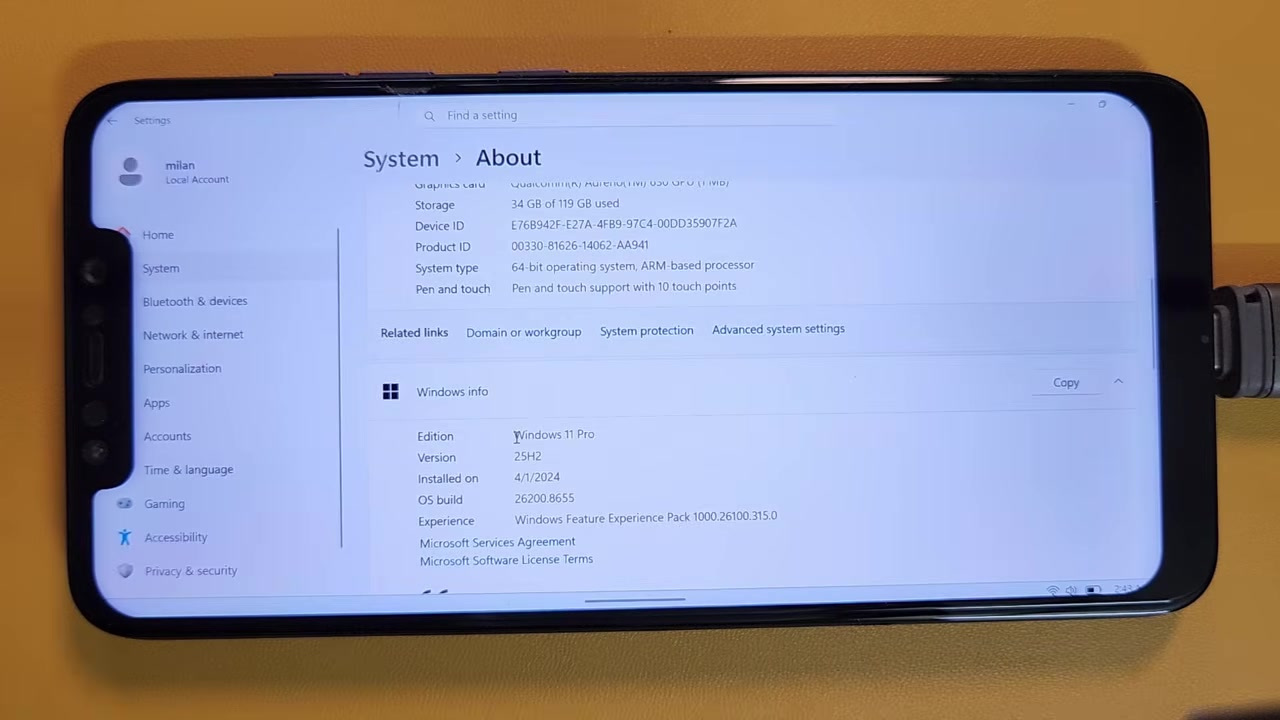
This is not a Windows launcher, screen mirroring, or remote desktop connection. This is the actual ARM version of Windows 11 running directly on the phone hardware. In this tutorial, the process is demonstrated on the POCO F1, also known by its codename beryllium.
After installation, you can boot into Windows 11, open Windows Settings, use File Explorer, browse the web in Microsoft Edge, and install compatible Windows ARM applications. On the POCO F1, features like touchscreen, Wi-Fi, Bluetooth, speakers, brightness control, and battery status can work properly depending on the installation and drivers.
Important Things to Know Before Starting
Windows 11 cannot be installed on every Android phone. This method works only on selected supported devices because each phone needs compatible UEFI firmware, Windows drivers, recovery files, and installation scripts.
This is possible because of the Renegade Project and other community developers who created custom UEFI firmware and Windows drivers for selected Android devices.
For this guide, the demo device is the POCO F1. The method and files shown here are specifically for the POCO F1. Do not use the same recovery image, installer, driver package, or commands on another phone unless that phone has its own dedicated guide.
Even if another phone has the same Snapdragon processor, the partition layout, recovery file, drivers, and UEFI boot files can be different.
Check Supported Devices
Before downloading any file, first check whether your phone is supported. Open the Renegade Project supported devices page and look for your device name or codename.
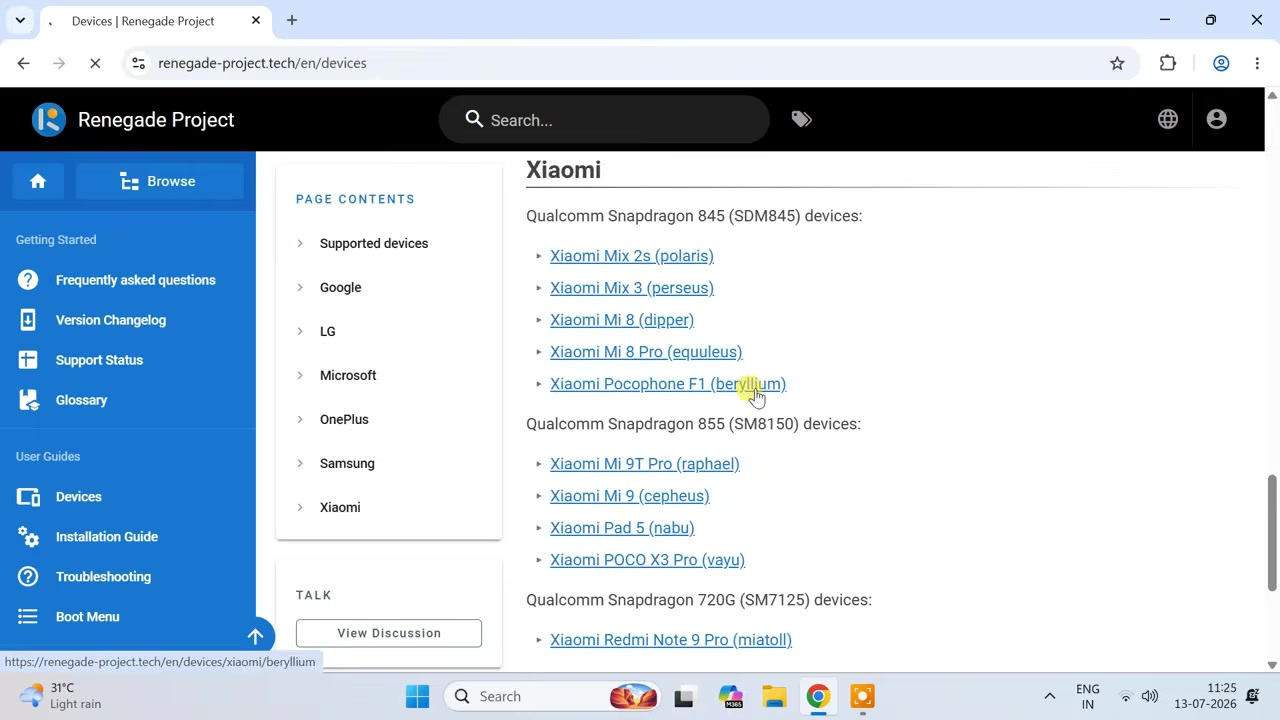
If your phone is not listed, do not continue with random files from another device. Using files made for another phone can break the installation or stop your phone from booting.
What You Need
Before starting the installation, make sure you have these things ready:
- A supported Android phone
- An unlocked bootloader
- A Windows PC
- A USB data cable
- Android SDK Platform Tools
- Modified TWRP or OrangeFox recovery for your exact device
- Compatible Windows ARM ESD image
- Compatible WinInstaller ZIP for your exact device
- At least 70 percent phone battery
- USB OTG storage or microSD card for backup
You should also back up your photos, videos, documents, and other important files before continuing. This process can erase everything stored on the phone.
Android SDK Platform Tools
To flash the modified recovery, you need Fastboot on your computer. Fastboot is included in Android SDK Platform Tools.
After saving the Platform Tools ZIP file on your computer, extract it. We will use this folder later to run Fastboot commands.
Bootloader Unlock Requirement
To flash a custom recovery, your phone’s bootloader must already be unlocked. If the bootloader is locked, you will not be able to flash the modified recovery.
For Xiaomi, Redmi, and POCO phones, the bootloader is usually unlocked using the official Mi Unlock Tool. If you do not know how to unlock the bootloader, you can follow a separate bootloader unlock guide first.
Step 1: Get the Modified Recovery for Your Phone
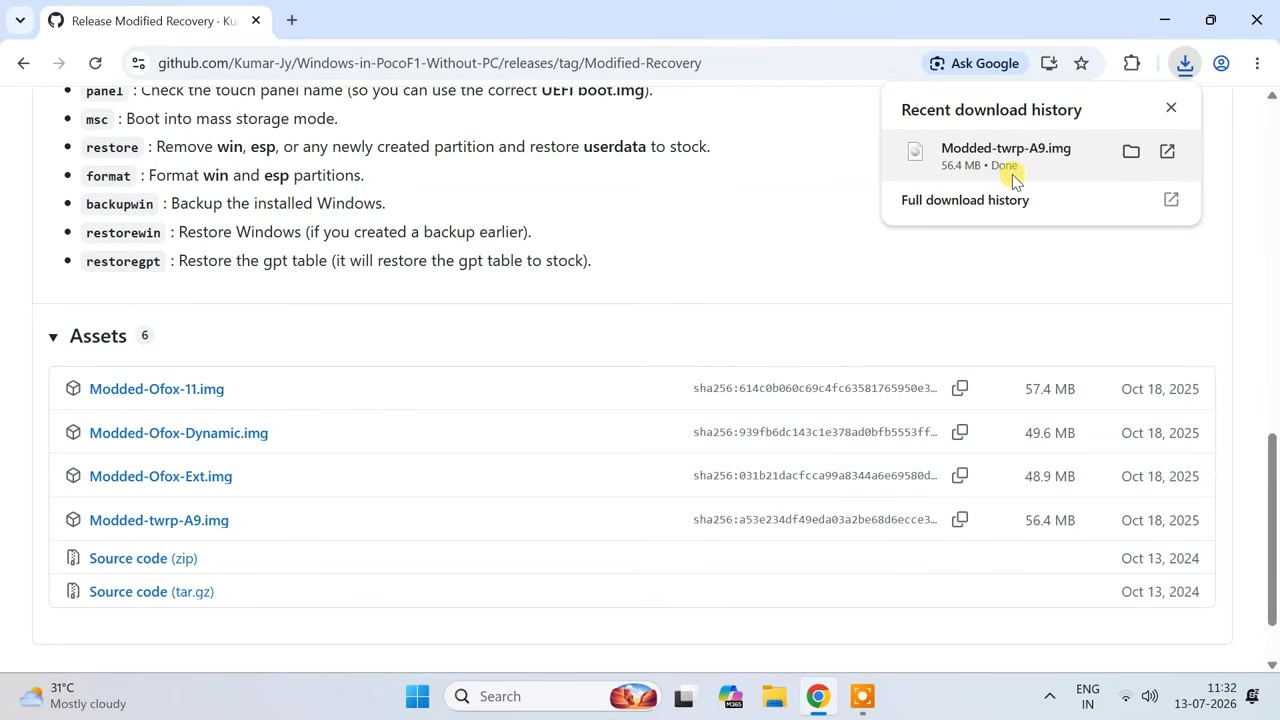
The first step is to install a modified TWRP or OrangeFox recovery on the phone.
A normal custom recovery is not enough for this installation because it may not include the special partitioning tools required for Windows installation. The modified recovery can create the Windows and EFI partitions directly from the phone.
For the POCO F1, download the modified recovery image from the device-specific guide. Make sure the recovery file is made for your exact device and codename.
Step 2: Boot the Phone into Fastboot Mode
Now power off the POCO F1 completely.
After that, press and hold the Volume Down and Power buttons together until the Fastboot screen appears.
Once the phone is in Fastboot mode, connect it to your computer using a USB cable.
Step 3: Open Command Prompt Inside Platform Tools
On your computer, open the extracted Platform Tools folder.
Click on the folder address bar, type:
cmdThen press Enter.
This will open a Command Prompt window directly inside the Platform Tools folder.
Step 4: Check Fastboot Connection
Now run this command:
fastboot devicesIf the phone is connected correctly, you should see the device serial number followed by the word fastboot.
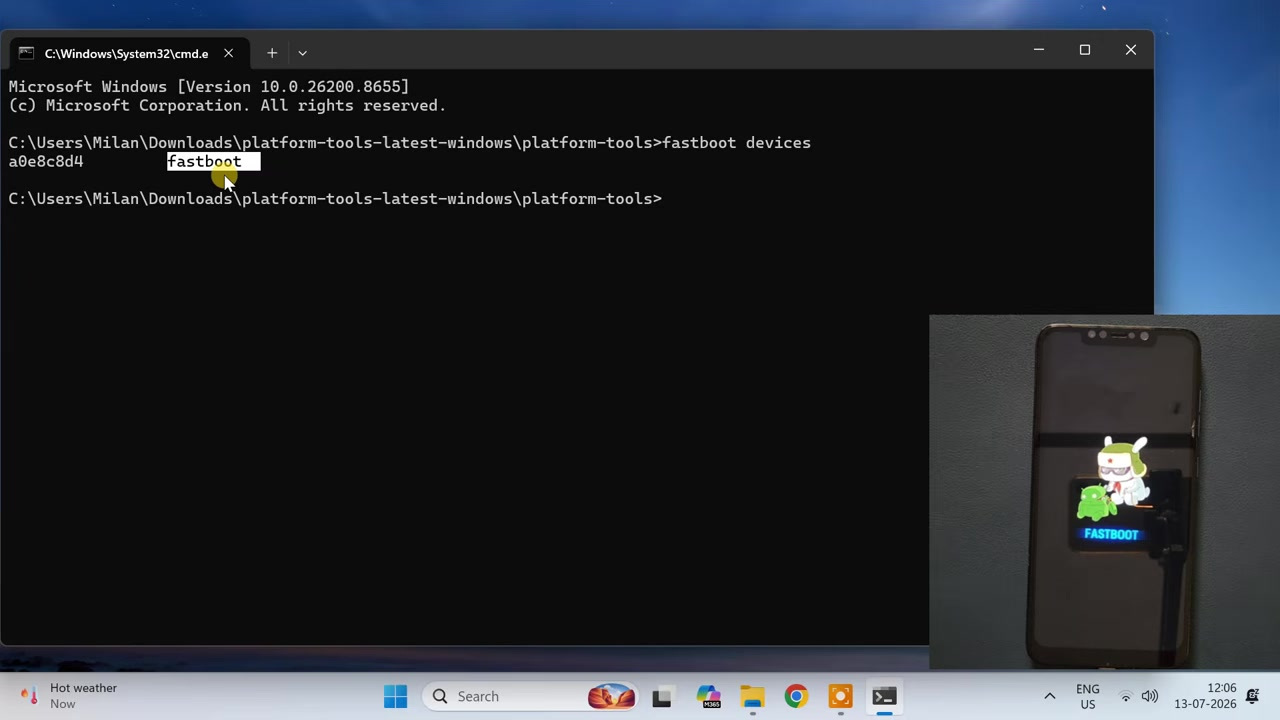
If nothing appears, try changing the USB cable, using another USB port, or reinstalling the required USB drivers on your computer.
Step 5: Flash the Modified TWRP Recovery
Now we need to flash the modified recovery image.
In Command Prompt, type this command, but do not press Enter yet:
fastboot flash recoveryAfter the word recovery, add a space. Then drag and drop the downloaded modified TWRP image file into the Command Prompt window.
This will automatically paste the full file path. The command will look something like this:
fastboot flash recovery "C:\Users\YourName\Downloads\modified-twrp.img"Now press Enter.
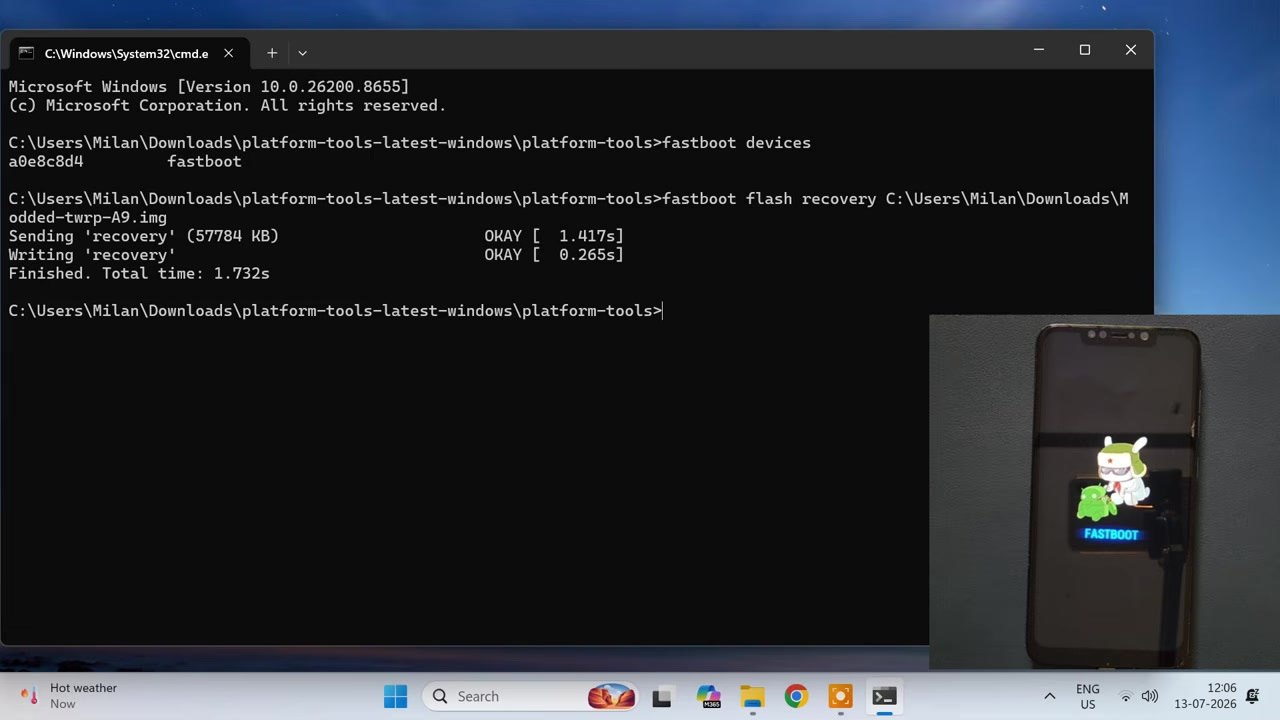
Fastboot will write the modified TWRP image to the phone’s recovery partition.
Step 6: Boot Directly into Modified TWRP
Once the recovery has been flashed successfully, disconnect the USB cable.
Now press and hold the Volume Up and Power buttons together.
When the POCO logo appears, release the Power button, but continue holding the Volume Up button until the modified TWRP recovery opens.
This step is important because some phones may restore the stock recovery if you reboot normally after flashing TWRP.
Step 7: Back Up Important Partitions
Now that the modified TWRP recovery is installed, the next step is to back up important device partitions.
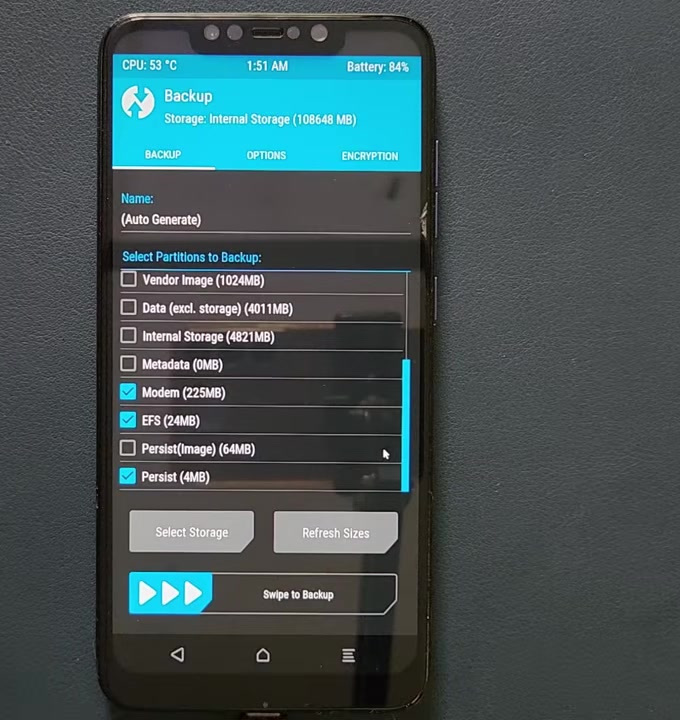
From the TWRP home screen, tap on Backup.
You can create a full system backup if you want, but at minimum, back up these important partitions:
- Boot
- Modem
- EFS
- Persist
These partitions are important for boot, network, sensors, and device-specific information. Since we are going to change the internal storage layout, this backup can be extremely useful if something goes wrong.
Step 8: Save the Backup to External Storage
Connect a microSD card or USB pendrive to the phone using an OTG adapter.
Inside TWRP, tap on Select Storage and choose the microSD card or connected USB storage as the backup location.
Do not save the backup inside the phone’s internal storage because the internal storage will be repartitioned.
Now swipe to start the backup and wait until the process is complete.
Step 9: Unmount All Partitions
After the backup is complete, return to the TWRP home screen.
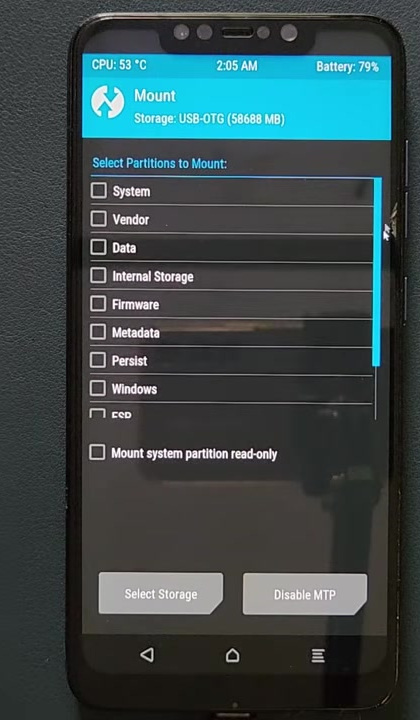
Open Mount.
Remove the check mark from every selected partition so that all partitions are unmounted.
This helps avoid partitioning issues in the next step.
Step 10: Create Windows Partitions
Now return to the TWRP home screen.
Tap on Advanced, then open Terminal.
In the terminal, type:
partitionNow enter the amount of storage you want to allocate to Windows. For example, enter:
50This will allocate 50 GB of storage to Windows.
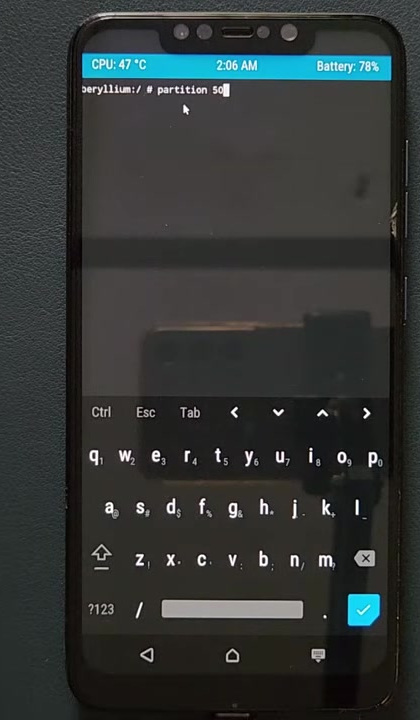
Do not allocate all internal storage to Windows because Android still needs enough space to boot and work properly.
If the script asks you to run the partition command again, type:
partitionagain. Then enter Y to confirm.
Wait until the partitioning process finishes and shows a successful completion message.
Step 11: Reboot Back into Android
After the Windows and EFI partitions are created, you must reboot the phone back into Android before installing Windows.
From the TWRP home screen, tap on Reboot, then select System.
The phone should now boot back into Android.
This reboot is important because booting into Android once forces the phone to reload the updated partition table and properly initialize the newly created partitions.
Once Android boots, complete the initial Android setup if needed.
Step 12: Save Windows ESD and WinInstaller on the Phone
After reaching the Android home screen, open your browser and go to the same device-specific guide from where you downloaded the modified recovery.
From that guide, download the compatible Windows ESD image and the latest WinInstaller ZIP for your exact device.
The Windows ESD file is the actual Windows operating system image. However, it cannot install itself directly on the phone. To install it, we will use the WinInstaller script.
Save both files inside the phone’s internal storage, for example inside the Downloads folder.
Step 13: Boot Back into Modified TWRP
Now power off the phone and boot back into the same modified TWRP recovery.
If Android has automatically restored the default recovery, you will need to flash the modified TWRP again using the same Fastboot method shown earlier.
Before starting the Windows installation, disconnect the charger and any unnecessary USB accessories from the phone.
Also, make sure the phone has at least 70 percent battery.
Step 14: Run the WinInstaller ZIP
From the TWRP home screen, tap on Install.
Navigate to the folder where you saved the Windows ESD image and WinInstaller ZIP file.
Select the WinInstaller ZIP and swipe to confirm the flash.
The installer will search for the Windows ESD image and begin the installation.
During this process, it will prepare the Windows partitions, apply the Windows image, install the POCO F1 drivers, and configure the UEFI boot environment.
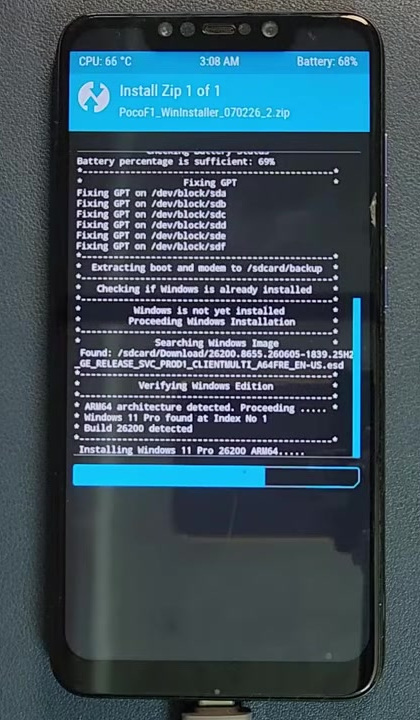
This process may take several minutes. Wait patiently until the installation completes successfully.
Step 15: Boot into Windows Boot Manager
Once the installation is complete, reboot the phone.
You may see a UEFI boot menu before Windows starts.
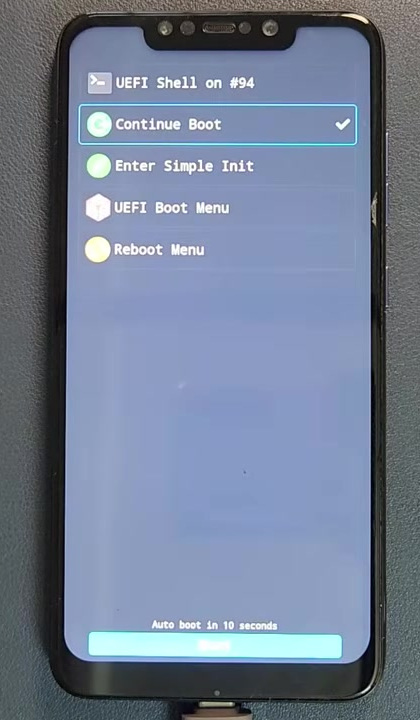
From this menu, select:
Windows Boot ManagerThen tap on Boot.
The first Windows boot may take longer than usual. Wait patiently and do not force restart the phone.
Step 16: Complete Windows 11 Setup
After some time, the Windows 11 setup screen should appear.
You can connect a wireless mouse and keyboard to make the setup easier.
Now select your region, keyboard layout, Wi-Fi network, and other setup options.
The setup process is similar to setting up Windows on a normal laptop or desktop computer.
Step 17: Use Windows 11 on Your Android Phone
After completing the setup, Windows 11 should boot on your phone.
You can open Settings, go to System, and then open About to check the device information.
On the POCO F1, Windows 11 runs on the Qualcomm Snapdragon 845 ARM processor. If you install Windows 11 Pro, activate it using a genuine Windows 11 Pro product key.
You can also change the display orientation to landscape mode for a better desktop-like experience.
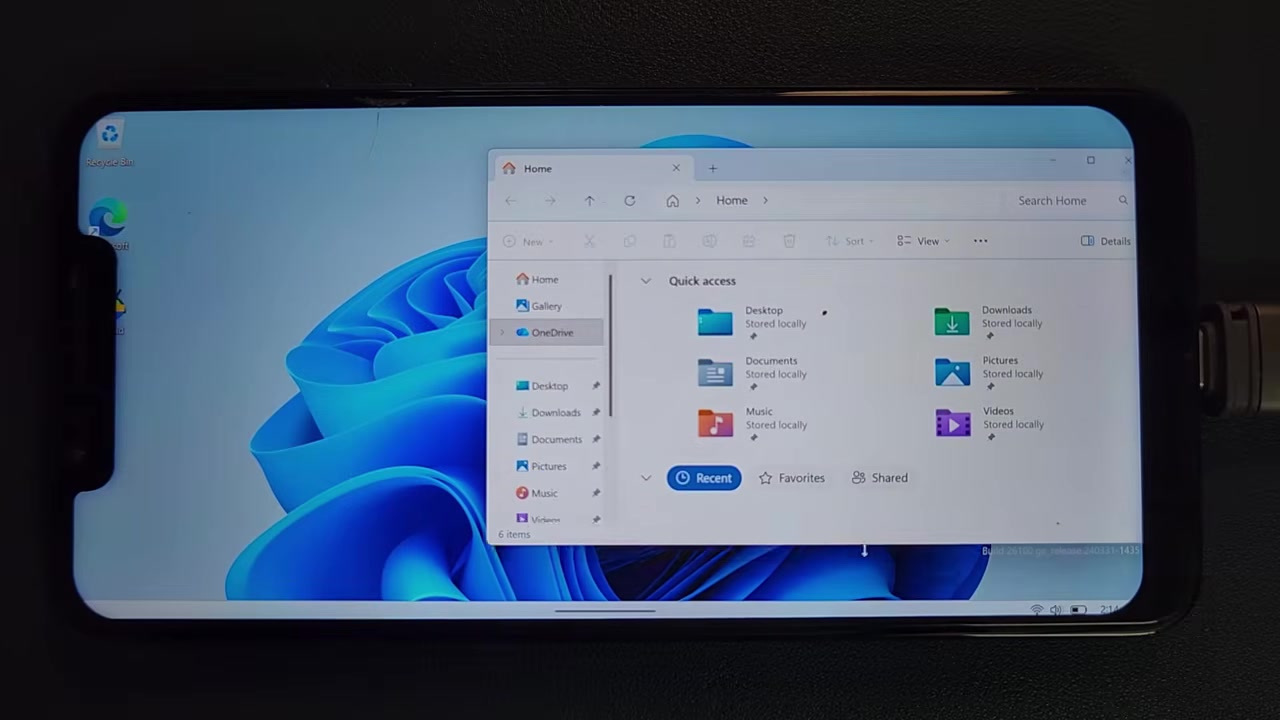
What Works on Windows 11 Phone Installation?
On the POCO F1 installation, these features can work:
- Touchscreen
- Wi-Fi
- Bluetooth
- Speakers
- Brightness control
- Battery status
- File Explorer
- Microsoft Edge
- Compatible Windows ARM apps
Actual working features can depend on the device, drivers, and the guide you follow.
What May Not Work?
Since this is an experimental Windows ARM installation on phone hardware, not everything will work like a normal laptop.
Features such as the camera, fingerprint sensor, and mobile network may not work properly.
Heavy games, professional editing software, and programs that require advanced graphics drivers may also not work correctly.
This setup is better for basic web browsing, file management, office work, coding tools, and lightweight Windows programs.
Performance Expectations
Do not expect the performance of a modern Windows laptop.
The POCO F1 uses the Snapdragon 845, which is powerful for an older phone, but Windows 11 ARM on phone hardware is still experimental.
Basic tasks can work reasonably well, but heavy multitasking and demanding software may feel slow or may not work properly.
Can You Dual Boot Android and Windows?
Because part of the internal storage is kept for Android, the phone can still use both operating systems when the dual-boot setup is configured correctly.
However, dual boot configuration depends on the device-specific guide. Follow the same guide carefully if you want to configure dual boot between Android and Windows.
How to Remove Windows 11 and Restore Android Storage
If Windows does not work properly or if you want to return to Android-only usage, you can remove Windows and restore the original partition layout.
If the phone is currently running Windows, use the Android shortcut on the desktop to boot back into Android.
After that, power off the phone and boot into the same modified TWRP recovery used earlier.
If the modified recovery has been replaced by the default recovery, flash the modified recovery again using Fastboot.
Step 1: Unmount All Partitions
Once modified TWRP opens, tap on Mount.
Remove the check mark from every selected partition so that all partitions are unmounted.
Step 2: Run the Restore Command
Now return to the TWRP home screen.
Tap on Advanced, then open Terminal.
Type:
restoreand press Enter.
If the script asks you to enter the restore command again, type:
restoreagain.
The recovery will now remove the Windows, EFI, and other partitions created during the Windows installation. It will also restore the Android userdata partition to its original size.
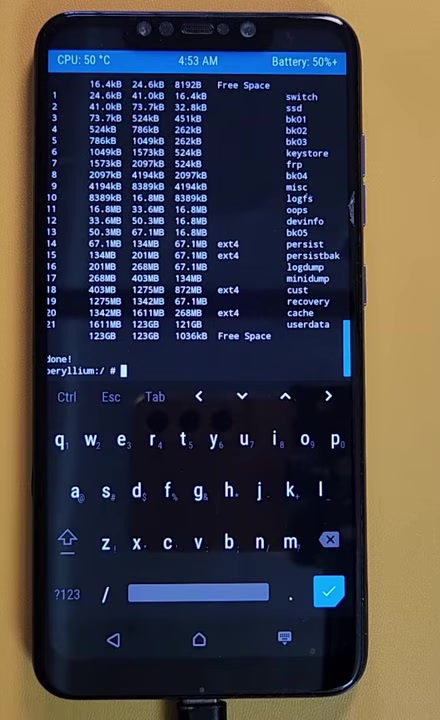
Wait until the process finishes successfully.
Step 3: Format Data
After the restore process finishes, return to the TWRP home screen.
Tap on Wipe, then select Format Data.
Type:
yesto confirm.
Once formatting is complete, tap on Reboot System.
The phone should now boot into Android with the original storage layout restored.
Important Safety Tips
Before trying this process, remember these points:
- Use only files made for your exact phone model.
- Do not use POCO F1 files on another phone.
- Back up your important files before partitioning.
- Back up Boot, Modem, EFS, and Persist to external storage.
- Keep the battery charged before installation.
- Do not interrupt the installation process.
- Try this only on a secondary phone.
Frequently Asked Questions
Can I install Windows 11 on any Android phone?
No. Windows 11 ARM can only be installed on selected supported devices with compatible UEFI firmware, drivers, and installation tools.
Does this install real Windows 11?
Yes, this method installs the ARM version of Windows 11 directly on supported phone hardware. It is not a launcher or remote desktop setup.
Which phone is used in this guide?
This guide is based on the POCO F1, also known as beryllium.
Can I use the same files on another Snapdragon phone?
No. Do not use the same files on another phone, even if it has the same Snapdragon processor. Each device needs its own recovery, drivers, UEFI files, and partition layout.
Will Android be removed completely?
Not necessarily. If the partitioning and dual-boot setup are configured correctly, Android can remain on the phone. However, the process can erase data, so backup is required.
Can I remove Windows later?
Yes. You can boot into modified TWRP and run the restore command to remove Windows partitions and restore the Android userdata partition size.
Will all Windows apps work?
No. Windows ARM can run compatible ARM applications and some supported programs, but heavy applications, games, and software needing advanced graphics support may not work properly.
Is this safe for my primary phone?
No. This is an experimental modification, so it is better to try it only on a secondary phone.
Conclusion
So, this is how you can install Windows 11 ARM on an Android phone.
In this guide, we used a supported device, installed a modified recovery, backed up important partitions, created Windows and EFI partitions, installed Windows using WinInstaller, and booted into Windows 11 from the UEFI boot menu.
I also showed how to remove Windows later and restore the original Android partition layout if the installation does not work properly or if you want to return to Android-only usage.
Remember, this tutorial is specifically based on the POCO F1. Do not use the same recovery image, installer, or commands on another device without following its dedicated guide.